How to remove drivers side door panel L300

Delicatessan

Well-Known Member
I’ve seen it described. But I am unaware of any place on the internet that shows photos.

To attract people to this board, and make this board a place for Delica thought leadership, we need good “how to” posts. Please consider this my comtribution:

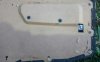
Step 1: Open your door. You will be presented with something that looks like this:

685E537E-FF83-4BA6-8C38-1D3DDE791FC3.jpeg

Note that my door does not have a built-in light. I understand some do. If yours does, you’ll have an added step here.

Step 2: unscrew the plastic locking knob:

39B325EE-A16E-4721-97E0-E294834B8403.jpeg

So far so good, right?

Step 3: locate the plastic screw covers on your door handle:

170F16B1-37AE-4038-946D-7D277A6B5864.jpeg

Step 4a: don’t forget these are 25+ year old vehicles. Everything is more brittle and fragile than it was. And car trim starts out fairly fragile. So get yourself a good set of vinyl trim tools. Don’t try to use a screwdriver. Or your keys. Or a knife. Got your vinyl tools? Ok. Good. Let’s move in.

Step 4b: use your vinyl tool to pry out the screw covers. They should come out easily and without too much trouble:

24E6B98F-0E3A-4B48-BB68-930A245CE380.jpeg

Step 5: use a screwdriver and unscrew the screws you will find in those holes. Don’t lose those screws. Although the door panel is held on by clips, those screws are what connects your handle to the metal frame so that you don’t rip your plastic panel out of the frame every time you close your door:

32C36D04-0893-4CCD-9855-F07FB4219D11.jpeg

So far, so good, nothing too hard yet....

Step 6: this is going to be a little tricky. Your inside door handle has a plastic cover underneath the handle. And right in the middle of that plastic cover is a hinged plastic piece that hides a tiny screw. Your mission is to pop open that hinged plastic to get access to the screw. When I tried this, I could not tell how the piece was held on, which side was attached and which side would come free. I carefully worked my vinyl tool a bit and decided I had it figured out. I guessed right and still almost broke the piece. Be careful here:


D4D6AA50-54E8-4B14-A347-CB83C13C4932.jpeg

It turns out, the piece clips in on the top and bottom. It is hinged and attached on the right, and is completely loose on the left:

E3CBB3FA-24C9-421D-AFBF-0EF774F75238.jpeg

Once you pop the tiny cover, you’ll see a screw. Unscrew it:

AB543E50-1436-4CAF-9384-1194AC0E66CC.jpeg

Now the cover will come right out. Here’s what it looks like:

6F12FC29-FAD7-47E5-B879-6BFAA3D9B6C5.jpeg

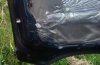
Step 7: there is a black triangular plastic piece right where the window and door panel meet at the hinges of the door:

2811F227-CD42-4AEB-95A7-66A58B8C9044.jpeg

Getting this thing off is tricky. Be careful. I was successful, but I could tell this would be super easy to break. I used my vinyl tools. The side closest to the window has a lot more play. The side furthest from the window was almost immovable. I worked the side closest to the window to gain some looseness. Then I used my hand and sort of worked that side “off” and then I was able to work the other side off. I’m not describing it well. But I didn’t really understand how it was on there. Perhaps a picture of the back of the piece and the exposed door will help you get it better than I did:
 
275DE6D6-4C39-4084-BA86-040912ACA6E1.jpeg

DE719A9E-628F-49FD-BE45-671C041B422D.jpeg

Step 8: If you have a door panel light, you need to pop off the cover, unscrew anything that needs unscrewing (unsure if any screws will be there), and carefully disconnect the light from its harness. I have not actually done this. I just read a description. You’re on your own here. If you don’t have a door panel light (I do not) skip to Step 9.

Step 9: buckle up. This is delicate work. The door handle job and the triangle removal might have broken something. But you could probably get a new part from Coombs or Rising Sun. And you could probably even live with a damaged part. But now you’re about to pry off your door panel. And those are harder to replace and something you want to look nice. So use your vinyl tool. Be careful. Work slow. Use your hands, eyes, and ears. Definitely start at the bottom towards the door hinges. Work your way around:

7C1D3930-4895-4802-8319-1FC1E693DA69.jpeg

There are a total of 10 panel clips to pop out. Before you do the job, look at my pictures below. It really helps to understand what you are dealing with instead of working blind. To do this right, you want the pressure on the metal door frame. The back of your door panel is cardboard. If you do this wrong, you’ll have your clip still in the door, but ripped right out of your door panel. That’s great for getting the panel off, but it won’t go back on. If at all possible, you want to be prying right where the clip is, with your vinyl tool right under the clip itself pushing the clip away from the door frame.

Here’s what the clips look like:

8AA23A62-5CAE-4B00-A763-C4CC67912A84.jpeg8095C4F0-202E-436F-AAB7-1FF9241535B4.jpeg

Here’s what the back of your door panel looks like:

F550A9E4-6FDB-428D-9C19-1146FD24DEEC.jpeg

Once you get all the clips popped away, all you will need to do is lift the door panel straight up and then in and away from your door. Easy. It is very very light and comes away with almost no effort. If a struggle, you have not removed some part or popped some clip.

And here’s what the inside door looks like with the panel removed:

D0628C90-182E-4210-938B-F92F3939B8F1.jpeg


Presumably, you removed your door panel to do some work on a window motor, a door lock, etc. (I was giving a go at installing a remote locking system). You still need to remove the plastic “vapor barrier” ( not sure that is what it is called. That’s what we call something very similar in construction, so I am going with it).

Be gentle. Be careful. Don’t just rip it up, cut into it, or pull it off in a heap. Slowly and gently peel it away from the area you need to work on. You will want to put it back. It is held on by a black non-drying/hardening adhesive. I’d wear gloves here. Sticky. Hard to get off your hands.

You can use tape to hold it off to one side. If you do happen to jack it up, go by some plastic to replace it. Don’t put your door back together without a vapor barrier. Helps with rust and leaks and wetness and sound.

Here’s what it looks like removed to the side:

F3202ACF-610F-40B6-85DD-271A0FDBD216.jpeg

And that’s it... now you know how to remove your driver’s side door panel.

I hope this was helpful. Hopefully, people can just link to this particular sets of posts for any “how to” they post that starts with panel removal.

And I’m selfishly hoping that by posting this, it will encourage more people to take a crack at fixing window motors, fixing broken locks, installing remote lock systems, etc. I’m sure I will benefit down the road when those problems arise for me.
 
Last edited:
Taking the photos as I went probably added 3 minutes total to a 30 (tops) minute job.

Write up took 35-ish minutes, including converting the photos to low res so I could post here.

If you do a project, take photos along the way. Write it up on the back end.

It will help people out. That is its own reward and the right thing to do. But it will also draw people to the board because it will be the best resource. And, eventually, having more people here will help each of us because those people will have good knowledge and insight too.

Don’t assume anything is too simple to photograph and write up. You may have done 50 oil or air filter changes. Some guy on here will be doing his first. Same for windshield wiper blades. Fluid refill. Etc.

End of preaching. Hope the post was helpful.

PS if anyone ever tackles this with a panel light, take photos and add to this post so others can see the part I could not show.

PPS can’t show the remote lock system yet. Mine kept blowing a fuse so I didn’t install.

PPPS: A couple of things I forgot to add that might help you:

(i) when taking the door panel off, you need to use your vinyl trim piece that looks like a chisel with a "v" notch in it. That will allow you to get right around those plastic clips and not break anything. I should have said that, and taken of photo of that tool. I did not. Sorry.

(ii) stay aware of where the little collar is that goes around the hole that the lock pull goes into. Easy to lose since it is not connected.

(iii) when you're putting the door back on, the firs thing you'll do is slide the door panel into the window/top part of the door. You'll feel like you should do that starting to your right -- the side with the pull lock. Don't. Otherwise, it will be hard to seat the left side all the way in. But if you start on the left, the right side will slot in just fine. Do the black triangle at the very last. You need the door on and fully seated before that will fit back on just right.
 
Last edited:
Just done this and I have the light in the door. I just disconnected it from the back at step 9 before I lifted the door card off. Thanks for the great write up very useful.
 

Attachments

  • IMG_20190704_225259.jpg
    IMG_20190704_225259.jpg
    259.7 KB · Views: 48
  • IMG_20190704_225644.jpg
    IMG_20190704_225644.jpg
    330.8 KB · Views: 47
Anybody have a recommendation for a set of trim tools? I'm about to dig into my front doors to replace some of the gaskets and tighten things up a bit but don't want to break anything getting in there. Also probably into the side door at some point to fix a sticking lock which I'm assuming is a bit more involved....
 
Cool, I'll see if I can find a kit that has something similar. Any other must haves?

One more question - I've found most of the window rubber that I need to replace on Amayama, is this the best spot to buy these sorts of things or is there somewhere more local to the U.S. that's involves less $ for shipping?
 
Nice, thanks Delicatessen.

For kicks, would you mind adding to your post the tools you used?
Looks like a #2 Philips and trim removal tools.
 
Also, not to be naggy ;), I saw that you added a FAQ tag to this, great.
I also did a search and found there is no way to search out "How To". Not in tags or in general search. So I went and added a proper How To tag to the list. First post is "how to make a rear cargo mat", haha....that's all i had in my kinda how to do anything of past posts.
 
Nice, thanks Delicatessen.

For kicks, would you mind adding to your post the tools you used?
Looks like a #2 Philips and trim removal tools.

I try to use JIS, not Philips. Recommend that for everyone on these vans. Will make your screw heads last longer.

I have a nicer set, but I think for this project I used a trim set like this: https://tinyurl.com/u4twpf7
 
To add a tag just go to the first post. Under the heading you will see the the little tag icon.
Mouse over the icon and it will ask you to edit the tag. Just go ahead and populate it with whatever you want.

1580244797674.png

1580244921258.png


My guess is one of the admin tagged yours with FAQ. I would say that if we start using a "how to" tag that would be also helpful.
In the search, there is a function specifically to search out tags.

It seems as tough there are quite a few FAQ's listed in there which are in my opinion would be much more appropriately labeled as a how to. Any of the admin have thoughts on getting these updated?

1580244848250.png

1580245043327.png
 
I try to use JIS, not Philips. Recommend that for everyone on these vans. Will make your screw heads last longer.

I have a nicer set, but I think for this project I used a trim set like this: https://tinyurl.com/u4twpf7

Sorry, I was less concerned for my need and more just trying to keep things in one place for others who want to use this for reference.
And yes, agreed on the phillips head part. I just defaulted to that out of habit. Having a JIS screwdriver should become part of everyone's tool kit if they plan to do work on their vans.
 
Learned that (about JIS) working on old Japanese motorcycles. Much easier than screwing up the fastener and using an impact driver to remove or drilling it out.
 
Top