Phelan
Member
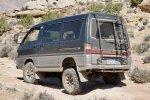
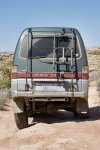
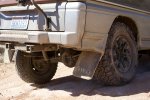
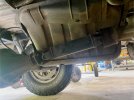
To make a long story short, my old leaf springs were shot so I rolled the dice on a bunch of new Ironman gear. With a bit of futzing, I gained a 2” lift in the back and significantly increased my rear suspension travel. Overall, the new springs are performing really well, but with only 1K miles under their belt, I consider them fairly untested. Here is a break-down of the kit I put together, if any of you are searching for new leaf spring solutions:
Springs
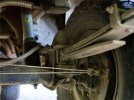
The Ironman MITS018B leaf spring is a general fit for the Delica l300 4x4, but it needs a leaf removed to enable a 2” lift. I took my measurements from the top of the bumper line to the center of the axle. The stock measurement is 22.5”. With the new out-of-the-box spring installed, the rear measured 26”, a 3.5” lift. Removing the third spring (counting down from the top) takes the height to 24.5”, a 2” lift.
For a squishiness reference, I found loading 100lbs over the rear axle caused the rear to sag about a 1/4”.
Bushings
The front bushings are the most difficult aspect of installing these springs. I was able to make it work, but hopefully someone can come up with a better solution.
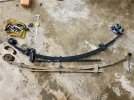
The bolt that holds the front of the spring is 14mm in diameter. The bracket has a ~78mm gap. The spring is 70mm wide, and the eye has a 32mm ID.
Ironman 715UK - The front bushing’s ID is 18mm and it does not come with a sleeve. The flange is 5mm wide. This means the spring+bushings width is 80mm, a little tight for the bracket gap.
My solution - I harvested the sleeves (20mm OD) from my old bushings and pressed them into the 715UK bushings with a bunch of lube.
Installation - The flange on the outside of these bushings is just wide enough to make installing the front of the leaf spring a real pain. I used a few clamps and worked the front of the spring into place by lifting/lowering the back of the spring with a floor jack.
Shackle
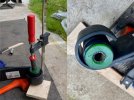
Ironman 795 is a heavy duty replacement for the stock shackles. If you find a new bushing solution for the front, you will still need a bushing kit like 715UK to outfit the shackle.
Caster Wedge
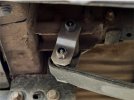
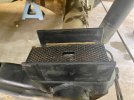
Because the differential is dropping 2 inches relative to the transfer case, it is important to keep your driveline aligned correctly. I bought an Ironman 4 Degree Wedge Kit and my u-joints are pretty much equally balanced at a 4 degree bend.
If I were to do it again, I think I would go for the Ironman 3 Degree Wedge Kit to account for angle change under load or when the back is heavily weighed-down.
Shocks
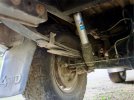
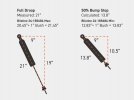
These springs allow for significantly more droop than the old sprigs, so it is important to make sure your shocks are up to the range. At full droop, the upper pin to the axle mount is 21” and the gap between the bump-stop is 7”. With a 50% compression of the bumpstop, the axle would see 8.5” of travel. I measured the horizontal distance between the mounting locations to be about 9”. Lastly, you want to take into account a ~1” bushing when specifying this style of shock. With a little bit of trig, I ended up looking for a 20”x12.8” shock. I bought Bilstein 24-185684 (20.45 x 12.83).
It might be worth noting, some people specify a 2/3rds compression for bumpstops, but I like to live on the edge.
Sway Bar
The new spring travel is able to max-out the sway bar linkage, straightening the bar and link at full-droop. This means the sway bar can conceivably invert in a full-send situation. I decided to remove the sway bar complexity and found surprisingly little difference to the drive. If you want to keep your sway bar, consider longer links.
Misc.
Extended Brake Line: Endura 24" Straight #3 to Straight #3
Brake Line Adapter (2): Russell 641411
Diff-Breather Extension: 1/4" ID Fuel Line
In Conclusion
I’m no expert so do some research before jumping into the deep end.


Springs
The Ironman MITS018B leaf spring is a general fit for the Delica l300 4x4, but it needs a leaf removed to enable a 2” lift. I took my measurements from the top of the bumper line to the center of the axle. The stock measurement is 22.5”. With the new out-of-the-box spring installed, the rear measured 26”, a 3.5” lift. Removing the third spring (counting down from the top) takes the height to 24.5”, a 2” lift.
For a squishiness reference, I found loading 100lbs over the rear axle caused the rear to sag about a 1/4”.

Bushings
The front bushings are the most difficult aspect of installing these springs. I was able to make it work, but hopefully someone can come up with a better solution.
The bolt that holds the front of the spring is 14mm in diameter. The bracket has a ~78mm gap. The spring is 70mm wide, and the eye has a 32mm ID.
Ironman 715UK - The front bushing’s ID is 18mm and it does not come with a sleeve. The flange is 5mm wide. This means the spring+bushings width is 80mm, a little tight for the bracket gap.
My solution - I harvested the sleeves (20mm OD) from my old bushings and pressed them into the 715UK bushings with a bunch of lube.
Installation - The flange on the outside of these bushings is just wide enough to make installing the front of the leaf spring a real pain. I used a few clamps and worked the front of the spring into place by lifting/lowering the back of the spring with a floor jack.

Shackle
Ironman 795 is a heavy duty replacement for the stock shackles. If you find a new bushing solution for the front, you will still need a bushing kit like 715UK to outfit the shackle.

Caster Wedge
Because the differential is dropping 2 inches relative to the transfer case, it is important to keep your driveline aligned correctly. I bought an Ironman 4 Degree Wedge Kit and my u-joints are pretty much equally balanced at a 4 degree bend.
If I were to do it again, I think I would go for the Ironman 3 Degree Wedge Kit to account for angle change under load or when the back is heavily weighed-down.


Shocks
These springs allow for significantly more droop than the old sprigs, so it is important to make sure your shocks are up to the range. At full droop, the upper pin to the axle mount is 21” and the gap between the bump-stop is 7”. With a 50% compression of the bumpstop, the axle would see 8.5” of travel. I measured the horizontal distance between the mounting locations to be about 9”. Lastly, you want to take into account a ~1” bushing when specifying this style of shock. With a little bit of trig, I ended up looking for a 20”x12.8” shock. I bought Bilstein 24-185684 (20.45 x 12.83).
It might be worth noting, some people specify a 2/3rds compression for bumpstops, but I like to live on the edge.

Sway Bar
The new spring travel is able to max-out the sway bar linkage, straightening the bar and link at full-droop. This means the sway bar can conceivably invert in a full-send situation. I decided to remove the sway bar complexity and found surprisingly little difference to the drive. If you want to keep your sway bar, consider longer links.
Misc.
Extended Brake Line: Endura 24" Straight #3 to Straight #3
Brake Line Adapter (2): Russell 641411
Diff-Breather Extension: 1/4" ID Fuel Line
In Conclusion
I’m no expert so do some research before jumping into the deep end.


