You are using an out of date browser. It may not display this or other websites correctly.
You should upgrade or use an alternative browser.
You should upgrade or use an alternative browser.
LED Halo Head Lamps
- Thread starter feetforbrains
- Start date

Krazykraut
Active Member
I have them - they do fit perfectly. Got the dark ones, for LHD, with HID bulbs. They're basically a drop-in replacement for the post-facelift versions (1990+ ?). Included ballasts are a bit cheap, but workable. The bulb holders for the signals have a tab that the original doesn't, but a sharp knife or dremel helps there, or, as I did, you can just use the old bulb holders.

Amanda Thomas
Member
Hey! So we got these lights but the plugs don't fit at all to the socket. Are we missing something?I have them - they do fit perfectly. Got the dark ones, for LHD, with HID bulbs. They're basically a drop-in replacement for the post-facelift versions (1990+ ?). Included ballasts are a bit cheap, but workable. The bulb holders for the signals have a tab that the original doesn't, but a sharp knife or dremel helps there, or, as I did, you can just use the old bulb holders.
View attachment 1071
Talking about this piece not able to connect to anything.

Krazykraut
Active Member
Amanda,
the new lights did come with pigtails only, no connectors. The wiring isn't terribly complicated, but it has a lot of parts. I did go to Headlights NW (http://headlightsnw.com) for help, and did all the work alongside their guy. We cut off the main connector on the van side and wired the ballasts directly on there with spade terminals. Basically, there are: one ground, one pin for the main lights, and one for high beam. You can identify them with a voltmeter. With HID, there isn't really a second filament or separate circuit - the high beam switch just moves a little piece out of the way that normally block some of the light. Or so I'm told.
The halos I spliced into the position lights (the little white square ones below), so they are not on all the time.
The signals, as far as I remember, came with the correct plug already attached., but the bulb holder didn't fit, so I reused the old bulb holder.
I'd be happy to help over the weekend if you want, but only if you bring your puppy. We are in canine withdrawal. The whole thing shouldn't take more than an hour. All you need is some splices, zip ties, spade terminals and electrical tape. Or go to the Headlights NW guys if you need it earlier.
- Fabian (aka Krazykraut)
How is the light from them? I find the stock LHD pattern pretty abysmal for driving our winding mountain roads in the dark.I have them - they do fit perfectly.
Amanda Thomas
Member
Amanda,
the new lights did come with pigtails only, no connectors. The wiring isn't terribly complicated, but it has a lot of parts. I did go to Headlights NW (http://headlightsnw.com) for help, and did all the work alongside their guy. We cut off the main connector on the van side and wired the ballasts directly on there with spade terminals. Basically, there are: one ground, one pin for the main lights, and one for high beam. You can identify them with a voltmeter. With HID, there isn't really a second filament or separate circuit - the high beam switch just moves a little piece out of the way that normally block some of the light. Or so I'm told.
The halos I spliced into the position lights (the little white square ones below), so they are not on all the time.
The signals, as far as I remember, came with the correct plug already attached., but the bulb holder didn't fit, so I reused the old bulb holder.
I'd be happy to help over the weekend if you want, but only if you bring your puppy. We are in canine withdrawal. The whole thing shouldn't take more than an hour. All you need is some splices, zip ties, spade terminals and electrical tape. Or go to the Headlights NW guys if you need it earlier.
- Fabian (aka Krazykraut)
Oh my gosh, that'd be AMAZING! And yes, we can provide all the pups and breakfast/lunch and coffee. Want to shoot me your cell and we can link up? Zack will join too of course since he's more of the know-how on these types of things.
Krazykraut
Active Member
Can't say I'm an expert - but compared to the old yellowed out and crusty originals it is night and day, literally. Coming back from our camping trip, I drove for two hours through pitch dark forest on winding USFS roads and can't complain about visibility. Mind you, especially with HIDs a good alignment/aiming is key. We did mine somewhat sloppily on a garage door but I guess you could take it to a place where they have one of the electronic thingamajigs for aiming for optimum results. Haven't been flashed by oncoming traffic yet, so I guess they're good.How is the light from them? I find the stock LHD pattern pretty abysmal for driving our winding mountain roads in the dark.
The included ballasts are cheap junk and will need to be held somewhere in the headlights cavity, but a simple bracket with two sheet metal screws will do. Mine are bouncing about loosely - another project/another day.
Last edited:
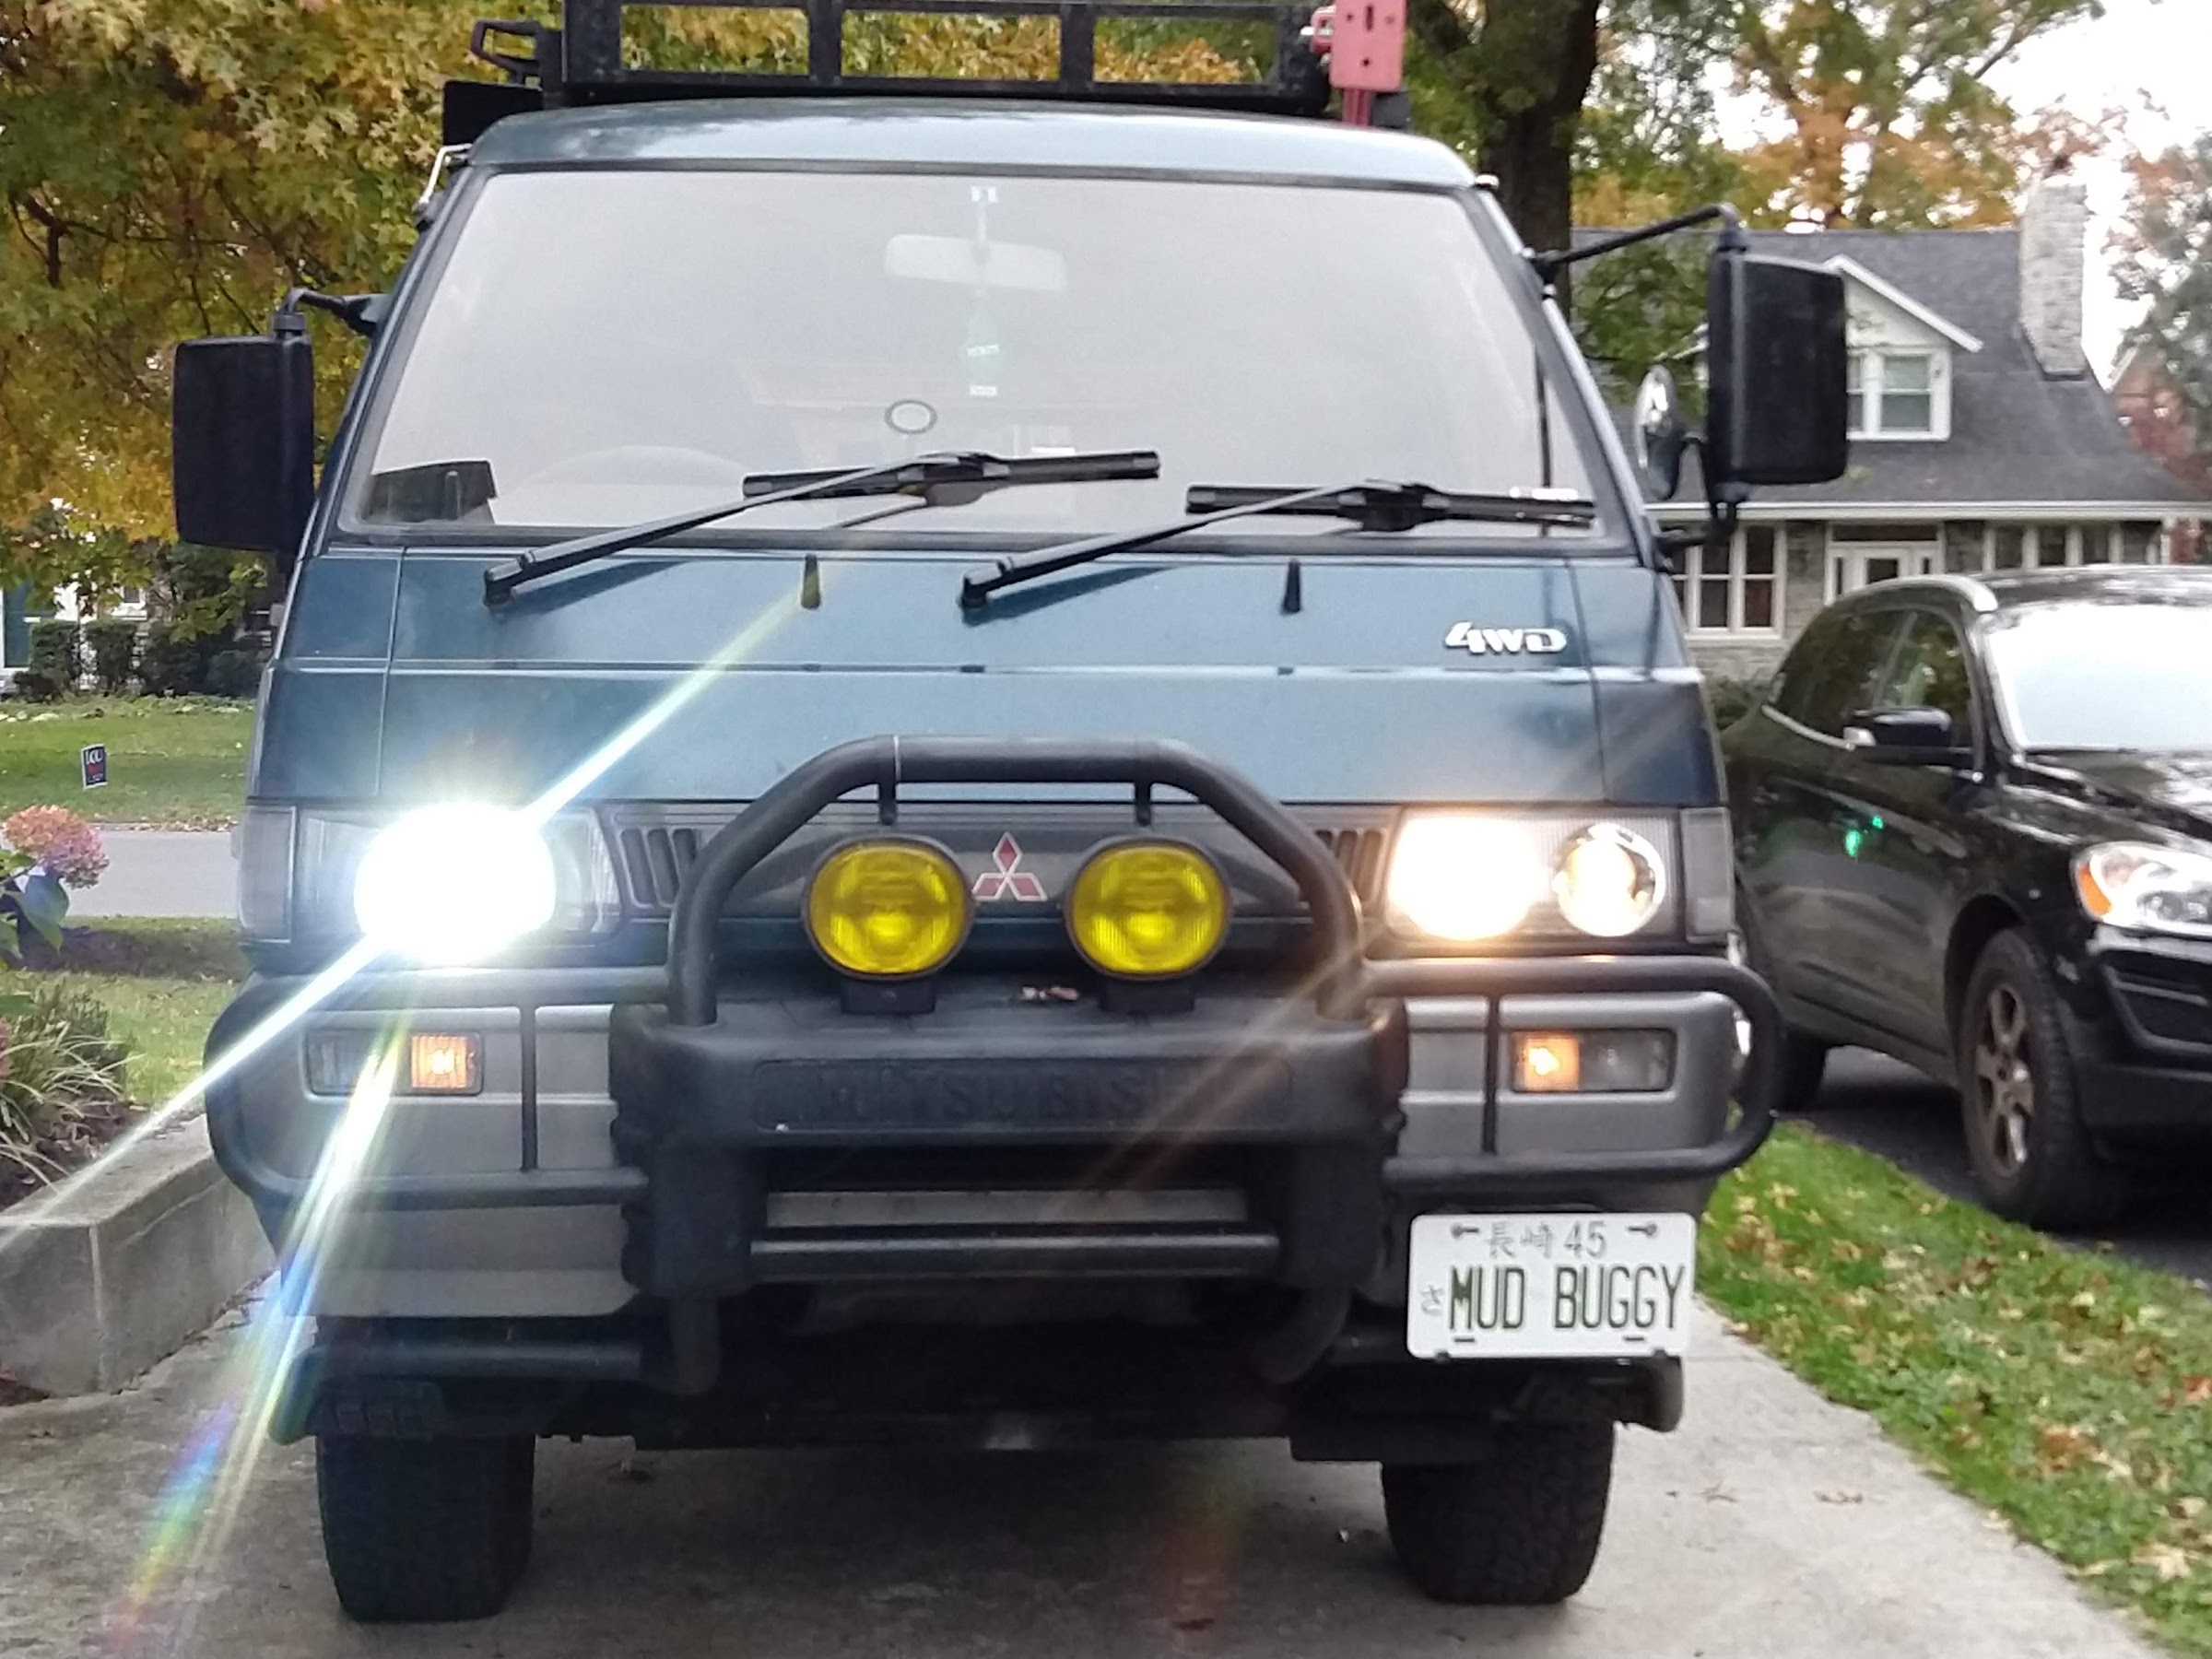
Mine arrived yesterday and I spent some time figuring them out/installing and documented what I found... they come with no instructions. I bought the smoke version as shown in the OP. They're not very dark at all, but a lot less shiny/silver than the corner lights that come with them. I just kept my original corner lights because I thought they matched better. If you do replace the corner lights, there is no wiring required. The original bulb holders fit right in place (better than the replacements IMO).
BTW, make sure to get the LHD versions, not the RHD versions linked to in the OP!
First off, they are way brighter than the originals, and a lot "whiter." The headlight lenses are actually glass as advertised.... kind of surprising given the price and the trend to poly lenses these days. Here are some pics of the install after doing only the driver's side for comparison (I didn't get around to aiming them yet).
The LED ring light I connected to the lower marker light.

Low Beams

High Beams
I cut the plug off of the old headlight and used it to replace the new one (solder and heat shrink). These are the color matches I found.

I bundled all the excess wire and secured it to the mounting bracket behind the headlight.

To connect the LED halo to the lower marker light I pulled the two spade terminals from the plug, soldered the red and black wires to them, and reinserted. I left the white wire disconnected because I couldn't see what it was for.
Update: If you do want daytime running lights connect the white wire to the lower marker light instead, and connect the red wire to an ignition switched power source. Wired that way the LED halo will be on bright whenever the ignition is on, and it will dim when the other lights are on.

Plug everything back in, reinstall the lights, and repeat on the other side. Don't forget to move the two plastic square nuts from the old headlight over to the new ones before installing (the ones that clip into the square holes and are for securing the trim).
TBH, I kind of prefer the look of the original 4 light headlights; but the dimness and poor RHD pattern was something I just didn't want to live with any longer than necessary.
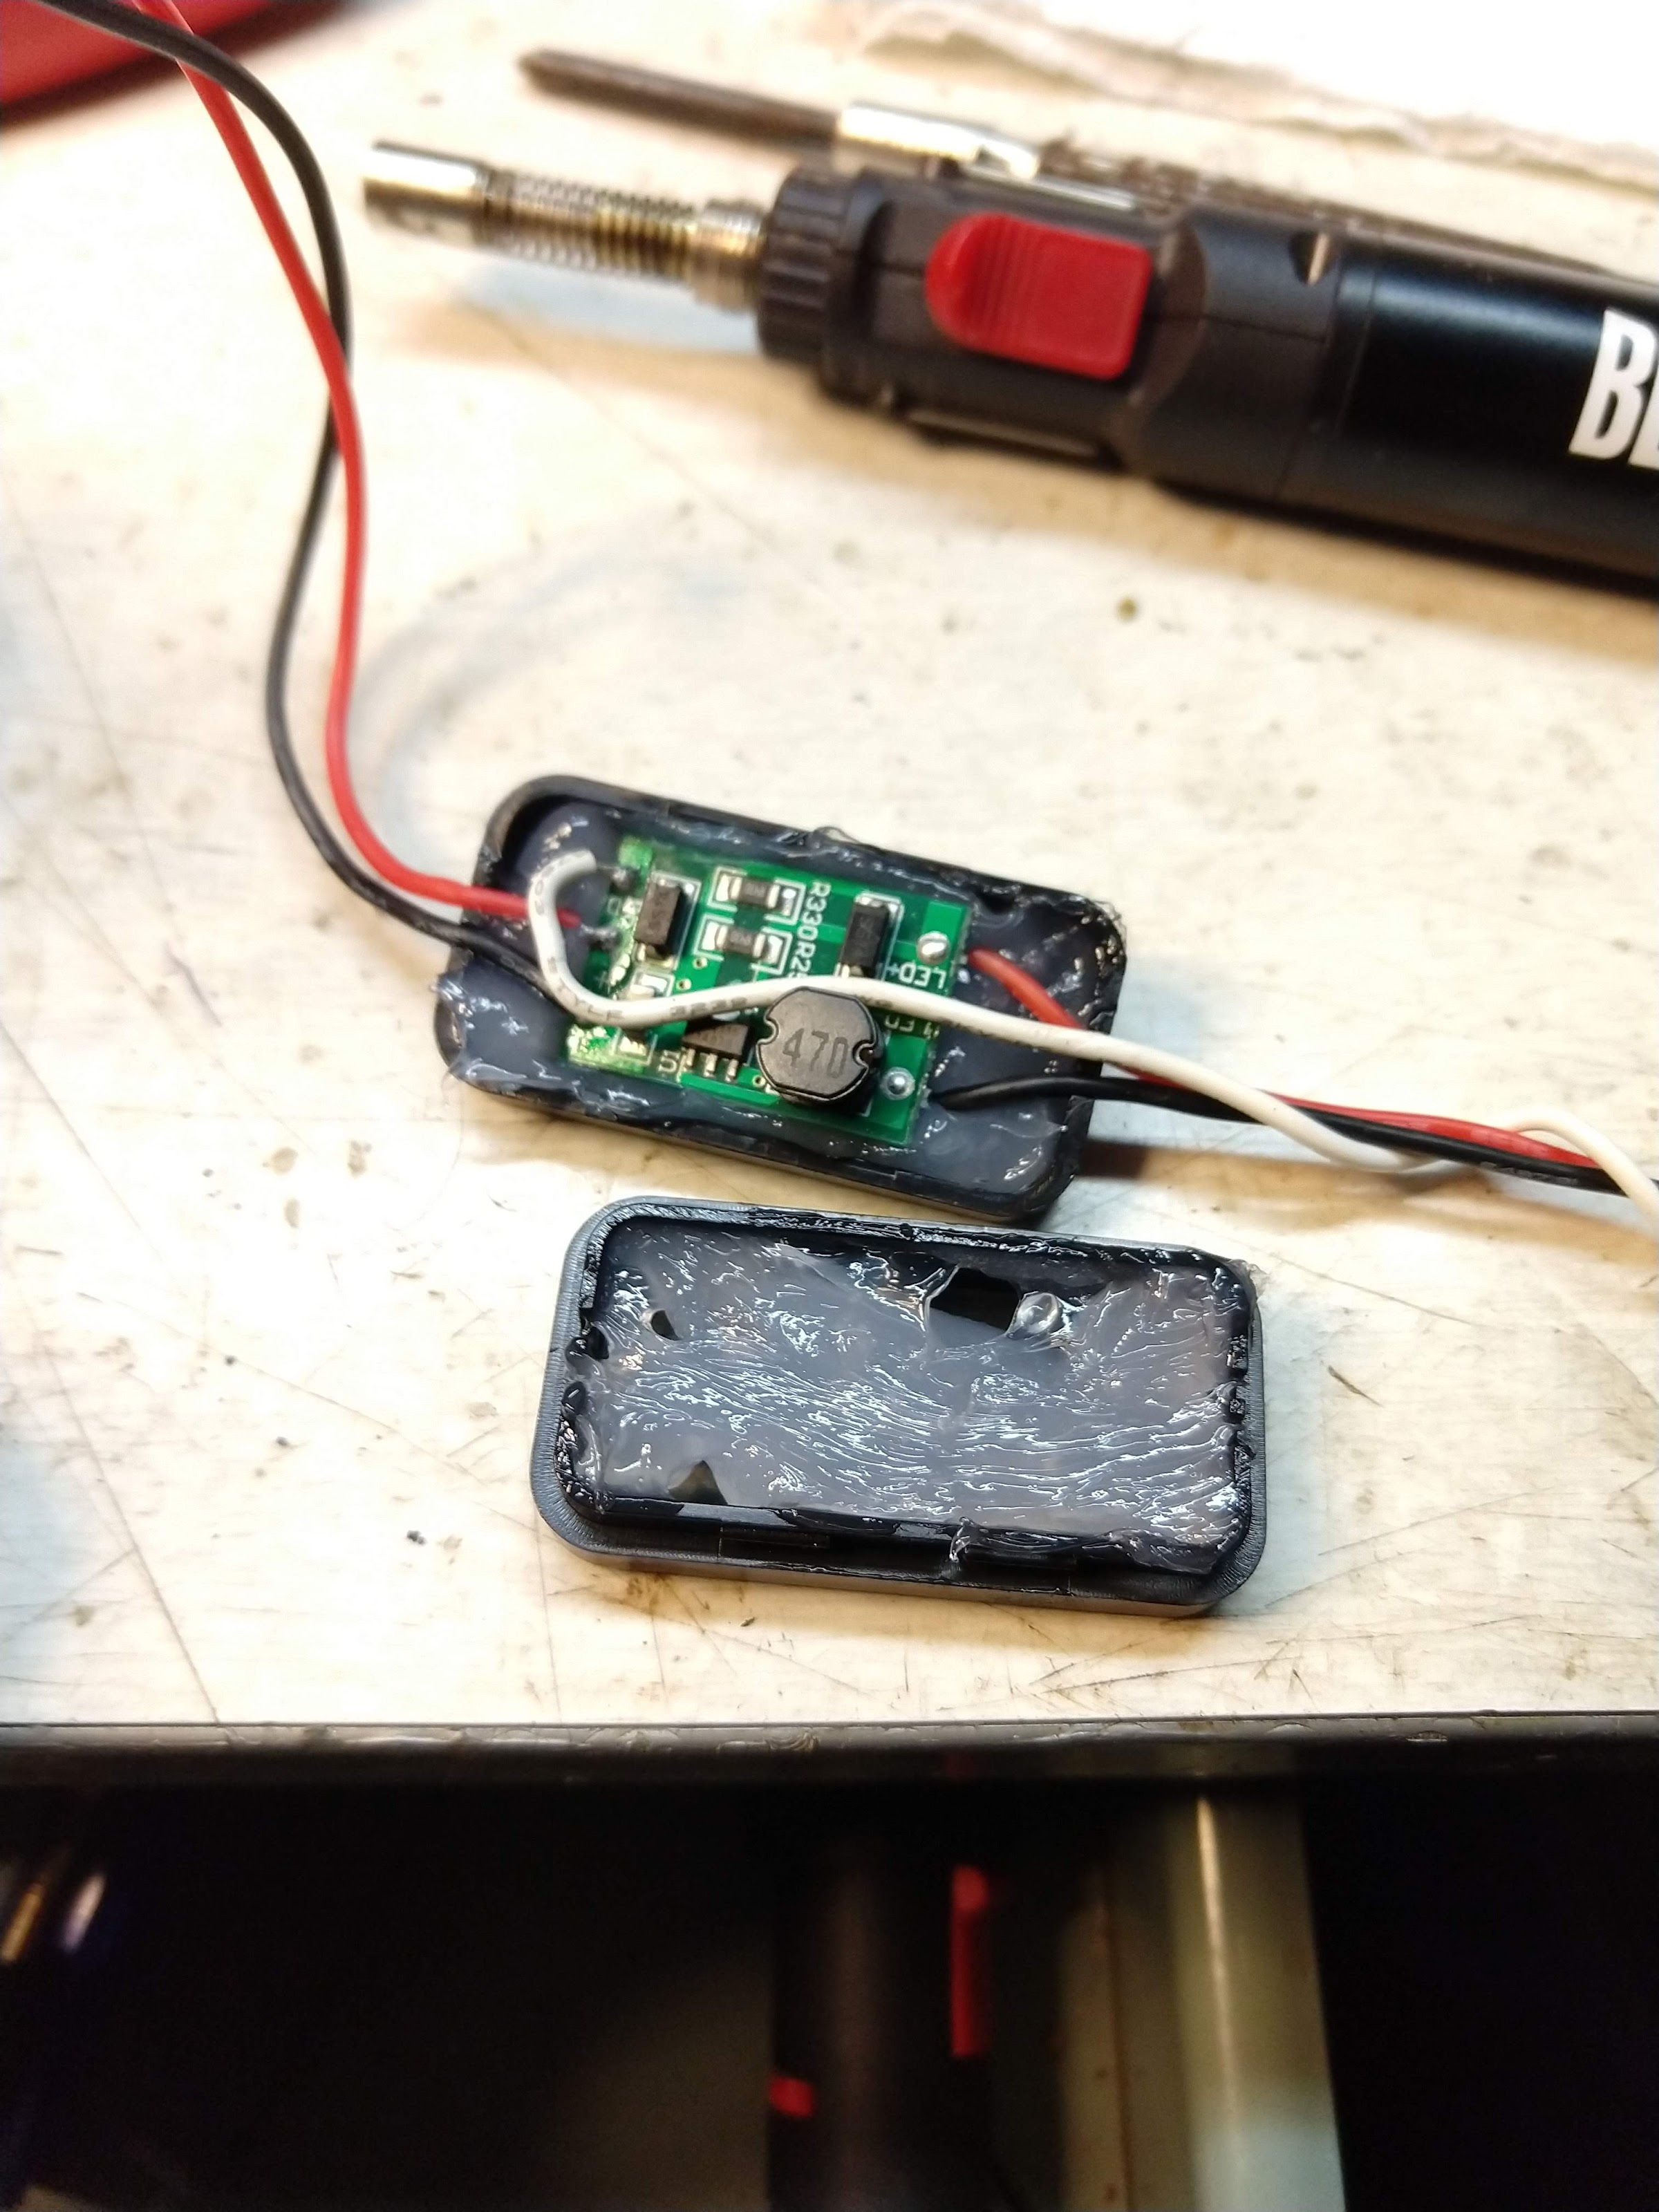
Update 2: After a drive in the rain one of my LED halos went out right when I need to get the van inspected... My first fear was I got bit by a (relatively) cheap product. My second thought was maybe one of my solder connections was weak/failed or the plug came apart.
After a bit of fussing and redoing the solder connections just incase I finally opened up the LED control module, it just snaps open easily and has no sealing of any kind... it had water in it causing an electrical short. Luckily nothing fried. So I dried it out, packed it with dielectric silicon grease (actually wasn't sold as dielectric and therefore a lot cheaper), and then sealed it with shrink tubing. Caulk and tape would work as well but you would need to let the caulk fully cure before applying power (let it dry out). I also used the dielectric grease on all of the connecters when putting everything back together.

BTW, make sure to get the LHD versions, not the RHD versions linked to in the OP!
First off, they are way brighter than the originals, and a lot "whiter." The headlight lenses are actually glass as advertised.... kind of surprising given the price and the trend to poly lenses these days. Here are some pics of the install after doing only the driver's side for comparison (I didn't get around to aiming them yet).
The LED ring light I connected to the lower marker light.
Low Beams
High Beams
I cut the plug off of the old headlight and used it to replace the new one (solder and heat shrink). These are the color matches I found.
I bundled all the excess wire and secured it to the mounting bracket behind the headlight.
To connect the LED halo to the lower marker light I pulled the two spade terminals from the plug, soldered the red and black wires to them, and reinserted. I left the white wire disconnected because I couldn't see what it was for.
Update: If you do want daytime running lights connect the white wire to the lower marker light instead, and connect the red wire to an ignition switched power source. Wired that way the LED halo will be on bright whenever the ignition is on, and it will dim when the other lights are on.
Plug everything back in, reinstall the lights, and repeat on the other side. Don't forget to move the two plastic square nuts from the old headlight over to the new ones before installing (the ones that clip into the square holes and are for securing the trim).
TBH, I kind of prefer the look of the original 4 light headlights; but the dimness and poor RHD pattern was something I just didn't want to live with any longer than necessary.
Update 2: After a drive in the rain one of my LED halos went out right when I need to get the van inspected... My first fear was I got bit by a (relatively) cheap product. My second thought was maybe one of my solder connections was weak/failed or the plug came apart.
After a bit of fussing and redoing the solder connections just incase I finally opened up the LED control module, it just snaps open easily and has no sealing of any kind... it had water in it causing an electrical short. Luckily nothing fried. So I dried it out, packed it with dielectric silicon grease (actually wasn't sold as dielectric and therefore a lot cheaper), and then sealed it with shrink tubing. Caulk and tape would work as well but you would need to let the caulk fully cure before applying power (let it dry out). I also used the dielectric grease on all of the connecters when putting everything back together.
Last edited:
Krazykraut
Active Member
You beat me to it. We installed a pair last weekend and took tons of pictures too, but I didn’t find the time yet for the write up. The white wire is not needed. It dims the halo.Mine arrived yesterday and I spent some time figuring them out/installing and documented what I found... they come with no instructions. I bought the smoke version as shown in the OP. They're not very dark at all, but a lot less shiny/silver than the corner lights that come with them. I just kept my original corner lights because I thought they matched better. If you do replace the corner lights, there is no wiring required. The original bulb holders fit right in place (better than the replacements IMO).
First off, they are way brighter than the originals, and a lot "whiter." The headlight lenses are actually glass as advertised.... kind of surprising given the price and the trend to poly lenses these days. Here are some pics of the install after doing only the driver's side for comparison (I didn't get around to aiming them yet).
The LED ring light I connected to the lower marker light.
Low Beams
High Beams
I cut the plug off of the old headlight and used it to replace the new one (solder and heat shrink). These are the color matches I found.
I bundled all the excess wire and secured it to the mounting bracket behind the headlight.
To connect the LED ring to the lower marker light I pulled the two spade terminals from the plug, soldered the red and black wires to them, and reinserted. I left the white wire disconnected as I couldn't figure out what it was for; maybe daylight running light switching which I don't have?
(if anyone does know what it's for please let me know!)
Plug everything back in, reinstall the lights, and repeat on the other side. Don't forget to move the two plastic square nuts from the old headlight over to the new ones before installing (the ones that clip into the square holes and are for securing the trim).
TBH, I kind of prefer the look of the original 4 light headlights; but the dimness and poor RHD pattern was something I just didn't want to live with any longer than necessary.
Don’t skip the aiming, mine were set to “blind and stun” oncoming drivers
How does the white wire dim the led? What would it be connected to?You beat me to it. We installed a pair last weekend and took tons of pictures too, but I didn’t find the time yet for the write up. The white wire is not needed. It dims the halo.
Don’t skip the aiming, mine were set to “blind and stun” oncoming drivers
Krazykraut
Active Member
I don’t have it connected, but we tried on the bench. Connected to 12v, it dims the ring, if I remember correctly
Great writeup, and an excellent option for RHD Delicas!
I'd say the red wire for the LED halo goes to ignition (so it acts as a nice bright DRL whenever the engine is on), the white wire goes to the lower marker light (so the halo dims to marker light brightness at night).
I'd say the red wire for the LED halo goes to ignition (so it acts as a nice bright DRL whenever the engine is on), the white wire goes to the lower marker light (so the halo dims to marker light brightness at night).
Delicatessan
Well-Known Member
Great writeup, and an excellent option for RHD Delicas!
I'd say the red wire for the LED halo goes to ignition (so it acts as a nice bright DRL whenever the engine is on), the white wire goes to the lower marker light (so the halo dims to marker light brightness at night).
Same Growler that runs the Canada Delica site?
Kiiiind of. I'm just a moderator, but I seem to be the most active poster so I can understand the misapprehension.
Krazykraut
Active Member
Wow, it's an honor to have you here. Too quiet on the Canadian forum?Kiiiind of. I'm just a moderator, but I seem to be the most active poster so I can understand the misapprehension.
Steven/SK66 cross-posted his install. The Canadian site is still fun (and it has the technical reference library) but they seem to be moveing away fgrom L300s into L400s, which I have little experience of.