Passenger window non-op

PhilE

Active Member
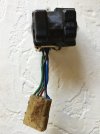
Having problems with the passenger window. Last time, I was able to open up the switch and clean the contacts to get it going. This time the switch broke apart; I'm not sure if the problem was with the switch or otherwise. A few questions that maybe someone can answer:
1) Is there a difference in functionality between the early and late switches?
2) Are the early rocker switches forward-compatible with the later up/down switches?
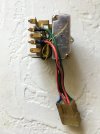
3) Is there a diagram explaining the contacts in the switch connector? I would like to test by bypassing the switches.
4) Does anyone know the crossover year for the switch change? Mine is a 96 with later up/down switches.
Thanks for any help!
 
Also... any know crossovers? Or was the same switch molding (up/down hook style) used elsewhere in the Mitsubishi fleet?
 
The fault was probably in the switch, they get drinks spilled on them quite regularly. By the time they get tot the "cleaning the contacts" stage they're on borrowed time. Faulty motors tend to slow down rather than stop outright.

I tried to install the later model switches in my '91 and couldn't get them to work. I don't recall what the problem was, it was a while ago, but I'm pretty sure it was how they worked electrically (not something as simple as "wrong shape plug").

Thinking about it now that doesn't really make sense- their function is pretty straightforward. Hmm. Maybe I need to visit the wreckers today.
 
Similar thoughts, Grant. I picked up the early style at the yard and plugged, but no play. Seems like the break year was '94. Need to visit the connector with a multimeter and some jumpers. I found the switch on Alibaba, new at low cost. Though the depression is on the wrong side (and part number is 159874 instead of 159873 on Amyama- so I fear they are for LHD, with the express down on the passenger side). I've enquired of two of the suppliers. If it works out, I may just buy the 10 minimum and sell the spares off here at cost. not much more then the cost of one switch on aliexpress. I haven't been able to find the wiring diagram; but if you have any better luck, I can pore over it to see which what is what. I picked up a couple dpdt switches at Jaycar but no success yet.
 
Similar thoughts, Grant. I picked up the early style at the yard and plugged, but no play. Seems like the break year was '94. Need to visit the connector with a multimeter and some jumpers. I found the switch on Alibaba, new at low cost. Though the depression is on the wrong side (and part number is 159874 instead of 159873 on Amyama- so I fear they are for LHD, with the express down on the passenger side). I've enquired of two of the suppliers. If it works out, I may just buy the 10 minimum and sell the spares off here at cost. not much more then the cost of one switch on aliexpress. I haven't been able to find the wiring diagram; but if you have any better luck, I can pore over it to see which what is what. I picked up a couple dpdt switches at Jaycar but no success yet.
What was the outcome? I also have to figure out the best way to resolve this same problem. Started with Ali Express but no luck with my year (pre-94) and RHD model.
 
Last edited:
I'd start by disassembling and cleaning the switch.
You begin by removing the pivot pin, and from there on disassembly is easy and usually unexpectedly rapid: there are some springs in the switch, be sure to hold the rocker down when you remove the pivot pin.

Clean the contacts with Deoxit or similar contact cleaner, and reassemble.
 
Thanks for the ideas, will do that. We were at Sask Glacier trailhead about to leave for a hike when the problem occurred. Not wanting to leave an open window all day, I pulled the switch and tried manually closing the contacts by pushing on them, etc. Eventually (after about an hour of messing around) the window closed and we were able to go for a hike. The switch had been warning me that this might happen and I had been pushing my luck for months, so I asked for it, I'm just thankful that is closed eventually and we could still go for a hike.
 
Does anyone know the Power Window Switch Part/Model Number for the 1992 Mitsubishi Delicia L300 TD-4cyl Chamonix?
Or perhaps where to Buy one? I am in need of purchasing one, as mine went out and need replaced.

I am having a hard time finding and sourcing that particular part...I am finding the early 1988-90 and 1994-06 years but not for the 1991-93 power window switches.

I have found these so far - Links:
1.) https://www.ebay.com/itm/174453364473?hash=item289e3b16f9:g:4UMAAOSw1GJfb~Cm
2.) https://www.ebay.com/itm/193288308739?hash=item2d00e18803:g:nY4AAOSw7XFeExsg
3.) https://www.aliexpress.com/i/33055739840.html
4.) https://www.amazon.com/Control-MR159874-94-2006-Mitsubishi-Removal/dp/B07XJWXLGW

But none of specified for the 1992, so I was curious if they may be Compatible or if I have wire them to be compatible.

Any information or help is appreciated! Thank you Dearly!
 

Attachments

  • IMG_8659.JPG
    IMG_8659.JPG
    136.5 KB · Views: 11
  • IMG_8658.JPG
    IMG_8658.JPG
    133.5 KB · Views: 12
As suggested to me above, a few months ago, after it stopped working completely, I pulled mine and cleaned the contacts with emery cloth and alcohol. I did not bother trying to save the rubber gasket. It seems to be working fine since then. As you do not mention whether you tried this or not, thought it might be worth mentioning. Perhaps you will not need to buy a new one in the end.
 
Does anyone know the Power Window Switch Part/Model Number for the 1992 Mitsubishi Delicia L300 TD-4cyl Chamonix?
It's best to look up part numbers for your specific vehicle, but in this case the power window switch is MB423534. That's the switch used in all L300s from 1987 until March 1994. (MR159873 is for April '94 onwards).

They're pretty robust switches though, as @JohnK said try cleaning it first.
 
Emergency work-around.

Today my driver's side window switch failed again, but fortunately it's in my driveway. If this happens at a trailhead, parking lot, etc., (as it did to me previously), you may need an 'emergency' way to raise the window. I just did this, and it works (be sure your passenger side window is in the UP position before you start this):
  1. Remove the window toggle switch panel, and disconnect it.
  2. The connector has has 6 wires in 2 groups. It is the group of four, 2 red and two green, that are of interest to you.
  3. Start with one color, and using a fine tip by inserting it from the south end, release the spades by levering the little lock tabs that hold them in place while you exert enough pressure to extract them to the north.
  4. reverse the original position of them in the connector by snapping them back into place.
  5. Now do the same with the green wires.
  6. Rejoin the connector.
  7. You can now control the driver's window with the passenger side switch. You can probably lower your passenger window with the driver's side switch, but may not get it up again unless you reverse the above procedure.
 
I second…hmm… third pulling it apart. Did this a few years back and got it working okay but not perfect. But it wasnt as simple as cleaning the contacts. I would definitely start there though.

Mine required actually diving into the mechanism. If i recall the contact itself from one of the buttons itself was worn pretty bad and wasn’t making the connection. I cleaned things up and bent the contract so they meet better. In pulling things apart though, there was some long ribbon that ran the length of the unit. You have to be gentle not to mind that up.
I ended up buying a new used Switched just because I wasn’t super confident and it’s long-term. But I did keep the old switch and I can probably find it and dig into it for some pictures to share.
 
Wow, that is interesting. I'll definitely be interested in those pic's if you get a chance. As I previously pulled my passenger seat and built a slide out tray for an ARB fridge there instead, using my work around and not being able to open the window on that side affects me less than it might do for others who may have to keep a passenger by the name of "She Who Must Be Obeyed" happy.ARB.jpg
 
sorry @JohnK, I’ve had a bunch on my plate but managed to dig into this today.

First thing you want to do it to pull the switch from the center console and from its own mounting plate. This requires removing two screws from behind. Easy enough.
EC31B9EF-B331-4500-8A52-C7C52960AB70.jpeg

Next you want to pull up the side of the rubber cover to reveal a pin. Get something small enough in there too push it out enough to get a handle on. It should pull out relatively easy.
7FE4F30B-5FEC-4266-8A25-072A90DCA047.jpegAD0667D9-8D2F-453F-A748-6B64A690D870.jpeg


With the Pin removed you will be able to separate the switches from the actual mechanism with the electronics. This is where the work begins.
First, be careful when opening the box as there are spring loaded parts that provide the return to the switches. They aren't pre-loaded, so the won't come shooting out but they may separate.
24B5F1C0-DE88-4365-B80C-570125B041C7.jpeg


Next you will remove the two toggles below the passenger side switch.
Notice how the connection points are blackened on both sides. You will definitely want to clean this up.
I think when I first pulled these apart, they were corroded. Not sure why with the limited amount of use these have seen are already burnt.
B9804E1E-A43E-43FD-8A26-0BA853923D82.jpeg4F9414A8-230A-4667-A96E-2DF8B2A41260.jpeg


This ca be an optional step but it was worth it on my side. Pull the big white slider that actuates the driver window. To do this a needle nose or tweezer will work. Grab the edges and pull straight up.
3CDF493A-BF5C-4970-8A32-621885556E6E.jpeg9901D5EA-ECE4-4F80-9C33-12BA0B86EDA0.jpeg

You can kind of see in this pic that one of the edges is a little deformed. Not really much I can do about that here, but it's good to know. This edge is what pushes the contacts together.
633C8AD2-37E6-497F-A22B-63F3E4D7F476.jpeg

Here you can also kind of see how these contacts have carbon on them. Again, these were corroded the first time i opened these up. Some light sanding will clean those up. Be careful not the bend the connector out of position. Unfortunately easily done.

33D1C87C-7C28-47DE-96F4-860761B1304A.jpeg
 
Last edited:
Once the contacts are cleaned, you then want to make sure when you push the button, things are actually connecting.
Reattach the white slider if removed and and slide.
It will be easiest if you push down and slide from the hollow side.
612E3181-21E5-415C-8F52-3A3C079D4562.jpeg


Next you want to add back in the little rockers. They are asymmetrical and have a directional fit. Jost make sure the little side cuts fit into the protruding edges in the box.
A3DFDBBD-752C-4779-88B6-CBADBC878F19.jpeg77FAC479-8819-4996-905D-64E8B4810055.jpeg


Reassemble any of the spring loaded parts, sit the box onto the cover, and slide the pin back through.
B05F18D8-8594-44A9-A058-98AD3C043BF6.jpeg

When I reassembled the last time i did use silicone grease on the components since there is a lot of contact points from the buttons and bc I did see wear. I also added a thin layer of silicone grease to the contact points but that may be why I ended up with some carbon on them. Maybe someone here has a better answer for that.

I did dig deeper when I opened mine the first time, but upon doing this again, I think it was unnecessary. So for now I will leave this as is. We can go further if needed.

Let us know how it goes.
 
Top