Copied from the tapatalk Mitsubishi 4x4 owners group
Fuel pump removal 2.8 fuel pump seal replacement ( Courtesy of R.Ambrose )
Tools and stuff
Lots and lots of patients! It took me nearly 3 days. Bear in mind that a lot of places are closed Sunday and are only open Saturday mornings. So I don’t recommend doing it over a weekend if you need the car for work on Monday!
Socket set of ¼”, 3/8” & ½” drive with various extension bars.
Combination spanners.
Nut sizes are 7, 8, 10, 12, 14, 17, 19 and 22mm.
Pliers
Mirror and torch/inspection lamp
Small tie wraps
Box of surgical gloves
Penetrating oil
Engine degreasant (Include a couple of aerosols)
Copper slip.
Anti freeze, Jug and funnel.
Bucket to catch the old stuff
A bit of clean engine oil to lubricate engine seals & bolts before re-fitting.
Small plastic bags to cover holes and put the nuts and bolts in that you take off.
String.
Tipex.
Digital camera. If you’ve not got one buy one (you need a pc as well!). There’s a newer version of mine a Cannon A75 for £125 takes superb pictures. It was invaluable when it came to putting things back.
Tell the other half you’re saving £600 by DIY.
The front drive shaft seal and seal kit if required.
I got mine from :
T.T. Automotive
Unit 6 Royal Way
Loughborough
Leicestershire
LE11 5XR
Email sales@ttauto.co.uk. Tel: 01509 633300.
They’re very quick.
My pump number is 104741-3211 (’93 Lwb, Eng 4M40)
The drive shaft seal (not included in the seal kit) is p/n 9461615663 @ £1.31
The seal kit which contains the top plate seal and throttle o-ring amongst other bits. P/n 9461610423 @ £10.22.
When I finally got the pump out I was unable to shift the nut holding on the gear.
I took the pump and drive shaft seal to City Auto Diesel in Plymouth and they replaced it for ½ an hours labour (£15+vat). You may want to have transport on standby.
When I changed the fuel pipes to the fuel filter I had parked the car on a downward slope and got covered in fuel. This time I had the car facing upwards and stayed dry! The wife said I smelt better!!!
Disconnect both batteries and remove the front one and it’s tray.
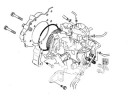
Turbo Intercooler removal

Disconnect the 2 hoses as shown. Use a plastic bag to block the hole next to the oil filler cap.
There are 4 bolts securing the frame of the intercooler.
Set No.1 piston to TDC
Remove the 2 sump guards/bash plates from underneath the car.
Remove rocker cover. Recommend you give it a clean first to stop any muck getting in around the camshaft.
Note that the 2 securing bolts aren’t very tight.
Undo the p-clip bracket at the rear of the rocker cover and disconnect the breather hose.

Align the v groove on the crankshaft pulley to 0. You’ll need a mirror for this.
Turning the crankshaft must be done in a clockwise direction (as you look at the pulley) using a 22mm socket and ratchet
The Haynes manual mentioned a protrusion next to the second cam must be sticking up. Mine didn’t have one!
The Mitsu manual said the notch in the hexagonal nut points up. My nut didn’t have a notch.
Re-fit the rocker cover to prevent dirt entering.
Drain the antifreeze. My radiator had a plastic drain plug at the bottom right of the radiator. Undo a few turns and fluid should drain via a hose. Catch it in the bucket. Loosen the radiator cap to aid draining.
Disconnect the metal fuel pipes from the injectors

Disconnect the electrical harness. Take note which connector plugs onto what.
Very carefully undo the nut on the earth terminal by No.1 injector. It will probably be rusted so give it a good soak in penetrating oil.
Move the harness out of the way.
Mine was also tie wrapped to the black throttle cable.
Don’t forget the fuel shut off solenoid plug at the base of the pump
Remove the large water hose and keep safe.

Disconnect the fuel pump water hoses X2. (You may not have these if you don’t have the cold start pack)
Hose 1 runs across the top of the fuel pump.
Hose 2 is between the 4 fuel pipes and the engine
Disconnect the turbo boost hose that goes from the top of the fuel pump to the metal pipe above the rad hose.
Disconnect the fuel leak-off pipe at the injector manifold end.

Disconnect the orange and black cables marking the position of the adjusting nuts.
Disconnect the fuel pipe from the fuel filter (fuel pump end top connection).
Disconnect the fuel return pipe from fuel pump end (bottom connection).
Disconnect the aneroid pipe from the fuel pump.
Power Steering Pump

Release the brackets that support the pipes for the power steering pumps.
There are 2 bolts that hold the pump on. Note that the top bolt is shorter (50mm) than the bottom (60mm). Now the power steering pump can be swung and rested on top of the engine.
The gear that is now exposed, belongs to the fuel pump. Mark a tooth and the housing (tipex) to ensure the fuel pump is fitted back the same way.

Remove the oil pressure switch and the metal pipe that connects the oil pump to the engine. Take care not to loose the copper washers either side of the banjo bolts.
Undo the 2 bolts that hold the oil pump on. Note the top bolt is longer (65mm) than the bottom (60mm).
There are a further 3 bolts to be undone on the front housing. One is behind a pulley wheel. (Spanner required).
Now for the swearing. There is a short bolt that holds the fuel pump to a bracket. From the rubber water hose that went across the top of the fuel pump, follow it down the side of pump (now a metal pipe). It ends in a banjo bolt (I recommend you remove this pipe for access). Go under the pump and slightly forward. I told you you’d swear. It needs a 14mm socket.
You may need to remove the wiring to the starter motor to give you more room.
When all the bolts are undone the pump will start to fall away.
As you slide the pump backwards, stop when you can see the gearing and mark the pump body with tipex (use the same tooth as before). Wrestle the pump out of the car. Be careful of the fuel injector pipes and also the large round o-ring (pump to housing).
As mentioned before, I couldn’t take the gear off the pump and for the £15ish the diesel guys charged for replacing the seal, I let them have the hassle. Note they didn’t check anything just changed the seal. You can have them do a complete overhaul but I believe that’ll cost over £100.
Before you refit the pump lay something across the engine mount like a small plastic bag. This will prevent the bolt from disappearing when you try and fit it to that damn bracket underneath the pump!
I dropped it twice and had to take the pump out to retrieve it!
Fitting is pretty much the reverse.
Make sure all mating joints are clean.
Smear a bit of engine oil on the large round o-ring on the front of the pump and on the bolts that pass through the housing..
Make sure that your markings line up.
Fit the awkward bolt as the third one (fit a couple from the front to take the weight), that way if it goes astray you don’t have too much undoing to get it!
Once that bolt is fitted don’t forget to remove the bag or what ever was used to cover the hole.
Flush the coolant system before refilling. Make sure the drain tap is done up!
I only managed to get just over 3 litres in.
Temporally connect the intercooler hoses but have the intercooler sit on the rocker cover so that you have a good view of the fuel pump (to check for leaks and make throttle adjustments if you also did the diesel pump top leak fix.
Fuel pump removal 2.8 fuel pump seal replacement ( Courtesy of R.Ambrose )
Tools and stuff
Lots and lots of patients! It took me nearly 3 days. Bear in mind that a lot of places are closed Sunday and are only open Saturday mornings. So I don’t recommend doing it over a weekend if you need the car for work on Monday!
Socket set of ¼”, 3/8” & ½” drive with various extension bars.
Combination spanners.
Nut sizes are 7, 8, 10, 12, 14, 17, 19 and 22mm.
Pliers
Mirror and torch/inspection lamp
Small tie wraps
Box of surgical gloves
Penetrating oil
Engine degreasant (Include a couple of aerosols)
Copper slip.
Anti freeze, Jug and funnel.
Bucket to catch the old stuff
A bit of clean engine oil to lubricate engine seals & bolts before re-fitting.
Small plastic bags to cover holes and put the nuts and bolts in that you take off.
String.
Tipex.
Digital camera. If you’ve not got one buy one (you need a pc as well!). There’s a newer version of mine a Cannon A75 for £125 takes superb pictures. It was invaluable when it came to putting things back.
Tell the other half you’re saving £600 by DIY.
The front drive shaft seal and seal kit if required.
I got mine from :
T.T. Automotive
Unit 6 Royal Way
Loughborough
Leicestershire
LE11 5XR
Email sales@ttauto.co.uk. Tel: 01509 633300.
They’re very quick.
My pump number is 104741-3211 (’93 Lwb, Eng 4M40)
The drive shaft seal (not included in the seal kit) is p/n 9461615663 @ £1.31
The seal kit which contains the top plate seal and throttle o-ring amongst other bits. P/n 9461610423 @ £10.22.
When I finally got the pump out I was unable to shift the nut holding on the gear.
I took the pump and drive shaft seal to City Auto Diesel in Plymouth and they replaced it for ½ an hours labour (£15+vat). You may want to have transport on standby.
When I changed the fuel pipes to the fuel filter I had parked the car on a downward slope and got covered in fuel. This time I had the car facing upwards and stayed dry! The wife said I smelt better!!!
Disconnect both batteries and remove the front one and it’s tray.
Turbo Intercooler removal
Disconnect the 2 hoses as shown. Use a plastic bag to block the hole next to the oil filler cap.
There are 4 bolts securing the frame of the intercooler.
Set No.1 piston to TDC
Remove the 2 sump guards/bash plates from underneath the car.
Remove rocker cover. Recommend you give it a clean first to stop any muck getting in around the camshaft.
Note that the 2 securing bolts aren’t very tight.
Undo the p-clip bracket at the rear of the rocker cover and disconnect the breather hose.
Align the v groove on the crankshaft pulley to 0. You’ll need a mirror for this.
Turning the crankshaft must be done in a clockwise direction (as you look at the pulley) using a 22mm socket and ratchet
The Haynes manual mentioned a protrusion next to the second cam must be sticking up. Mine didn’t have one!
The Mitsu manual said the notch in the hexagonal nut points up. My nut didn’t have a notch.
Re-fit the rocker cover to prevent dirt entering.
Drain the antifreeze. My radiator had a plastic drain plug at the bottom right of the radiator. Undo a few turns and fluid should drain via a hose. Catch it in the bucket. Loosen the radiator cap to aid draining.
Disconnect the metal fuel pipes from the injectors
Disconnect the electrical harness. Take note which connector plugs onto what.
Very carefully undo the nut on the earth terminal by No.1 injector. It will probably be rusted so give it a good soak in penetrating oil.
Move the harness out of the way.
Mine was also tie wrapped to the black throttle cable.
Don’t forget the fuel shut off solenoid plug at the base of the pump
Remove the large water hose and keep safe.
Disconnect the fuel pump water hoses X2. (You may not have these if you don’t have the cold start pack)
Hose 1 runs across the top of the fuel pump.
Hose 2 is between the 4 fuel pipes and the engine
Disconnect the turbo boost hose that goes from the top of the fuel pump to the metal pipe above the rad hose.
Disconnect the fuel leak-off pipe at the injector manifold end.
Disconnect the orange and black cables marking the position of the adjusting nuts.
Disconnect the fuel pipe from the fuel filter (fuel pump end top connection).
Disconnect the fuel return pipe from fuel pump end (bottom connection).
Disconnect the aneroid pipe from the fuel pump.
Power Steering Pump
Release the brackets that support the pipes for the power steering pumps.
There are 2 bolts that hold the pump on. Note that the top bolt is shorter (50mm) than the bottom (60mm). Now the power steering pump can be swung and rested on top of the engine.
The gear that is now exposed, belongs to the fuel pump. Mark a tooth and the housing (tipex) to ensure the fuel pump is fitted back the same way.
Remove the oil pressure switch and the metal pipe that connects the oil pump to the engine. Take care not to loose the copper washers either side of the banjo bolts.
Undo the 2 bolts that hold the oil pump on. Note the top bolt is longer (65mm) than the bottom (60mm).
There are a further 3 bolts to be undone on the front housing. One is behind a pulley wheel. (Spanner required).
Now for the swearing. There is a short bolt that holds the fuel pump to a bracket. From the rubber water hose that went across the top of the fuel pump, follow it down the side of pump (now a metal pipe). It ends in a banjo bolt (I recommend you remove this pipe for access). Go under the pump and slightly forward. I told you you’d swear. It needs a 14mm socket.
You may need to remove the wiring to the starter motor to give you more room.
When all the bolts are undone the pump will start to fall away.
As you slide the pump backwards, stop when you can see the gearing and mark the pump body with tipex (use the same tooth as before). Wrestle the pump out of the car. Be careful of the fuel injector pipes and also the large round o-ring (pump to housing).
As mentioned before, I couldn’t take the gear off the pump and for the £15ish the diesel guys charged for replacing the seal, I let them have the hassle. Note they didn’t check anything just changed the seal. You can have them do a complete overhaul but I believe that’ll cost over £100.
Before you refit the pump lay something across the engine mount like a small plastic bag. This will prevent the bolt from disappearing when you try and fit it to that damn bracket underneath the pump!
I dropped it twice and had to take the pump out to retrieve it!
Fitting is pretty much the reverse.
Make sure all mating joints are clean.
Smear a bit of engine oil on the large round o-ring on the front of the pump and on the bolts that pass through the housing..
Make sure that your markings line up.
Fit the awkward bolt as the third one (fit a couple from the front to take the weight), that way if it goes astray you don’t have too much undoing to get it!
Once that bolt is fitted don’t forget to remove the bag or what ever was used to cover the hole.
Flush the coolant system before refilling. Make sure the drain tap is done up!
I only managed to get just over 3 litres in.
Temporally connect the intercooler hoses but have the intercooler sit on the rocker cover so that you have a good view of the fuel pump (to check for leaks and make throttle adjustments if you also did the diesel pump top leak fix.