douglas.the.delica
Active Member
After coming up short in my searches, I wanted to share some tips and photos from the front speaker install on my '93 Delica.
First of all, I ordered the "Kicker 46CSC44 CS Series 4" 2-way car speakers" from Crutchfield. The price was right at $50 shipped. Amazon was the same price, and Crutchfield has the best support in the industry, so I can't recommend them enough. I am powering these with the Sony XAV-AX1000 ($250 shipped, also from Crutchfield). If you plan on keeping the stock stereo or something with less power output, you may want to opt for the less power-hungry Kicker 43DSC404 DS Series. These are currently the same price on Crutchfield but have a maximum of 30 RMS instead of the 50 RMS of the CS Series. All the other specs look similar.
Here's a screenshot of the CS Series speakers I chose:

The speakers arrived in a few days and came packaged with grills, screws, metal clips, and butt connectors. I tossed all this and kept the speakers and the wires only.
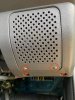
To access the stock speakers to remove them, I started on the driver side (which is MUCH easier). Locate the speaker grill to the right of the steering wheel, find the two Phillips screws on the grill (NOT on the dash itself). Here's a photo showing which screws to remove. I put an X over the screws you will leave alone:

Once the grill is removed, you will remove two more screws holding in the speaker and pull it out to expose the wires.
To wire in the speakers, I used a "Ratcheting Wire Terminal Crimper Tool for Insulated Terminals" along with "TICONN 250PCS Heat Shrink Wire Connectors", both from Amazon for around $20 each to make the connections into the stock wiring (I had previously used cheap butt connectors, heat shrink tubing, and a non-ratcheting crimper and these are SUCH an upgrade). I did cut the wires off the back of the stock connector, as they do not fit onto the Kicker speakers and I couldn't easily locate an adapter. Strip the cut wires, twist the copper strands, and insert it into the butt connector. Crimp all the way down until the tool releases. Tug on the wire to make sure you have a tight connection and use a heat gun / hair dryer / lighter to shrink the heat shrink. Match the black wire to the black wire on both sides (this is negative -).
I recommend playing some music and using the Balance and Fade settings on your stereo to move between the speakers, enjoying how much better the new speaker sounds.
Now for the much more difficult passenger side.
You will not be accessing the speaker from the front like the driver side, instead, you will be removing the glove box and either using a mirror or the selfie camera on your phone, along with a compact yet bright flashlight to see the backside of the dash. I recommend the "Cat CT1000 Pocket COB LED Flood Beam Pocket Work Light" for around $11 on Amazon. It has a magnet on the back and an LED strip for even light output.
Here's a photo showing which screws to remove. I have redacted the contents of my glovebox:

You may have to move the curved sliders/supports to the side to allow them to pull out of the holes in the dash. Once the glovebox is removed, set it to the side.
Break out the aforementioned flashlight and phone/mirror and precariously balance them inside the dash facing back towards the speaker. I initially removed 3 of the 4 Phillips screws but this is NOT required. The 4th screw is impossible to access using any screwdriver and upon closer inspection, I located 2 small 8mm nuts holding the speaker to the metal bracket. Due to the length of the studs, you must use a deep well socket. I could not fit even a 1/4" socket wrench into the tight space, so I used my hand to loosen the nuts with the socket only. You may have a smaller or more flexible socket wrench so YMMV.
Here is a photo showing which nuts to remove. I put an X over the screws you will leave alone (don't make my mistake, they were a huge pain to put back in and tighten):

Pull the speaker out to expose the wires, cut them right behind the connector and repeat the same steps to wire up the new speaker. You will match black to black again.
I recommend testing the speaker now, using Balance and Fade settings on your stereo to isolate this speaker. If there are any issues, you want to find out NOW before you finish the install.
Now that you have confirmed you will be able to install this speaker (and will not be returning it), you need to break off TWO of the screw tabs at the factory break line. Due to the tight fitment on this side, these must go. Use pliers and bend them back and forth until they break. Optionally use a Dremel, file, or sandpaper to clean off the sharp edges to protect your hands in the next steps.
Here's a photo showing the tabs to break off:

If everything sounds good, carefully line up the tabs on the speaker to the studs and reinstall the two nuts. I pressed the speaker up against the dash with one hand while I tightened the nuts using the deep well socket in my other hand, to make sure it was secure.
At this point, you will reinstall the glovebox using the 5 Phillips screws. Test again with your stereo, setting Balance and Fade settings to your liking.
Good luck and enjoy the upgrade in sound!
First of all, I ordered the "Kicker 46CSC44 CS Series 4" 2-way car speakers" from Crutchfield. The price was right at $50 shipped. Amazon was the same price, and Crutchfield has the best support in the industry, so I can't recommend them enough. I am powering these with the Sony XAV-AX1000 ($250 shipped, also from Crutchfield). If you plan on keeping the stock stereo or something with less power output, you may want to opt for the less power-hungry Kicker 43DSC404 DS Series. These are currently the same price on Crutchfield but have a maximum of 30 RMS instead of the 50 RMS of the CS Series. All the other specs look similar.
Here's a screenshot of the CS Series speakers I chose:
The speakers arrived in a few days and came packaged with grills, screws, metal clips, and butt connectors. I tossed all this and kept the speakers and the wires only.
To access the stock speakers to remove them, I started on the driver side (which is MUCH easier). Locate the speaker grill to the right of the steering wheel, find the two Phillips screws on the grill (NOT on the dash itself). Here's a photo showing which screws to remove. I put an X over the screws you will leave alone:
Once the grill is removed, you will remove two more screws holding in the speaker and pull it out to expose the wires.
To wire in the speakers, I used a "Ratcheting Wire Terminal Crimper Tool for Insulated Terminals" along with "TICONN 250PCS Heat Shrink Wire Connectors", both from Amazon for around $20 each to make the connections into the stock wiring (I had previously used cheap butt connectors, heat shrink tubing, and a non-ratcheting crimper and these are SUCH an upgrade). I did cut the wires off the back of the stock connector, as they do not fit onto the Kicker speakers and I couldn't easily locate an adapter. Strip the cut wires, twist the copper strands, and insert it into the butt connector. Crimp all the way down until the tool releases. Tug on the wire to make sure you have a tight connection and use a heat gun / hair dryer / lighter to shrink the heat shrink. Match the black wire to the black wire on both sides (this is negative -).
I recommend playing some music and using the Balance and Fade settings on your stereo to move between the speakers, enjoying how much better the new speaker sounds.
Now for the much more difficult passenger side.
You will not be accessing the speaker from the front like the driver side, instead, you will be removing the glove box and either using a mirror or the selfie camera on your phone, along with a compact yet bright flashlight to see the backside of the dash. I recommend the "Cat CT1000 Pocket COB LED Flood Beam Pocket Work Light" for around $11 on Amazon. It has a magnet on the back and an LED strip for even light output.
Here's a photo showing which screws to remove. I have redacted the contents of my glovebox:
You may have to move the curved sliders/supports to the side to allow them to pull out of the holes in the dash. Once the glovebox is removed, set it to the side.
Break out the aforementioned flashlight and phone/mirror and precariously balance them inside the dash facing back towards the speaker. I initially removed 3 of the 4 Phillips screws but this is NOT required. The 4th screw is impossible to access using any screwdriver and upon closer inspection, I located 2 small 8mm nuts holding the speaker to the metal bracket. Due to the length of the studs, you must use a deep well socket. I could not fit even a 1/4" socket wrench into the tight space, so I used my hand to loosen the nuts with the socket only. You may have a smaller or more flexible socket wrench so YMMV.
Here is a photo showing which nuts to remove. I put an X over the screws you will leave alone (don't make my mistake, they were a huge pain to put back in and tighten):
Pull the speaker out to expose the wires, cut them right behind the connector and repeat the same steps to wire up the new speaker. You will match black to black again.
I recommend testing the speaker now, using Balance and Fade settings on your stereo to isolate this speaker. If there are any issues, you want to find out NOW before you finish the install.
Now that you have confirmed you will be able to install this speaker (and will not be returning it), you need to break off TWO of the screw tabs at the factory break line. Due to the tight fitment on this side, these must go. Use pliers and bend them back and forth until they break. Optionally use a Dremel, file, or sandpaper to clean off the sharp edges to protect your hands in the next steps.
Here's a photo showing the tabs to break off:
If everything sounds good, carefully line up the tabs on the speaker to the studs and reinstall the two nuts. I pressed the speaker up against the dash with one hand while I tightened the nuts using the deep well socket in my other hand, to make sure it was secure.
At this point, you will reinstall the glovebox using the 5 Phillips screws. Test again with your stereo, setting Balance and Fade settings to your liking.
Good luck and enjoy the upgrade in sound!