You are using an out of date browser. It may not display this or other websites correctly.
You should upgrade or use an alternative browser.
You should upgrade or use an alternative browser.
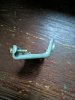
L300 gauge pod
- Thread starter Megerald
- Start date

never found one sadly.Did you ever find one of these? Curious how much you had to spend since the Delica I'm looking to buy is missing this pod as well.
carrosene
Member
Bummer. That doesn’t give me hope about finding one either.never found one sadly.
Patience and luck? One of our forum members offered up a 2 gauge pod just recently that I picked up. I thought my original pod was ok til I tried to take it off, clean it, and center the gauges. The plastic was just disintegrating as I started to dismantle it... I have seen them come up on Ebay.
carrosene
Member
Good to know. I'm in the process of buying a Delica that's missing it's gauge pod, so I will definitely be on the hunt soon.Patience and luck? One of our forum members offered up a 2 gauge pod just recently that I picked up. I thought my original pod was ok til I tried to take it off, clean it, and center the gauges. The plastic was just disintegrating as I started to dismantle it... I have seen them come up on Ebay.
Sputnik
Well-Known Member
Are there any aftermarket that would work? Mine just busted
There are generic 'universal' gauge pods available, for example:
Amazon.com: GlowShift Universal Black Triple Gauge Swivel Dashboard Pod - Fits Any Make/Model - Swivels 360 Degrees - ABS Plastic - Mounts (3) 2-1/16" (52mm) Gauges to Vehicle's Dash: Industrial & Scientific
Buy GlowShift Universal Black Triple Gauge Swivel Dashboard Pod - Fits Any Make/Model - Swivels 360 Degrees - ABS Plastic - Mounts (3) 2-1/16" (52mm) Gauges to Vehicle's Dash: Housing Pods - Amazon.com ✓ FREE DELIVERY possible on eligible purchases
www.amazon.com
Or
Amazon.com: Car Inclinometer Level Tilt Gauge, AUTOOL X90 Car HUD GPS Speedometer MPH Car Electronic Compass Clinometer Indicator, Digital Inclinometer Car Angle Slope Meter For off-road Vehicle: Automotive
Buy Car Inclinometer Level Tilt Gauge, AUTOOL X90 Car HUD GPS Speedometer MPH Car Electronic Compass Clinometer Indicator, Digital Inclinometer Car Angle Slope Meter For off-road Vehicle: Multi Gauges - Amazon.com ✓ FREE DELIVERY possible on eligible purchases
www.amazon.com
or in some cases, people use 'plastic weld' to rebuild/strengthen their original pods.
I ordered this last week. On the slow boat from China, apparently.
I figured a speedometer in mph would be useful for my daughter, a newly licensed driver who will be using the Deli. Right hand drive, kph, and stick are a lot for a new driver to deal with. The inclinometer and other features are a bonus.
Amazon.com: AUTOOL X95 GPS Slope Meter Car Inclinometer Level Tilt Gauge, Car HUD GPS Speedometer MPH Car Electronic Compass Clinometer Indicator, Digital Inclinometer Car Angle Slope Meter for Off-Road Vehicle: Car Electronics
Buy AUTOOL X95 GPS Slope Meter Car Inclinometer Level Tilt Gauge, Car HUD GPS Speedometer MPH Car Electronic Compass Clinometer Indicator, Digital Inclinometer Car Angle Slope Meter for Off-Road Vehicle: Gauges - Amazon.com ✓ FREE DELIVERY possible on eligible purchases
www.amazon.com
I figured a speedometer in mph would be useful for my daughter, a newly licensed driver who will be using the Deli. Right hand drive, kph, and stick are a lot for a new driver to deal with. The inclinometer and other features are a bonus.
Grib
Active Member
What measurements do you need as it's a bit of a weird shape ? I have mine out at the mo so could do itIf anyone has a 3 pod back that is not mounted and wants to start giving me measurements, I'll work on creating a 3D printable version. (mine is cracked, but installed currently. So, to take it out is too much of pain at this point.
Well, yesterday evening @InstrumentOfPeace stopped by to borrow a Thermal camera to help find his battery drain and he loaned me his! So, last night I started working on the model and spent 3-4 hours...What measurements do you need as it's a bit of a weird shape ? I have mine out at the mo so could do it

Then I realized that I got the tilt angle of the case wrong, that's why all my measurements started going off the higher I went...
So, I restarted with the case again...

But, I hope to have a model done soon(ish)
Last edited:
Grib
Active Member
Well done that's looking good. it's quite a lot of work but I bet you have a lot of tackers when you're done . Nice oneWell, yesterday evening @InstrumentOfPeace stopped by to borrow a Thermal camera to help find his battery drain and he loaned me his! So, last night I started working on the model and spent 3-4 hours...
View attachment 7474
Then I realized that I got the tile angle of the case wrong, that's why all my measurements started going off the higher I went...
So, I restarted with the case again...
View attachment 7472
But, I hope to have a model done soon(ish)
Dear, lord... Intersect faces, just SCREWS the model up so badly! Will have to clean the edges up A LOT!!!! But, here's a quick look of the progress so far.


Still need to do the top rail. Plus, had to re-do a bunch of fittings, since the measurements were off over the length of things.
Magenta is the interior color, so where you see it, there are gaps I need to fix, and if you see a bunch of lines, I need to redo the surface to be 'SMOOTH'
Still need to do the top rail. Plus, had to re-do a bunch of fittings, since the measurements were off over the length of things.
Magenta is the interior color, so where you see it, there are gaps I need to fix, and if you see a bunch of lines, I need to redo the surface to be 'SMOOTH'
liveworkwander
New Member
Well, yesterday evening @InstrumentOfPeace stopped by to borrow a Thermal camera to help find his battery drain and he loaned me his! So, last night I started working on the model and spent 3-4 hours...
View attachment 7474
Then I realized that I got the tilt angle of the case wrong, that's why all my measurements started going off the higher I went...
So, I restarted with the case again...
View attachment 7472
But, I hope to have a model done soon(ish)
How goes this neat little project?
Sputnik
Well-Known Member
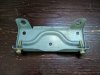
There's a metal backing plate which mates between the gauge and the car dashboard. Is anyone able to give me the measurement of the holes?
@nogas that is amazing work. AMAZING !!
I don't have any proper software to illustrate this unfortunately.
But I'll give it a go.
Overall the bracket base is 4¾" x 1¾"
The following measurements are to the center of each hole.
Pulling from the front edge, the side base holes are 1⅜" from the front and 7/16" from the sides.
The center front hole is 9/16" from the front and 2⅜" from either side.
Each hole is ¼" in diameter.
-----------------
The front flange is ¾" tall and leans back a few degrees.
Each hole for the front pod retaining screws is 7/16" from each side and ½" from the bottom and 3/16" in diameter. Both holes have a threaded nut welded/glued to the backside.
-----------------
The rear flange is 1" tall and also leans a few degrees. Each hole for the pod retaining pegs is 7/16" from the edge, about 9/16" from the bottom and ⅜" in diameter.
Attachments
Well...
Here's the Google SketchUp Model... (zipped and attached)


When I used Sketchup to export an STL file, it got "wonky"!

I then tried a few online model "fixers" and it did not look much better...

But, I got a render-able STL file from exporting the object as a DAE file, and then importing that into MeshLabs and export that as an STL file.

Will be trying a test print soon, but my printer is too small to print full-scale, so will print a 25% scale model.
Here's the Google SketchUp Model... (zipped and attached)
When I used Sketchup to export an STL file, it got "wonky"!
I then tried a few online model "fixers" and it did not look much better...
But, I got a render-able STL file from exporting the object as a DAE file, and then importing that into MeshLabs and export that as an STL file.
Will be trying a test print soon, but my printer is too small to print full-scale, so will print a 25% scale model.