Vandré3000
Member
I saved this a while ago. Can’t find it now to give you the actual link. Hope it helps. (There’s also a super mediocre video of a guy in South Asia changing the brakes and oil on an L300. You might want to look at that too):
View attachment 2169View attachment 2170View attachment 2171View attachment 2172View attachment 2173View attachment 2174
In case anyone — like myself — wanted to be able to read the instructions, here's a copy/paste of the original from http://www.mdocuk.co.uk/forums/viewtopic.php?t=32794&sid=5d1994415c82c7e0b5d691ed89b01de7
---
L300 Full engine service guide
** Now BEFORE I start, I know I am probably teaching a lot of you how to suck eggs, BUT this guide is aimed at members with none or very limited mechanical knowledge **
I have decided to put together a guide for anyone who wants to avoid garage bills and have a go at servicing their own Deli's. This guide is aimed at the Delica L300 2.5TD only. I can probably be persuaded to do another guide for the L400 2.8TD but that's another story!!
YOU WILL NEED:
1/ Oil filter
2/ 7 litres of 15w/40 turbo diesel oil
3/ Sump plug washer (can re-use old if necessary)
4/ Fuel filter
5/ Air filter
6/ 17mm spanner
7/ 10mm spanner
8/ Mole grips or similar
9/ Overalls or old work clothes
10/ A nice big cup of tea!
Right then cup of tea at the ready, overalls on, here we go!
Step one: oil removal
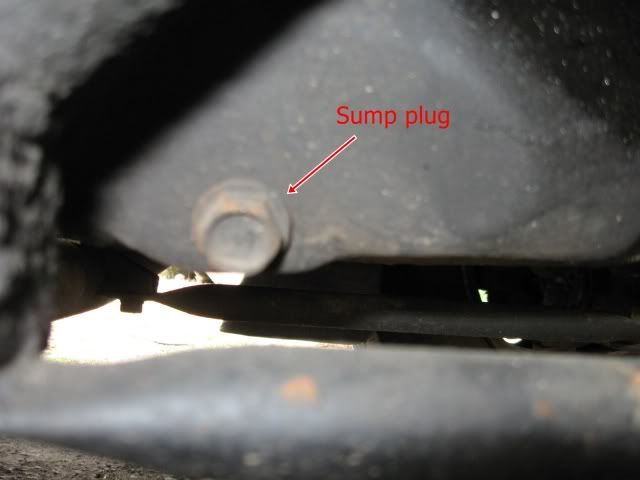
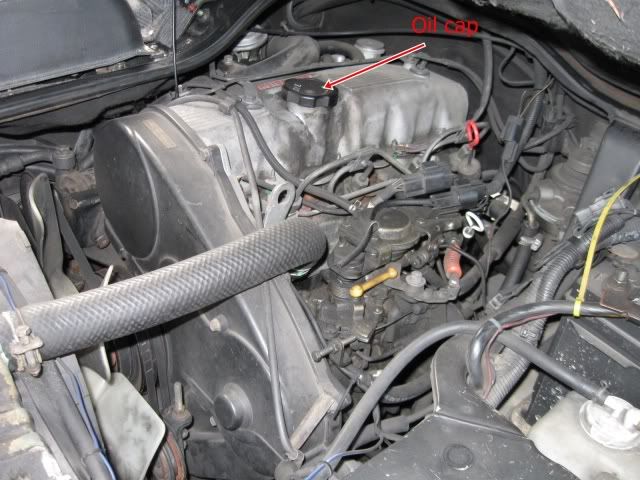
I always start by running the engine for 5 minutes to warm the oil (helps the oil to drain out). Find a large container to drain the oil into (will need to be large enough to hold 6.5 litres) and working from the drivers side of the vehicle place the container under the drain plug (refer to picture 1). If you crawl underneath just behind the front wheel and move towards the centre of the vehicle you should see the plug on the side of the oil sump. Using a 17mm ring spanner, loosen and remove the drain plug (in an anti clockwise direction), taking care not to lose the copper washer attached to the plug. Also be careful of the warm engine oil! Up in the cab, remove the oil cap (picture 2) this allows the oil to drain quicker!
Picture 1
Picture 2
Step two: oil filter removal
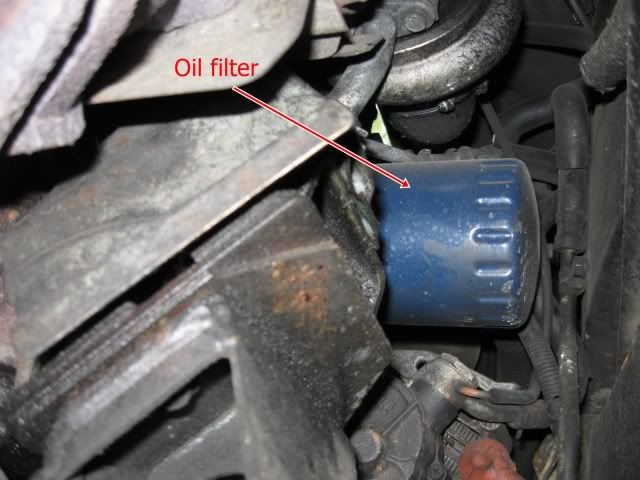
Crawl back underneath the drivers side (again behind the drivers wheel) and look up the right hand side of the engine. You are looking for the oil filter (refer to picture 3). Reach up the side of the engine, grasp hold of the oil filter and turn it towards yourself (anti clockwise) to remove. The filter should only be hand tight, BUT if the filter won't budge, you can either unscrew it by using a special oil filter removal tool, or you can tap a long screwdriver through the side of the filter to use as a lever to loosen the filter. Allow the oil to drain into the oil draining container then dispose of the filter.
Picture 3
Step three: oil filter refitting and oil replenishing
When all the oil has drained from the sump, clean the sump plug with a lint free cloth and if you can source a new washer then remove the old washer and replace with the new one. If not you can reuse the old washer if it looks okay. Refit the sump plug, making sure the plug it tight (but NOT over tight so as not to damage the threads). This next bit is a bit tricky as you are working somewhat blind! Get a clean cloth, reach up the side of the engine where the oil filter came from and clean the flange onto which the oil filter screws up to. This removes any dirty oil before the new filter is fitted. Next dip a finger into some CLEAN engine oil and spread a thin layer around the seal on the top of the new oil filter. Now carefully fit the new filter into position and tighten in a clockwise direction (away from you). Tighten the filter HAND TIGHT only. DO NOT use any filter removal tools to tighten!! Just tighten by hand until the filter will turn no more. Back up into the cab, remove and clean the dipstick (refer to picture 4). Make sure you remove the correct dipstick! In the photo above the RED coloured one is the engine oil and the WHITE one is the gearbox oil.
Next, using a funnel or jug, measure out and refill the engine with 6.5 litres of turbo diesel oil. Leave the oil to settle for 2 minutes then check the level with the dipstick. You are aiming at the MAXIMUM mark on the dipstick. Add more oil a bit at a time if needed (checking the level each time). Once the level is correct, refit the dipstick and the oil cap. Start the engine and let it tick over. (DO NOT REV!). Observe the oil light on the dashboard, this should go out after 5-6 seconds. With the engine running, crawl underneath and check for any leaks from the sump plug and oil filter. Finally, stop the engine and recheck the oil level (add more if required). That's the oil change done and dusted! Give yourself a pat on the back
Step four: air filter replacement
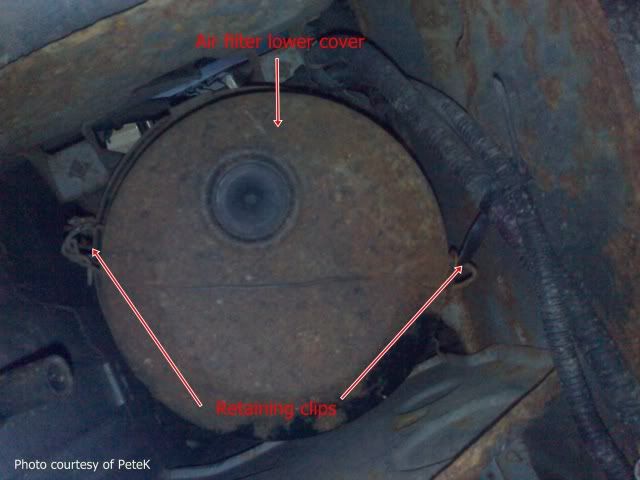
Now if you get on the floor on the drivers side, and look upwards DIRECTLY behind the wheel you will see the bottom of the air filter housing (refer to picture 5.) Using the picture as a guide, unclip the 2 retaining clips and remove the bottom of the filter housing. Inside you will see the bottom of the air filter, held in place with a wing nut. Remove the nut (anti clockwise) and withdraw the filter from the housing. Simply refit the new filter into the housing, refit the wing nut and clip the filter housing back on! Simples!
Picture 5
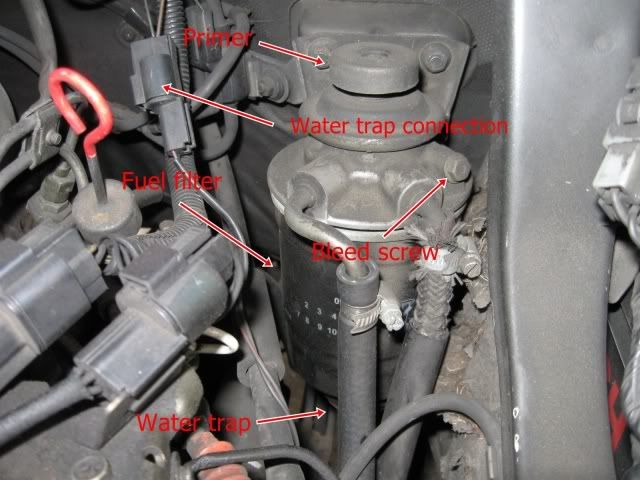
Step five: fuel filter replacement
Working in the engine bay, locate the fuel filter (refer to picture 6). The first thing to do is locate and disconnect the water trap connecting plug as illustrated. If you are struggling to locate the plug, reach down to the bottom of the filter and grab hold of the wire coming out of the bottom. Trace this back up to the plug. Once this is disconnected move the wire out of the way and unscrew the fuel filter by hand in an anti clockwise direction. Be ready to get a hand full of diesel at this point! Carefully remove the filter from the engine bay and discard of the diesel in a safe manner. Next get a pair of mole grips or similar and remove the large plastic screw fitting on the base of the filter (this is the water level warning device). Again this unscrews in an anti clockwise direction. Inside the new fuel filter packaging there should be a new seal. Remove the old seal from the water level device and refit with the new seal. Refit the water level device to the new filter taking care not to over tighten, remember it's only plastic! Now carefully guide the new filter into position and refit, hand tight in a clockwise direction. Now locate the bleed screw on the filter housing (again refer to picture). Loosen this screw with a 10mm spanner. Next push the priming knob on the top of the filter housing and keep pushing it until all the air is expelled from the bleed screw and diesel starts to spill out. Re tighten the bleed screw. Finally reconnect the water trap connecting plug. Now start the engine and run at a fast tick over. If the engine stops there may be some air in the fuel pump. Simply crank until it restarts. When the engine is running okay, check all around the fuel filter for any leaks, making sure to check the air bleed screw and the water level device at the bottom of the filter (usually best done by running your hand around the base of the filter).
Picture 6
Finally, go for a short test drive, come back home and recheck for leaks and recheck the oil level one last time.
And that's about it! All that remains is to finish your cup of tea off, and dispose of the old oil at your local recycling centre.
JOB DONE!
