Furi
Active Member
So I have the Quick Glow system.
Also have the default 6V Glow Plugs.
For the past year at times I would hear sporadic clicks of the relays. It never caused any problems starting but writing was on the wall.
A quick overview of how the system is suppose to operate based on my research (& thx @Growlerbearnz @sk66). Unfortunately I still haven't been able to find proper documentation on the details of the process but here are the broad strokes...
- Once the Key is turned to start, the controller turns on the 12v Relay(1st click) and at the same time checks its logic(temperature, etc).
- Depending on the logic it will turn off the 12v relay after 1 or more seconds (2nd click).
- If all is well car can be started after hearing the 2nd click.
- Once the car is running the controller continues checking its logic and will cycle the 6v relay until its requirements are met. Which we usually hear the quick click-click in colder weather.
I checked the glow plugs, relays and water temp sensor so by process of elimination figured it must be the controller, and I've been trying to bypass any computerized/electronics that I don't feel are essential as they will eventually fail.
There are two ways of bypassing the Glow System Controller.
1. To run power to the Glow Bus Bar directly from a switch. Which would require heavy switch, wires and proper fusing.
2. To use the existing Relays and wire them to a switch.
I'm doing 2 since Relays are working properly and already have the proper wiring in place.
It will probably take less time to do this than read this thread. So....
Could remove the driver seat for easier access. I didn't; wasn't too bad.
Fold back the carpet behind the drivers seat.

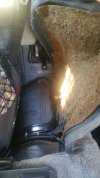
Unscrew the Wing nut and remove the panel. Just so you know what else is keeping that panel in place....
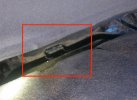
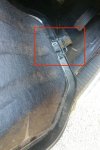
Remove the bolt. Pull up and wiggle the air duct out of the way.
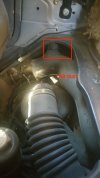
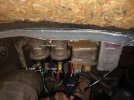
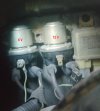
Once out you'll see the glow relays. Left one is 6V, right one is 12V. Middle wire is the activation trigger. In this photo I've already removed the trigger wire from the 12v relay.
Straight forward after this. Wire in your own trigger wire to each relay.
DON'T FORGET TO SECURE THE ORIGINAL TRIGGER WIRES AS THEY WILL BE LIVE IF YOUR GLOW SYSTEM IS STILL (UN)FUNCTIONING.
(I did fix the O-ring connector/electrical tape!)
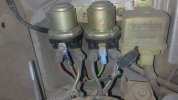
Run the wires to the front and connect to a switch. Needless to say make sure the wire(s) is well protected not to short against the body.
Theoretically the 12v relay should be sufficient for the pre and post ignition glow. But I figured there must a reason for the second relay(6v). Words of wisdom from @Growlerbearnz:
"my theory is that hitting 6V plugs with 12V is hard on the plugs: fast heat up/thermal expansion stresses the heater coil and the ceramic housing. Maybe it's ok when the engine's not running, but once it's running the plugs also have to deal with vibration and high pressures; rapidly heating them from the inside might lead to premature failure. 6V makes for a slower heat up, a more even temperature through the ceramic so less stress. I can see how adding a second 6V relay would get the best of both worlds, fast heat up with long term reliability."
Who am I to argue...
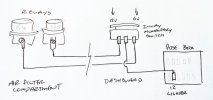
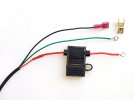
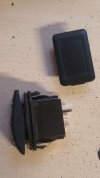
I used a momentary toggle switch to connect to both the 12v and the 6v relays to try to mimic the logic of the controller.
Amazon: B010AK0O96
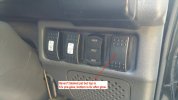
You can pretty much install your momentary switch wherever you like. I used a blank to fit the toggle switch in the dash. (I searched a looooot to find a switch that fits in the dash to reuse those spaces with no success)
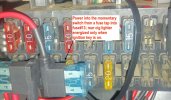
I also powered the switch using a fuse tap from the cigarette lighter fuse, which only gets power when the switch is on.
KEEP IN MIND OVER HEATING THE PLUGS WILL DAMAGE THEM. So you need to have some Idea of how long and when the Relays need to be energized for proper functionality. I think 3 or 4 seconds is the maximum the 12v relay should be energized. When everything was tip top with my system, the pre start click-click was 1 - 3 or 4 seconds depending on temperature. The post start click-click, if any, was ~1 second.
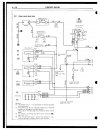
Again couldn't find any documentation with such details so going by previous experience. Wiring diagram below for reference.
Oh yea... put everything back!!!
Corrections/inputs welcome.
Also have the default 6V Glow Plugs.
For the past year at times I would hear sporadic clicks of the relays. It never caused any problems starting but writing was on the wall.
A quick overview of how the system is suppose to operate based on my research (& thx @Growlerbearnz @sk66). Unfortunately I still haven't been able to find proper documentation on the details of the process but here are the broad strokes...
- Once the Key is turned to start, the controller turns on the 12v Relay(1st click) and at the same time checks its logic(temperature, etc).
- Depending on the logic it will turn off the 12v relay after 1 or more seconds (2nd click).
- If all is well car can be started after hearing the 2nd click.
- Once the car is running the controller continues checking its logic and will cycle the 6v relay until its requirements are met. Which we usually hear the quick click-click in colder weather.
I checked the glow plugs, relays and water temp sensor so by process of elimination figured it must be the controller, and I've been trying to bypass any computerized/electronics that I don't feel are essential as they will eventually fail.
There are two ways of bypassing the Glow System Controller.
1. To run power to the Glow Bus Bar directly from a switch. Which would require heavy switch, wires and proper fusing.
2. To use the existing Relays and wire them to a switch.
I'm doing 2 since Relays are working properly and already have the proper wiring in place.
It will probably take less time to do this than read this thread. So....
Could remove the driver seat for easier access. I didn't; wasn't too bad.
Fold back the carpet behind the drivers seat.


Unscrew the Wing nut and remove the panel. Just so you know what else is keeping that panel in place....


Remove the bolt. Pull up and wiggle the air duct out of the way.

Once out you'll see the glow relays. Left one is 6V, right one is 12V. Middle wire is the activation trigger. In this photo I've already removed the trigger wire from the 12v relay.

Straight forward after this. Wire in your own trigger wire to each relay.
DON'T FORGET TO SECURE THE ORIGINAL TRIGGER WIRES AS THEY WILL BE LIVE IF YOUR GLOW SYSTEM IS STILL (UN)FUNCTIONING.
(I did fix the O-ring connector/electrical tape!)

Run the wires to the front and connect to a switch. Needless to say make sure the wire(s) is well protected not to short against the body.
Theoretically the 12v relay should be sufficient for the pre and post ignition glow. But I figured there must a reason for the second relay(6v). Words of wisdom from @Growlerbearnz:
"my theory is that hitting 6V plugs with 12V is hard on the plugs: fast heat up/thermal expansion stresses the heater coil and the ceramic housing. Maybe it's ok when the engine's not running, but once it's running the plugs also have to deal with vibration and high pressures; rapidly heating them from the inside might lead to premature failure. 6V makes for a slower heat up, a more even temperature through the ceramic so less stress. I can see how adding a second 6V relay would get the best of both worlds, fast heat up with long term reliability."
Who am I to argue...
I used a momentary toggle switch to connect to both the 12v and the 6v relays to try to mimic the logic of the controller.
Amazon: B010AK0O96
You can pretty much install your momentary switch wherever you like. I used a blank to fit the toggle switch in the dash. (I searched a looooot to find a switch that fits in the dash to reuse those spaces with no success)
I also powered the switch using a fuse tap from the cigarette lighter fuse, which only gets power when the switch is on.


KEEP IN MIND OVER HEATING THE PLUGS WILL DAMAGE THEM. So you need to have some Idea of how long and when the Relays need to be energized for proper functionality. I think 3 or 4 seconds is the maximum the 12v relay should be energized. When everything was tip top with my system, the pre start click-click was 1 - 3 or 4 seconds depending on temperature. The post start click-click, if any, was ~1 second.
Again couldn't find any documentation with such details so going by previous experience. Wiring diagram below for reference.

Oh yea... put everything back!!!
Corrections/inputs welcome.
Last edited:

