jeffery
Active Member
A few people have asked for this. Here is my experience with some photos (for some reason it will only let me post 10 photos maximum, sorry).
OVERVIEW
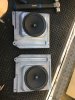
The Star Wagon features 2 rear speakers of 5.25" and 4 ohm impedence and 7 watts. These speakers honestly did not sound horrible, but given I upgraded the head unit to Sony XAV-AX100, I wanted to pursue some cleaner, better quality sound. I am not a huge audiophile or looking for loud sound, so please don’t take my set-up as anything amazing. (Even bigtime car audio guys seem to argue about this stuff endlessly.) The built-in amp on this stereo achieves 4 channels at 55 watts PEAK. The actual RMS output is only 20 watts per channel.
I already had 4" Kicker DSC40 speakers in front, so I elected to install Kicker 43DSC504 D-Series 5.25" 200W 2-Way 4-Ohm Car Audio Coaxial speakers. These speakers are 50 Watts RMS, with a max of 200 watts, which is already generally high for what the Sony puts out. Sizing up the speaker would not have yielded benefits for me. I'm pleased with the result. But ideally they would be better matched, as I should be pushing the speaker rather than underpowering. An amp that puts out closer to 45 RMS might be in store for the future as the 4" front kickers are 40 RMS and should handle the push fine. Hmmmmm.
You will need:
14mm socket
17mm socket
Panel/plastic retainer removal tool and replacement trim panel retainers, similar to this:
https://www.amazon.com/gp/product/B07L8CMYZW/ref=ppx_yo_dt_b_asin_title_o04_s00?ie=UTF8&psc=1
Small flathead screwdriver
JIS (Japanese Industrial Standard) or phillips screwdriver
Sound deadening mat and steel roller (optional)
Replacement speakers of choice. These are a direct fit:
https://www.amazon.com/gp/product/B01BO6ZU9E/ref=ppx_yo_dt_b_asin_title_o03_s00?ie=UTF8&psc=1
Soldering iron, solder, and shrink tubing — or other types of wire connectors as needed.

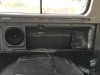
1. Remove rear seat by removing 6, 14mm bolts; each side has two in the rear and one to the front.

2. Addressing passenger side, remove the 4 screws in the metal curtain rail below the window holding securing the trim. As you pull the trim off, slide slightly forward to remove. Two of these screws also secure the top of the plastic speaker panel in place through plastic tabs, so be sure to remove them completely. (One of my tabs was already broken from age.)

3. Moving down the panel, there are two more easily accessible screws to remove. The lower is exposed and above it is another that is accessed by popping off the circular cover cap with your small screwdriver (shown).
4. Turning our attention to carpeted panels to either side of the wheel well, we will need to access one screw behind each securing the lower edge of the plastic speaker panel. It is not necessary or advised to remove the carpeted panels entirely.

5. Remove the forward seat belt attachment by removing the 17mm bolt beneath the vinyl cover. You can leave the spacers in place and let the belt hang. Next, remove the single screw holding the belt guide in place (shown) to release the belt guide. Repeat for the rear belt attachment and belt guide.

6. Starting with the rear panel, I found the rear most retainer is best accessed with your panel removal tool through the seat belt opening like this. It is not on the corner but a few inches below. (We will see why.) Once it is free, carefully work along the top edge with your tool to locate the remaining 2 panel retainers. The closer you get to being on/around the panel retainer, the less likely you are to damage the thin fiberboard panel.

8. Moving to the forward panel, work from the narrow edge nearest the wheel and carefully work along the top with the panel popper to free all three panel retainers. You can see the first one here. Once the top edges of both panels are free, you will have sufficient room to remove the two screws directly over the wheel well that attach the speaker panel (indicated by screwdriver here). You may be able to it get by removing only this one retainer, but I was not sure how things were going to be assembled.

9. NOTE: Two more panel retainer clips are now visible on lower edge of the plastic speaker panel. These do NOT need to be removed. Don't touch what ain't broke. The tabs are notched so the panel can slide up and out.


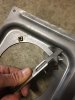
10. Two panel retainer attachments remain at the upper corners of the speaker cover panel. I did some slight damage to the brittle plastic removing this one. It was almost unavoidable, but I advise prying from the rear edge rather than top. As carefully as you can, pop these and remove the plastic panel. If you are lucky, you will only break the retainer rivet like these shown. Not a big deal. These are brittle and old. As you go to reassemble the panels, simply slide in a new one (shown at left from kit) as needed. When replacing broken carpet panel retainers, the head locks into the fiberboard via a keyhole shape.
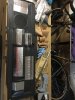
11. With the speaker mounting plate exposed, remove the four screws to detach the plate with the speaker in place. You can unclip the wiring and use a suitable adapter. I cut the wires and soldered them in.
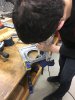
SIDE NOTE The screws holding the actual speaker suck. These are the same type that have previously given me BIG headaches in removal of the radio, etc. I removed the speaker mounting plate with the speaker in place, so I could shoot some PB Blaster on them and apply maximum downward pressure with my correct screwdriver. STILL, two of them still stripped. They are very soft metal and seem to bind with the welded-in steel nuts. Once they strip, I have found using using an 8mm bolt extractor socket and impact driver to rip them out brings joy. https://www.harborfreight.com/9-pc-38-in-drive-metric-bolt-extractor-socket-set-67894.html

12. While I had the speakers and mounting plate out, I applied some sound deadening mat to the mounting plate and also covered the inside of the body panel. Totally optional, but I figured for the price it can’t hurt. You just roll it on and trim with a utility blade. Note: This involved removing the small foam speaker ring that presses against the plastic speaker panel. I cut it off with a razor blade and glued back it back in place following sound mat. (Took photos, but reached limit)
13. Wire up your new speaker per instructions, paying careful attention to correct + and – connections.
15. Replace speaker screws, speaker mounting plate, and trim panels in reverse order. Enjoy!
(Driver’s side is the same, the only real difference being the upper trim runs the full length of the van.)
OVERVIEW
The Star Wagon features 2 rear speakers of 5.25" and 4 ohm impedence and 7 watts. These speakers honestly did not sound horrible, but given I upgraded the head unit to Sony XAV-AX100, I wanted to pursue some cleaner, better quality sound. I am not a huge audiophile or looking for loud sound, so please don’t take my set-up as anything amazing. (Even bigtime car audio guys seem to argue about this stuff endlessly.) The built-in amp on this stereo achieves 4 channels at 55 watts PEAK. The actual RMS output is only 20 watts per channel.
I already had 4" Kicker DSC40 speakers in front, so I elected to install Kicker 43DSC504 D-Series 5.25" 200W 2-Way 4-Ohm Car Audio Coaxial speakers. These speakers are 50 Watts RMS, with a max of 200 watts, which is already generally high for what the Sony puts out. Sizing up the speaker would not have yielded benefits for me. I'm pleased with the result. But ideally they would be better matched, as I should be pushing the speaker rather than underpowering. An amp that puts out closer to 45 RMS might be in store for the future as the 4" front kickers are 40 RMS and should handle the push fine. Hmmmmm.
You will need:
14mm socket
17mm socket
Panel/plastic retainer removal tool and replacement trim panel retainers, similar to this:
https://www.amazon.com/gp/product/B07L8CMYZW/ref=ppx_yo_dt_b_asin_title_o04_s00?ie=UTF8&psc=1
Small flathead screwdriver
JIS (Japanese Industrial Standard) or phillips screwdriver
Sound deadening mat and steel roller (optional)
Replacement speakers of choice. These are a direct fit:
https://www.amazon.com/gp/product/B01BO6ZU9E/ref=ppx_yo_dt_b_asin_title_o03_s00?ie=UTF8&psc=1
Soldering iron, solder, and shrink tubing — or other types of wire connectors as needed.
1. Remove rear seat by removing 6, 14mm bolts; each side has two in the rear and one to the front.
2. Addressing passenger side, remove the 4 screws in the metal curtain rail below the window holding securing the trim. As you pull the trim off, slide slightly forward to remove. Two of these screws also secure the top of the plastic speaker panel in place through plastic tabs, so be sure to remove them completely. (One of my tabs was already broken from age.)
3. Moving down the panel, there are two more easily accessible screws to remove. The lower is exposed and above it is another that is accessed by popping off the circular cover cap with your small screwdriver (shown).
4. Turning our attention to carpeted panels to either side of the wheel well, we will need to access one screw behind each securing the lower edge of the plastic speaker panel. It is not necessary or advised to remove the carpeted panels entirely.
5. Remove the forward seat belt attachment by removing the 17mm bolt beneath the vinyl cover. You can leave the spacers in place and let the belt hang. Next, remove the single screw holding the belt guide in place (shown) to release the belt guide. Repeat for the rear belt attachment and belt guide.
6. Starting with the rear panel, I found the rear most retainer is best accessed with your panel removal tool through the seat belt opening like this. It is not on the corner but a few inches below. (We will see why.) Once it is free, carefully work along the top edge with your tool to locate the remaining 2 panel retainers. The closer you get to being on/around the panel retainer, the less likely you are to damage the thin fiberboard panel.
8. Moving to the forward panel, work from the narrow edge nearest the wheel and carefully work along the top with the panel popper to free all three panel retainers. You can see the first one here. Once the top edges of both panels are free, you will have sufficient room to remove the two screws directly over the wheel well that attach the speaker panel (indicated by screwdriver here). You may be able to it get by removing only this one retainer, but I was not sure how things were going to be assembled.
9. NOTE: Two more panel retainer clips are now visible on lower edge of the plastic speaker panel. These do NOT need to be removed. Don't touch what ain't broke. The tabs are notched so the panel can slide up and out.
10. Two panel retainer attachments remain at the upper corners of the speaker cover panel. I did some slight damage to the brittle plastic removing this one. It was almost unavoidable, but I advise prying from the rear edge rather than top. As carefully as you can, pop these and remove the plastic panel. If you are lucky, you will only break the retainer rivet like these shown. Not a big deal. These are brittle and old. As you go to reassemble the panels, simply slide in a new one (shown at left from kit) as needed. When replacing broken carpet panel retainers, the head locks into the fiberboard via a keyhole shape.
11. With the speaker mounting plate exposed, remove the four screws to detach the plate with the speaker in place. You can unclip the wiring and use a suitable adapter. I cut the wires and soldered them in.
SIDE NOTE The screws holding the actual speaker suck. These are the same type that have previously given me BIG headaches in removal of the radio, etc. I removed the speaker mounting plate with the speaker in place, so I could shoot some PB Blaster on them and apply maximum downward pressure with my correct screwdriver. STILL, two of them still stripped. They are very soft metal and seem to bind with the welded-in steel nuts. Once they strip, I have found using using an 8mm bolt extractor socket and impact driver to rip them out brings joy. https://www.harborfreight.com/9-pc-38-in-drive-metric-bolt-extractor-socket-set-67894.html
12. While I had the speakers and mounting plate out, I applied some sound deadening mat to the mounting plate and also covered the inside of the body panel. Totally optional, but I figured for the price it can’t hurt. You just roll it on and trim with a utility blade. Note: This involved removing the small foam speaker ring that presses against the plastic speaker panel. I cut it off with a razor blade and glued back it back in place following sound mat. (Took photos, but reached limit)
13. Wire up your new speaker per instructions, paying careful attention to correct + and – connections.
15. Replace speaker screws, speaker mounting plate, and trim panels in reverse order. Enjoy!
(Driver’s side is the same, the only real difference being the upper trim runs the full length of the van.)
Last edited:
")