Removing center mirror cover

dan

Member
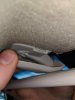
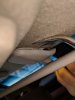
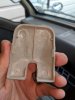
I jammed screwdrivers in this rear-view mirror cover from all directions and can't figure out how to remove it. It's chewed up the edges a bit and am worried I'm going to bust it in half if I give it any more torque. Does anyone know where the tangs are on this thing and the best way to remove it? The service manual doesn't really say.

IMG_20190126_100619.jpg

1548529183343.png
 
Last edited:
The two tags are on the sides, approximately where your red arrow is pointing. It's best to use a trim clip remover tool- like a small crowbar- so you can slide it between the trim cover and roof lining until it hits the metal bracket, then lever the cover out and down. A screwdriver doesn't quite allow the right angle.

Hang on, photos:
IMG_20190127_124241.jpgIMG_20190127_124251.jpgIMG_20190127_124304.jpgIMG_20190127_124309.jpg

(Ignore the position of the mirror- I've fitted a VW auto-dimming mirror, it's a touch larger than the standard one.)
 

Attachments

  • IMG_20190127_124251.jpg
    IMG_20190127_124251.jpg
    209 KB · Views: 20
  • IMG_20190127_124241.jpg
    IMG_20190127_124241.jpg
    205.3 KB · Views: 19
  • IMG_20190127_124309.jpg
    IMG_20190127_124309.jpg
    257.2 KB · Views: 18
Mine is loose too. I'm going to pull it out and replace it with one with a backup camera, so can do some dismantling of the original once it's out.
 
Which part is too loose? The ball joint on the back is nearly impossible to tighten (you have to pop the glass out, which has always damaged the plastic housing when I've tried it). The arm mounts to a break-away plinth, that comes loose sometimes- you just need to replace, or even just rotate, the roll pins.
 
Wow!!! That would have helped about a month ago when I dropped my headliner. Thank god it was possible which that one piece still attached. Albeit kind of a PITA. Lol thanks for the tip! Certainly makes the next time easier!!!
 
I managed to remove the glass (twice) w/o damaging anything... but you have to be willing to work with plastic hot enough to be painful.
I heated the assembly in the oven set to 225*f. And I had to work it barehanded as gloves thick enough to protect from the heat were unwieldily. I worked the glass out starting with one of the lower/wider corners; and reheated the assembly multiple times as it cooled too much. At least that gave my hands time to recover some...
Repeat to put it back in.

Inside there is a tension bar with screw type thing. When I got the first one apart it was broken internally. When I got a used replacement the arm mounting didn't match up, so I had to go through the process again to swap the new head to the old arm.
 
I managed to remove the glass (twice) w/o damaging anything... but you have to be willing to work with plastic hot enough to be painful.
I heated the assembly in the oven set to 225*f. And I had to work it barehanded as gloves thick enough to protect from the heat were unwieldily.
Okay... I'm now impressed. :)
 
I rammed bits of wooden matches in the ball joint on mine to wedge it!
As for the plastic cover on the roof - used a hairdryer to warm it up to get it off easier.
 
Top