Replacing the Speedometer Cable

active.world

Active Member
This past winter I noticed my speedometer became less and less reliable in the cold, often jolting around, on top of LOTS of "flapping/clicking" noise coming from behind the dash while the vehicle is in motion (this was a very annoying mystery for a long time, but finally one day the sound matched perfectly with the pulsing and jittering of the speedometer in the instrument panel). Ah-ha... OK I think the speedometer cable is most likely the culprit of this 2-year long on-again-off-again annoying noise. So... fast forward.... I finally bought a new speedometer cable and I plan to install it sometime in the next week while its warm outside so I'm not trying to do this in the winter when it gets cold again.

Before I begin, I have a couple of questions I'm hoping someone can answer who has done this replacement/repair:
  • Is this as simple as it seems?
    • 1. Unplug cable from back of instrument panel
    • 2. Unclip cable from any clips holding it in place under/behind dash
    • 3. Locate where the cable passes through the body, release grommet from under the vehicle (pulling to the exterior). Pull the interior section of the cable through the hole.
    • 4. Fish out loose cable from under the engine/along the frame of the vehicle towards the back. Separate from clips/zip ties as necessary.
    • 5. Unscrew the connector at the end of the cable from the transmission.
    • 6. Remove old cable.
    • 7. Align tooth on inside of the new cable with the slot inside transmission, then reverse the steps above.
  • Do I need to drain any/all of the transmission fluid before disconnecting the transmission end of the cable?
  • Is there any additional prep/greasing that needs to be done on the cable (at either end) during installation?
    • page 01-42 in the manual suggests sealing with water resistant grease where it plugs into the back of the transmission. Easy enough, but is any thing else to look out for or do? Does the end that connects to the instrument panel need anything besides cleaning the connection?
 
Replacement is as simple as you've said, but actually doing it will have you swearing at times. The cable is mostly held in place with bent metal tags, it's not (and shouldn't be) held rigidly at any point. If it goes through factory cable ties, they're usually not tightened. Take note of the cable routing and install the new cable in the same position. The cable should curve as gradually as possible.

You don't need to drain the transfer case oil, the speedo drive pinion is above the oil level.

A new, genuine Mitsubishi speedometer cable is pre-lubed and ready to install. I wouldn't add more/different lubricant.

Attaching at either end is straightforward with no special requirements. Once the cable is in place, attach the transmission end first. The speedo end is sometimes on the wrong angle to engage with the speedo easily, just rotate the instrument cluster until they go together. The retaining rings should screw down easily, if it feels like they're compressing the inner cable then stop and check that both ends are still engaged.
 
Ok. Easy, but annoying in some parts. Took me about 3 hours, solo, without lifting the van. Probably could do it again 1.5-2hours now that I've done it. YMMV.

Tools required:
- 12mm socket
- 10mm socket (deep sockets or with an extender will make this easier in some locations
- 10mm ratcheting wrench (for the single most difficult metal clip)
- Philips head screwdriver
- WD40
- gloves to keep your hands clean
- some eye protection cause you're going under the van and it's probably gonna be dirty

First, you'll need to remove the brush guard under the front of the van directly beneath the oil cooler.This gives you access to the hole in the body that the cable goes through, and makes it easy to fish the cable through the engine bay to the rear of the van. Remove the 12mm bolts (4 or 6 depending how you do it) and remove the pan.

Second, remove the speedometer cable from the back of the combination meter (speedometer) inside the instrument panel inside the van. Check the user manual page 52-8, steps 2-6.

There's a single flexible tab behind the dash that the cable should be held by. Open this up and free the cable.

Now back under the van. Go ahead and release the grommet from the body so you can start to free up the old cable. Once the cable has been removed from the body, let it hang as you love onto the next step.

If you wanna make this easier on yourself, fish the NEW speedometer cable under the van following the path of the original. Get everything aligned to length and leave it in place so you can swap out the cable in each metal clip as you go. BE VERY CAREFUL NOT TO KINK OR BEND THE NEW CABLE!

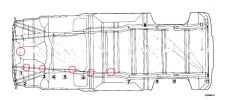
As @Growlerbearnz mentioned, there's a bunch of metal clips holding the cable in place along the chassis. These clips all use 10mm bolts and are located roughly in these locations (circles). Two of the clips also hold something else (fuel line maybe? Idk it's wrapped with heat protecting foam) but the others are all by themselves.
E96C5647-8B23-4DB6-A302-DF6E30D76C60.jpeg
The three clips in the front (left) can be easily accessed from under the front of the van. Follow the cable and you'll find the clips. Disassemble and remove the old cable. Swap in the new one. Leave the clips a little loose when you reassemble so you have play in case you need some slack in the cable.

The next one is hardest (between 5-6 in that diagram). It's right next to the compressor. Space is tight. Grab your 10mm ratcheting wrench and start playing twister alone with you van. You'll find the clip with your hands. Undo that bolt, switch the cables, put it back together, and pray you never have to do it again (until you tighten it down at the end). It's about as annoying/frustrating/dirty as trying to tighten the bolt on the alternator.

The last two are easy to reach, above the fuel tank. Repeat above replacement steps.

There are also three REUSABLE zipties holding the old cable against some wires. Don't cut these! They have a small tab on them that will let them disconnect. Remove old cable and replace with new. One ziptie is above the center of the fuel tank. The others are near the back of the fuel tank going down along the side of the transmission...easy to spot.

Once all the metal clips are holding the new cable in place, make sure you have enough slack. Unscrew the connection from the back of the transmission. Attach your new speedometer cable.

Next, go stick the interior end of the cable in through the bottom of the body (behind the area for your left foot in RHD vans). Once its in enough to grab from the other side, go into the foot well and continue gently pulling the cable through, making sure not to kink the cable. Fish it up towards the opening in your dash until you can grab it and put it in place. Lock it in place with that flexible tab behind the dash above your left foot.

Plug in the new cable to your combination meter. Reassemble the instrument panel.

Go back under the van check that the cable is not kinked or stuck in any weird places. Tighten down all the clips. Go for a test drive and make sure everything works.
Finally, reattach the brush guard.

Congrats, you're done!
 
Top