Timing Belt and Oil Seals

petie82

Member
Hi Everyone!

Been using this forum for a while now, but couldn't quite find what I was looking for with the search. I will be tackling my timing belt this week and am wondering whether it is smart and relatively easy to replace the injection pump front oil seal while I have everything apart. I will be planning on replacing the oil seals for the two balance shafts, the cam and the crank anyway. Thanks for the help.
 
Good question. I will be following this. I skipped it when I did my timing as I really didn’t wanna mess with my injection pump.

If you need a hand with things let me know. I’ve torn into the engine it feels like 10 times since November. I got it on lock!
 
I might take you up on that! I am also in Seattle. Any tips as I start to get into the front of this engine?
 
I believe the IP shaft seal is pretty easy and can be done with the pump in place. But IDT I would do it w/o cause... half the time when I do something "just because" it turns into a much more involved task than it should have been.
 
I might take you up on that! I am also in Seattle. Any tips as I start to get into the front of this engine?

Yeah, depending on how long that's been sitting, start soaking some of those bolts now with penetrating fluid. (PS Pump and Alt)

10mm 12mm, 13mm are your friends. If you don't have ratcheting wrenches in these sizes get some, The pivoting head type, they will make your life easy.

It's not all that difficult of a job. As I mentioned to someone else somewhere, walk through the procedure in the tech manual first, get yourself familiar. Also, as you are doing that begin to make a list of all the torque specs. It will make life much easier and re-assembly quicker when you aren't scrambling to find it while in the process. You will be guaranteed to overlook something if you are looking at the manual every minute to find a bolt spec.

I'm in Ballard. feel free to ping me if you need. aside from a ride or a hike this week I'm around.
 
Thanks for the help with this everyone! I got through the timing belt job in two days with the help of this forum.

I did end up replacing the IP shaft seal since I had it and it was pretty straight forward. I did use a puller on the IP gear and that seal seemed to be a lot more stuck than the ones holding back oil instead of fuel.

Other then that the job went relatively smoothly and the van fired right up on the first crank. But boy was I nervous to turn the key!!
How did you get that seal out? I’m staring at mine now and it’s refusing to come out. I’m replacing it because a ton of fuel was coming out when we were taking the engine apart.
 
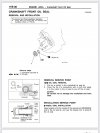
The way that someone mentioned a while back. Maybe it was growler in a head gasket post was to drill a small hole in the gasket and then to thread a screw in and pull. Do this on both sides and work it off. Or according to the manual I think you just get a screwdriver under the seal and pry out.
3CA2F27E-6287-4A6B-961F-C661EF6E961A.jpeg
 
Last edited:
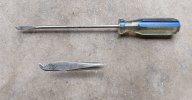
I made a puller from a spare screwdriver (make sure to ease all outside corners/edges and use a little block of wood/aluminum/etc to pry against). Just insert it through the lip and pry out the seal. The IP seal was more stubborn than all of the others...

sealPuller.jpg
 
Last edited:
Yeah, what those guys said! I am pretty sure if I remember correctly that I used a combination of the drill a hole and screw method and a seal puller (just like the cheap one you can buy at the autoparts store). Just try to get it so that you can apply some leverage and just slowly work it back and forth little by little. Just be careful not to scratch the mating surface for the seal!
 
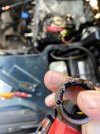
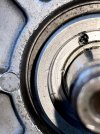
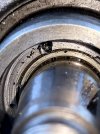
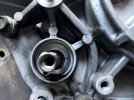
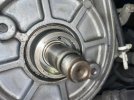
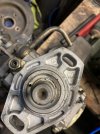
That's for the tips everyone! Unfortunately things did not go so well and I think I have done some costly damage. I decided to try the drill/screw method. My first mistake was not looking at the new seal before I started. If I had I would have seen this thing is made of metal. So I went in with a small and not very good drill bit thinking it was plastic/rubber like the other ones. After quite a bit of drilling it broke through and I bottomed out the drill bit. This wasn't so bad and if I had stopped here I think I would have been ok. So next I got a screw to thread in the hole and started to try and wiggle the seal out and that thing would not budge. The screw was bending and was about to break the head off but it pulled right out of the seal. So started to drill another hole and the tiny drill bit broke off and flew away - probably landing somewhere it will cause maximum damage if I ever get the van running again. I put another bit on and finally broke through again. Now my second and bigger mistake. I grabbed another longer screw which happened to have a self tapping tip. I didn't really think much of it until it was too late. I started trying to drill it in very slowly but the hole was too small so it wasn't biting. I started going faster and faster with the drill and then that screw finally caught an edge and buried itself so quick I didn't know what happened. So I backed it off a little and started to tried to pull it out while leveraging and it still pulled right out of the seal again. At this point I didn't think there was any chance I was going to get this thing out of there and that was going to be it. Finally a break! I had torn a pretty large hole in the face of the seal. Big enough to get the giant seal puller in there and finally I was able to pry it out. Since I hadn't pulled the pump out (I wish I had) I was only able to view my handwork by taking pictures with my phone. You can see there is quite a large hole on the top. I don't know if that is supposed to be there but if it is at the very least mangled it. Some of the black bits may be from the seal material. I had cleaned some out of there already. There is another smaller gouge on the left near the shaft. So if anyone else is reading and is about to do this for the first time. Don't be an idiot and don't do what I did. Take is slow!!! I'm attaching some gory pictures for everyone's amusement.
 

Attachments

  • 64788959169__65EA78BF-4351-4D73-B373-5F944752110D.jpg
    64788959169__65EA78BF-4351-4D73-B373-5F944752110D.jpg
    132.9 KB · Views: 54
  • IMG_4176.jpg
    IMG_4176.jpg
    207.3 KB · Views: 49
  • IMG_4196.jpg
    IMG_4196.jpg
    216.8 KB · Views: 53
  • IMG_4190.jpg
    IMG_4190.jpg
    204.8 KB · Views: 50
  • IMG_4177.jpg
    IMG_4177.jpg
    182.2 KB · Views: 54
I'm attaching some gory pictures for everyone's amusement.
Actually, I think you might be able to recover... it doesn't look like you hit either sealing surface significantly (?), and I'm 90% certain that's just housing (non rotating parts)... you didn't go through the housing did you?

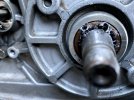
The last pic looks to be one of the balancer shafts; did you manage to hit that one too?
 
The balancer shaft was an accidental upload. That one should be fine.Here is another view of the IP. I didn't think I had created a hold in the housing. I was hoping at worst I mangled an existing one. You should be able to zoom in pretty far on that image
 

Attachments

  • IMG_4214.jpeg
    IMG_4214.jpeg
    200 KB · Views: 31
The balancer shaft was an accidental upload. That one should be fine.Here is another view of the IP. I didn't think I had created a hold in the housing. I was hoping at worst I mangled an existing one. You should be able to zoom in pretty far on that image
IDT there is an existing hole in that flange... and if there was, the chances of you hitting one blind are close to zero.
But, I didn't really look that closely when I did mine.
 
IDT there is an existing hole in that flange... and if there was, the chances of you hitting one blind are close to zero.
But, I didn't really look that closely when I did mine.
Had a spare parts pump and pulled the seal today
 

Attachments

  • DB8DA0DF-A7A6-4E74-89EC-9723AE1E1B40.jpeg
    DB8DA0DF-A7A6-4E74-89EC-9723AE1E1B40.jpeg
    169.1 KB · Views: 33
I wasn’t really able to get any of the extra metal out of there. It seems pretty solid for what looks like a pretty thin chunk. I might try again with a smaller pick. Thanks for posting the pic @13mclean
 
Top