You are using an out of date browser. It may not display this or other websites correctly.
You should upgrade or use an alternative browser.
You should upgrade or use an alternative browser.
Bad Batteries?
- Thread starter detroadster
- Start date
Delicatessan
Well-Known Member
You never cease to amaze.An Optima red-top battery is capable of higher cold cranking Amps but in short bursts, but then you should rely on your alternator to provide the power for electronics and such. An Optima yellow-top battery is better if your current draw can exceed your alternator outputs. I used to make Electric vehicles with yellow-tops.")
coop74
Active Member
I have been following this thread... I too have a pair of week batteries i am looking to change. When i look at the battery box the wiring for the dual battery system looks like a rats nest.
Is there a good diagram, thread, or video on dual battery replacement? Thanks in advance for any assistance.
Is there a good diagram, thread, or video on dual battery replacement? Thanks in advance for any assistance.
detroadster
Well-Known Member
Post up a photo of your battery box. Most "rats nest" antics are previous owners wiring up all kinds of junk that may or may not be needed or even functional anymore. First step for me is always back to stock, then go from there. Head to the "Resources" tab above and you can fine the shop manual with the electrical section if you really get into trouble. All in all there actually shouldn't be al that much in there even with the dual battery setup and from the factory it s actually very neatly laid out.I have been following this thread... I too have a pair of week batteries i am looking to change. When i look at the battery box the wiring for the dual battery system looks like a rats nest.
Is there a good diagram, thread, or video on dual battery replacement? Thanks in advance for any assistance.
If you look at my photos on page 1 here, prior to the batteries being installed in the tray, you can see all that's supposed to be there along with the batteries and battery cables. it's actually not all that much!
coop74
Active Member
looking at your photo's it would appear i just have mostly factory wiring but it does not look tidy like yours. Also it is not clear how much of it i must disassemble to get the the two positive cables loose.Post up a photo of your battery box. Most "rats nest" antics are previous owners wiring up all kinds of junk that may or may not be needed or even functional anymore. First step for me is always back to stock, then go from there. Head to the "Resources" tab above and you can fine the shop manual with the electrical section if you really get into trouble. All in all there actually shouldn't be al that much in there even with the dual battery setup and from the factory it s actually very neatly laid out.
If you look at my photos on page 1 here, prior to the batteries being installed in the tray, you can see all that's supposed to be there along with the batteries and battery cables. it's actually not all that much!
detroadster
Well-Known Member
Just go slow, take photos, and notes. I had to pull the entire wiring harness out of my motorcycle a few months back. I labeled each connector with a sharpie and took a phot of each one I disconnected in order as I disconnected them. Also took videos with my phone that I narrated as notes to myself. You’ll be fine! It looks like a mess in there but once you get into it your see there’s only a few connections and no real way to mess them up as the harness lengths pretty much dictate which terminal you connect to.looking at your photo's it would appear i just have mostly factory wiring but it does not look tidy like yours. Also it is not clear how much of it i must disassemble to get the the two positive cables loose.
Battery's dropping below 9.5 are on there way out and work your alternator harder than usualFirst time owning a diesel so I'm not sure just how far down a set of batteries should be expected to go while cranking. I've had my batteries on a trickle charger and the charger indicates they are topped off. Charge while at rest is 12.6 volts. With glowplugs on it drops to 11.0 to 11.5 ish. When cranking it drops all the way to mid 8's. Cranks slow but still starts. I'm thinking these batteries are on their way out. What do you all think?
coop74
Active Member
i have owned a lot of old bikes... i am all about the big ball of string exercise. BTW, thanks your picture was helpful. You dont happen to have one with all of the engine panels removed do you? especially the one under the drivers seat.Just go slow, take photos, and notes. I had to pull the entire wiring harness out of my motorcycle a few months back. I labeled each connector with a sharpie and took a phot of each one I disconnected in order as I disconnected them. Also took videos with my phone that I narrated as notes to myself. You’ll be fine! It looks like a mess in there but once you get into it your see there’s only a few connections and no real way to mess them up as the harness lengths pretty much dictate which terminal you connect to.
Last edited:
detroadster
Well-Known Member
Ah man, no I dont. You mean the bolt in panel under the driver's seat, right? Not the one with the wingnut that allows air-cleaner access. None of that should matter for battery replacement though. You must be after it for a different project.i have owned a lot of old bikes... i am all about the big ball of string exercise. BTW, thanks your picture was helpful. You dont happen to have one with all of the engine panels removed do you? especially the one under the drivers seat.
detroadster
Well-Known Member
Yep, that's why I replaced the batteries. Problem solved,Battery's dropping below 9.5 are on there way out and work your alternator harder than usual
coop74
Active Member
that is correct, that is part of the EGR and new EGT, Boost, coolant temp gauge projectAh man, no I dont. You mean the bolt in panel under the driver's seat, right? Not the one with the wingnut that allows air-cleaner access. None of that should matter for battery replacement though. You must be after it for a different project.
detroadster
Well-Known Member
Ah, yeah makes sense. Sorry I didnt snap any photos with that cover off when I installed my EGT, boost, and water temp gauges. You'll defintiely need to take the hatch off. Get used to it; you'll get good at it. I can get mine out of the van in under 10 minutes now. I think the first time took me an hour. LOL.that is correct, that is part of the EGR and new EGT, Boost, coolant temp gauge project
coop74
Active Member
must be part Land Rover design which guarantees if messing with 5 bolts at least one of them will be under some other part you must remove first to access it.Ah, yeah makes sense. Sorry I didnt snap any photos with that cover off when I installed my EGT, boost, and water temp gauges. You'll defintiely need to take the hatch off. Get used to it; you'll get good at it. I can get mine out of the van in under 10 minutes now. I think the first time took me an hour. LOL.
If someone has picture of Ebrake and fuel door disassembly that would be helpful.
Delicatessan
Well-Known Member
This is gold. Gold! “Nothing can stay gold, Johnny.”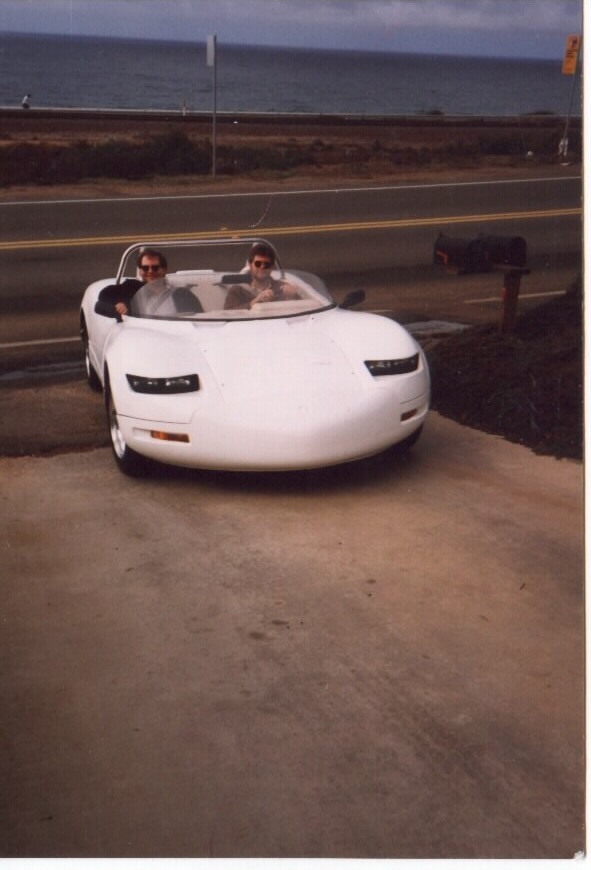
Oh, the hair I had back then....
Sputnik
Well-Known Member
My batteries are also on the way out. Hard starting, charge them on trickle, starts fine, next start struggles to turn over.
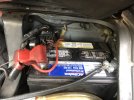
In examining the batteries, I found this sticker.

Running it though Google Lens translation, that 22/4/1 is the date when they were last changed, which, If I'm reading that 22 correctly, means Heisei 22 (22nd year of the Heisei era) which turns out to be 2010! So my batteries are 10 years old - I didn't think batteries even lasted that long. (I've owned the van for two years.). Mileage at that change was 120,884 and is now 177,xxx.
Anyway, I guess it's time for a change. Looking at the Optima D35s (Group 35 size), they don't have a lot of variation in price, but occasionally go on sale at $235 apiece.
In examining the batteries, I found this sticker.
Running it though Google Lens translation, that 22/4/1 is the date when they were last changed, which, If I'm reading that 22 correctly, means Heisei 22 (22nd year of the Heisei era) which turns out to be 2010! So my batteries are 10 years old - I didn't think batteries even lasted that long. (I've owned the van for two years.). Mileage at that change was 120,884 and is now 177,xxx.
Anyway, I guess it's time for a change. Looking at the Optima D35s (Group 35 size), they don't have a lot of variation in price, but occasionally go on sale at $235 apiece.
Last edited:
Sputnik
Well-Known Member
FWIW, Optima Group 34/78 are just a little bigger than the Group 35s (I have not confirmed fit), but the battery posts are on the same side as the stock batteries, so less fiddling with the positioning of the clamps/cables. They also offer a bit more CCA at a slightly increased cost.
Group 35
Model: D35
Weight: 36.4 lbs
C20 Capacity: 48 Ah
Post Type: SAE Post
CCA: 620 Amp
Width: 6.75 in
Length: 9.38 in
Height: 7.69 in
 www.optimabatteries.com
---------------------------------
Group 34/78
Model: D34/78
Weight: 43.5 lb
C20 Capacity: 55 Ah
Post Type: Dual SAE/GM
CCA: 750 Amp
Width: 6.94 in
Length: 10.06 in
Height: 7.88 in
 www.optimabatteries.com
Edit to add:
These look about right also, also with the posts in the stock-ish configuration.
Model: D34
Weight: 42.9 lb
C20 Capacity: 55 Ah
Post Type: SAE Post
CCA: 750 Amp
Width: 6.88 in
Length: 10.06 in
Height: 7.88 in
 www.optimabatteries.com
Model: D75/25
Weight: 37.8 lb
C20 Capacity: 48 Ah
Post Type: Dual SAE/GM
CCA: 620 Amp
Width: 6.81 in
Length: 9.38 in
Height: 7.75 in
 www.optimabatteries.com
Group 35
Model: D35
Weight: 36.4 lbs
C20 Capacity: 48 Ah
Post Type: SAE Post
CCA: 620 Amp
Width: 6.75 in
Length: 9.38 in
Height: 7.69 in
YELLOWTOP® D35
The YELLOWTOP® D35 is a high-performance AGM battery designed to deliver a strong burst of ignition power for a reliable start-up. Discover YELLOWTOP® today!
---------------------------------
Group 34/78
Model: D34/78
Weight: 43.5 lb
C20 Capacity: 55 Ah
Post Type: Dual SAE/GM
CCA: 750 Amp
Width: 6.94 in
Length: 10.06 in
Height: 7.88 in
YELLOWTOP® D34/78
The YELLOWTOP® D34/78 is a high-performance AGM battery designed to deliver a strong burst of ignition power for a reliable start-up. Discover YELLOWTOP® today!
Edit to add:
These look about right also, also with the posts in the stock-ish configuration.
Model: D34
Weight: 42.9 lb
C20 Capacity: 55 Ah
Post Type: SAE Post
CCA: 750 Amp
Width: 6.88 in
Length: 10.06 in
Height: 7.88 in
YELLOWTOP® D34
The YELLOWTOP® D34 is a high-performance AGM battery designed to deliver a strong burst of ignition power for a reliable start-up. Discover YELLOWTOP® today!
Model: D75/25
Weight: 37.8 lb
C20 Capacity: 48 Ah
Post Type: Dual SAE/GM
CCA: 620 Amp
Width: 6.81 in
Length: 9.38 in
Height: 7.75 in
YELLOWTOP® D75/25
The YELLOWTOP® D75/25 is a high-performance AGM battery designed to deliver a strong burst of ignition power for a reliable start-up. Discover YELLOWTOP® today!
Last edited:
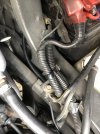
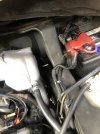
Anyone got a pic of the wiring for a SINGLE battery setup? I am going to pop in a YellowTop D35 but am worried the positive cable will not reach the (new) back positive post as configured. Current setup below.
Maybe the positive lead to the starter needs to run under the negative ground post (??) to get the extra length?
Maybe the positive lead to the starter needs to run under the negative ground post (??) to get the extra length?