Nenw
Well-Known Member
I'm doing it. I didn't think I would but I'm biting the bullet and going to install a front locker.
In the past there were 2 options that I knew of. 1. get a Lokka Lunch Box locker or 2. find the 8" diff from a gen one Montero and go ARB.
Well, there is a third option now. TRE 4x4 is offering a 7.25" Air locker, pretty much an ARB knockoff from what I have read. And if you look at their site, well, it's everything is a straight-up rip-off of ARB. If ARB had a locker for me, I might care, but beggars can't be choosers so here I am.
I do not know of anyone who has installed one of these yet and well, I've called like 5 or so shops and no one wants to get into it either because they are wusses and will only play with Toyota or Jeep. Or they only want to install things you bought through them. The one shop that sounded okay to do it, mentioned that they charge like $800 to do a bench install for a Toyota. Not worth it for me on top of the other $1000 in parts.
That is okay though because I like learning things.... especially hard things. So, I decided to take this on, to get some tools and develop a new skill set.
I do not intend to walk through how to install a diff. I do not know how to do this. I am going to learn in the process. There are a ton of resources out there to learn from. This will just be my experience, preparations, challenges, and a place to call on some of you all for some backup.
I am using a donor pumpkin provided by Josh Q and his super van. He just recently swapped to an 8" front diff.
The Air Locker comes care of @13mclean. I found it he bought it. I was going to buy another but Marco at Luso Overland mentioned we should check fit before buying a second. Solid suggestion since no one has done this install yet. @13mclean had other things going on so I am doing the initial legwork on this. Maybe if I get this good, I can trade him the labor to do his in return to build me a rear bumper
TRE AIR LOCKER:
The "While I am at it" List
Upright:
RESOURCES
A final note, I will continue to update part #’s as I get more worked out. Anything in RED is still questionable. I will also begin to add a tool list that I use or accumulate along the way.
I will be taking my time in doing this install trying to break it down into several days. Seeing as this is a pretty big job and I don’t want failures while in the field. I will do my best to get it right because I really only have one shot at it.
I will begin posting in the coming days.
Wish me luck!!
In the past there were 2 options that I knew of. 1. get a Lokka Lunch Box locker or 2. find the 8" diff from a gen one Montero and go ARB.
Well, there is a third option now. TRE 4x4 is offering a 7.25" Air locker, pretty much an ARB knockoff from what I have read. And if you look at their site, well, it's everything is a straight-up rip-off of ARB. If ARB had a locker for me, I might care, but beggars can't be choosers so here I am.
I do not know of anyone who has installed one of these yet and well, I've called like 5 or so shops and no one wants to get into it either because they are wusses and will only play with Toyota or Jeep. Or they only want to install things you bought through them. The one shop that sounded okay to do it, mentioned that they charge like $800 to do a bench install for a Toyota. Not worth it for me on top of the other $1000 in parts.
That is okay though because I like learning things.... especially hard things. So, I decided to take this on, to get some tools and develop a new skill set.
I do not intend to walk through how to install a diff. I do not know how to do this. I am going to learn in the process. There are a ton of resources out there to learn from. This will just be my experience, preparations, challenges, and a place to call on some of you all for some backup.
I am using a donor pumpkin provided by Josh Q and his super van. He just recently swapped to an 8" front diff.
The Air Locker comes care of @13mclean. I found it he bought it. I was going to buy another but Marco at Luso Overland mentioned we should check fit before buying a second. Solid suggestion since no one has done this install yet. @13mclean had other things going on so I am doing the initial legwork on this. Maybe if I get this good, I can trade him the labor to do his in return to build me a rear bumper
TRE AIR LOCKER:
- TR311 - 7.25", 25 Spline for A/T
- TR309 - 7.25", 28 Spline for M/T
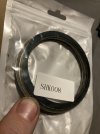
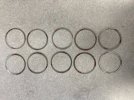
Viton 039 75A O-Ring- Note, not necessary but the O-ring is a critical component. TRE may have cut costs on this. You can get cheaper but this one is Military Spec. I would rather not have to tear into the diff a second time because a shitty consumable failed.
- MB092348 - Side Bearing (case) - QTY 2
- MB290013 - Side Seal (case) - QTY 2
- MB430694 - Center Isolator Bushing - QTY 1
- MB160578 - Rear Seal - QTY 1
- MB290962 - Rear Bearing outer - QTY 1
- MB290960 - Rear Bearing inner - QTY 2 - Note that only one is necessary for the install. The second is to use for setting pinion preload.
- MB160387 - Passenger Side Clip (Diff Side) - QTY 1
- MA143517 - Prop Shaft Nut - QTY 1
- MB185351 - Shim Set, Fr Diff Drive Pinion, Fr; Shim Set, Rr Diff Drive Pinion, Rr (Pinion Height) - QTY 1
- MB569391 - Shim Set, Fr Diff Drive Pinion (Pinion Preload) - QTY 1
- MB185519 or ARB SHK-008* - Spacer Set,Fr Diff; Spacer Set,Rr Diff - QTY 2
- MB518676 - Side Bushings - QTY 2 - Not required but since you are in there.
- MB160946 - Dust Seal Housing - Axle Tube - QTY 1
- MB001294 - Drain Plug Crush Washer - QTY 1
The "While I am at it" List
Upright:
- MB160670 - Needle Bearings - QTY 2
- MB160671 - Spacer - QTY 2
- MB160850 - Inner Seal - QTY 2
- MB393911 - (A/T) Driver Side Clip (Diff Side for axle) - QTY 1
- MB393884 - (M/T) Driver Side Clip (Diff Side for axle) - QTY 1
- MB160387 - (A/T) Passenger Side Clip (Diff Side) - QTY 1
- MB526189 - (M/T) Passenger Side Clip (Diff Side) - QTY 1
- Milner Offroad CV Boots - QTY 2
RESOURCES
- How to Install an ARB Air Locker (Very Detailed!) - YouTube
- DIY 2021 Toyota Tacoma Gears and Locker Install! 5.29 Yukon Gears And ARB Lockers In My 3rd Gen Taco - YouTube
- Diff rebuild - how to set pinion bearing preload Ep.1 #1023 - YouTube (part 1 of 4)
- Install a Locking Rear Diff - The Mostly Correct Guide - YouTube
- How Long Will The Rudicon Be 1/2 Dun? - YouTube
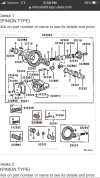
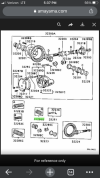
- Mitsubishi Workshop Manual – Section 26 – Front Axle
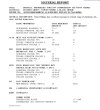
- TRE Manual
A final note, I will continue to update part #’s as I get more worked out. Anything in RED is still questionable. I will also begin to add a tool list that I use or accumulate along the way.
I will be taking my time in doing this install trying to break it down into several days. Seeing as this is a pretty big job and I don’t want failures while in the field. I will do my best to get it right because I really only have one shot at it.
I will begin posting in the coming days.
Wish me luck!!
Last edited: