You are using an out of date browser. It may not display this or other websites correctly.
You should upgrade or use an alternative browser.
You should upgrade or use an alternative browser.
Glowplug replacement
- Thread starter Grib
- Start date
It's fairly straightforward, just take care to replace all the little nuts/washers/lock washers/insulators (if fitted) in the correct order when reinstalling the bus bar. They're about as easy as replacing spark plugs.
Download a workshop manual from here for the official procedure and torque settings: http://delicaforum.com/index.php?resources/
Download a workshop manual from here for the official procedure and torque settings: http://delicaforum.com/index.php?resources/
Last edited:
Grib
Active Member
I have the super quick glow systemYou don't have the 6v quick glow system, right?
My mistake... you're good.I have the super quick glow system
Super-quick glow system has no glow plug warning lamp on the dashboard, you have to listen for the relays clicking. (One click when you turn the key to ignition, wait for the second click, then crank).Newbie here... How can I tell if I have the super quick glow system?
The other glow systems (quick and auto glow) have a dashboard light to tell you when the plugs are warmed up.
Is there a good way to "check" the super-quick glow system? My 91 Super Exceed doesn't have the dashboard lights, but I never hear the clicks...  But, the glowplugs are glowing, and when the engine first starts, I hear some relays clicking for the first 10 seconds or so.
But, the glowplugs are glowing, and when the engine first starts, I hear some relays clicking for the first 10 seconds or so.The workshop manual, section 16 (Engine Electrical) has a decent checking procedure, but it's basically what @sk66 says.Is there a good way to "check" the super-quick glow system?
Mancdelica
Member
I have recently installed a new alternator, battery and everything is reading as it should. It cranks over but takes 2/3 times and my foot on the gas a small bit to fire it up. Im guessing glow plugs is the next thing to replace? I tired to take a resistance reading but the reading was bouncing all over the place. For the sake of £40 im going to replace the plugs anyway. Could it be a relay issue too. My clicks are super quick. Maybe a second between them, certainly not 3-5.....
Mancdelica
Member
91 Exceed 2.5 TD by the way.
Sounds like bad glow plug(s)... resistance is off so the controller isn't working correctly. Of course it could also be the controller (common) or the relay(s) (less common). I would probably test to isolate the issue, but if you can't get a decent resistance measurement that points to the issue already.I have recently installed a new alternator, battery and everything is reading as it should. It cranks over but takes 2/3 times and my foot on the gas a small bit to fire it up. Im guessing glow plugs is the next thing to replace? I tired to take a resistance reading but the reading was bouncing all over the place. For the sake of £40 im going to replace the plugs anyway. Could it be a relay issue too. My clicks are super quick. Maybe a second between them, certainly not 3-5.....
Mancdelica
Member
Perfect thanks for that link. Ive ordered some as I like to service any vehicle I buy anyway with these sorts of things. But would be good to know where and why. Ill follow those steps. Very clear instructions cheers for that.
smappelbaum
Active Member
Here’s an interesting one —
I’ve got a 07/93 Exceed, and, according to the EPC data page, my van was outfitted with this glow plug system.
Upon first taking ownership, I had both the glow plug light on the dash illuminate in addition to the two relay clicks. The light was timed to the clicks and would turn off on the second click.
Eventually, the system failed and the shop I frequent, Dean’s Car Care, replaced the controller with one from a VW Rabbit. Now, there are no clicks but the light on the dash still lights up. The van cranks for a solid 3 seconds before sputtering to life, spewing a good amount of white smoke in the process.
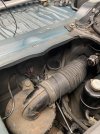
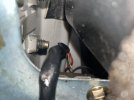
I’ve just received new OEM plugs and am hoping to install the rad bypass harness from @sk66 , but am quite unsure of how to tap the wires. I don’t think my stock controller or relays are in the van anymore. Photo attached of the air box area. Looks like a wire runs into the A-Pillar, and I think there may still be something bolted in there?
I’ve got a 07/93 Exceed, and, according to the EPC data page, my van was outfitted with this glow plug system.
Upon first taking ownership, I had both the glow plug light on the dash illuminate in addition to the two relay clicks. The light was timed to the clicks and would turn off on the second click.
Eventually, the system failed and the shop I frequent, Dean’s Car Care, replaced the controller with one from a VW Rabbit. Now, there are no clicks but the light on the dash still lights up. The van cranks for a solid 3 seconds before sputtering to life, spewing a good amount of white smoke in the process.
I’ve just received new OEM plugs and am hoping to install the rad bypass harness from @sk66 , but am quite unsure of how to tap the wires. I don’t think my stock controller or relays are in the van anymore. Photo attached of the air box area. Looks like a wire runs into the A-Pillar, and I think there may still be something bolted in there?
Attachments
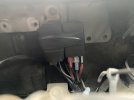
The wires into the B-pillar are probably to/from the OEM controller (e.g. temp sensor wire). That replacement controller appears to be a MK1/MK2 VW like this pinout, just installed 90˚ CW compared to the drawing.Here’s an interesting one —
I’ve got a 07/93 Exceed, and, according to the EPC data page, my van was outfitted with this glow plug system.
Upon first taking ownership, I had both the glow plug light on the dash illuminate in addition to the two relay clicks. The light was timed to the clicks and would turn off on the second click.
Eventually, the system failed and the shop I frequent, Dean’s Car Care, replaced the controller with one from a VW Rabbit. Now, there are no clicks but the light on the dash still lights up. The van cranks for a solid 3 seconds before sputtering to life, spewing a good amount of white smoke in the process.
I’ve just received new OEM plugs and am hoping to install the rad bypass harness from @sk66 , but am quite unsure of how to tap the wires. I don’t think my stock controller or relays are in the van anymore. Photo attached of the air box area. Looks like a wire runs into the A-Pillar, and I think there may still be something bolted in there?


The red spade is probably T, the blue/clear spade #86, and the blue spade hanging loose should be connected to #50 (which appears to be missing?). If that is the case, you would connect the bypass between #86 and #30 (as I interpret the schematic). You will have an extra wire and an extra switch position w/ the bypass kit as it was intended for the 6v super quick system. I recommend disconnecting the battery before messing with it... #30 is always live and is fused at 120A (should be the heavy red cable on the left).
If you are going strictly manual control, you might be better off switching to a more simple mechanical relay (but I wouldn't wire it the way they show). If you do decide to go with the manual relay, you can send the bypass kit back and I'll refund the purchase price. You'll really only need to run a single ground wire forward to a SPST momentary switch to make it work.
Last edited:
smappelbaum
Active Member
The wires into the B-pillar are probably to/from the OEM controller (e.g. temp sensor wire). That replacement controller appears to be a MK1/MK2 VW like this pinout, just installed 90˚ CW compared to the drawing.
View attachment 12052View attachment 12054
The red spade is probably T, the blue/clear spade #86, and the blue spade hanging loose should be connected to #50 (which appears to be missing?). If that is the case, you would connect the bypass between #86 and #30 (as I interpret the schematic). You will have an extra wire and an extra switch position w/ the bypass kit as it was intended for the 6v super quick system. I recommend disconnecting the battery before messing with it... #30 is always live and is fused at 120A (should be the heavy red cable on the left).
If you are going strictly manual control, you might be better off switching to a more simple mechanical relay (but I wouldn't wire it the way they show). If you do decide to go with the manual relay, you can send the bypass kit back and I'll refund the purchase price. You'll really only need to run a single wire forward to a SPST momentary switch to make it work.
You’re a true detective, @sk66 ! I’m going to dive a bit further into this shortly.