Have-dogs-needed-Van
New Member
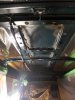
Started tackling the rust on my roof. Managed to pull the interoir, but now im starting to see how bad the issue is.
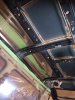
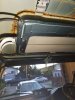
The front sunroof is a goner and the back has some bad rust too. I was expecting this getting into it. What i was predicting is all the areas i can't access from the top or bottom. At all the spots where these rubber stoppers were separating the roof from the structural peices underneath there are rust patches. They are mostly just surface rust, but they are all over the roof and very hard to access do to these structural pieces.
Im ready to cut out the front sunroof and just weld a sheet in its place and probably do the same in the back. My real problem is how to deal with everything inbetween.
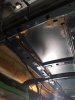
Im thinking of possibly cutting the roof sheet metal all the way from back to front so i can clean the structural pieces underneath then just weld new sheet metal back in. I do not know much about welding so im not sure how resonable this is. I will be hiring some to so the welding.
Any suggestions?
The front sunroof is a goner and the back has some bad rust too. I was expecting this getting into it. What i was predicting is all the areas i can't access from the top or bottom. At all the spots where these rubber stoppers were separating the roof from the structural peices underneath there are rust patches. They are mostly just surface rust, but they are all over the roof and very hard to access do to these structural pieces.
Im ready to cut out the front sunroof and just weld a sheet in its place and probably do the same in the back. My real problem is how to deal with everything inbetween.
Im thinking of possibly cutting the roof sheet metal all the way from back to front so i can clean the structural pieces underneath then just weld new sheet metal back in. I do not know much about welding so im not sure how resonable this is. I will be hiring some to so the welding.
Any suggestions?