As part of building the replacement 3D printed 3 pod gauge, I need a favor from ANYONE with a 3 gauge cluster (or just the digital thermometer, if only I still had it  )...
)...

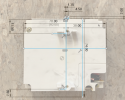
I need to know the accurate (using calipers please) measurements in mm of the (lines in orange above)...
)... I need to know the accurate (using calipers please) measurements in mm of the (lines in orange above)...
- Front Height
- Front Width
- Depth
- Height Offset of top screw
- Width Offset of top screw
- Height Offset of bottom screw
- Width Offset of bottom screw
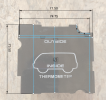
- Height Offset of text on the front (both top and bottom)
- Width Offset of text on the front (both top and bottom)