Flying_Fess
Active Member
What about Pajero Gauge pod? Connector looks the same and they dirt cheap. Original Delicas even in Russia cost like 100$ in a good shape.
Ok I'll tap it with a screw driver if it breaks no good.The issue with the originals, is the plastic has been baking in the sun for 20+ years, getting brittle and cracking...
 )...
)... for my Delica (with blown head gasket).


I am a very forgetful person, but I can likely get these measurements for you.Before I share a status update, I need a favor from ANYONE with a 3 gauge cluster (or just the digital thermometer, if only I still had it
I need to know the accurate (using calipers please) measurements in mm of the (lines in orange above)...
Update: So, I have got all the tweaks, notches, slices, etc done for the left gauge(altimeter), center gauge (inclinometer), and MY right gauge (PLX MultiGauge). But, I don't know if it will fit the thermometer yet, so want to make sure it will fit before letting the cat out of the bag.
- Front Height
- Front Width
- Depth
- Height Offset of top screw
- Width Offset of top screw
- Height Offset of bottom screw
- Width Offset of bottom screw
- Height Offset of text on the front (both top and bottom)
- Width Offset of text on the front (both top and bottom)
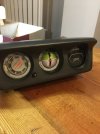
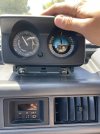
Now I have a working replacement 3D printed gauge pod
Note: there is A LOT of finishing work needed to smooth the print artifacts
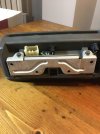
Inside the cluster with altimeter mounted
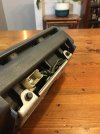
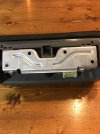
Back side, with my "fixed" illumination wiring.
Note: In full transparency, while fitting this together, I noticed that I'll need to move the alitmeter face forward 1mm since there is a slight panel gap with the gauge face mounted on that side. Also, I may print the face in two parts and glue them together thus removing the need to "fix" the surface blemishes.

Somewhere else you said that you had a Prusa MK3S, and its build volume was too small to print out the gauge pod. Did you get a bigger printer? Are there stl files?Before I share a status update, I need a favor from ANYONE with a 3 gauge cluster (or just the digital thermometer, if only I still had it
I need to know the accurate (using calipers please) measurements in mm of the (lines in orange above)...
Update: So, I have got all the tweaks, notches, slices, etc done for the left gauge(altimeter), center gauge (inclinometer), and MY right gauge (PLX MultiGauge). But, I don't know if it will fit the thermometer yet, so want to make sure it will fit before letting the cat out of the bag.
- Front Height
- Front Width
- Depth
- Height Offset of top screw
- Width Offset of top screw
- Height Offset of bottom screw
- Width Offset of bottom screw
- Height Offset of text on the front (both top and bottom)
- Width Offset of text on the front (both top and bottom)
Now I have a working replacement 3D printed gauge pod
Note: there is A LOT of finishing work needed to smooth the print artifacts
Inside the cluster with altimeter mounted
Back side, with my "fixed" illumination wiring.
Note: In full transparency, while fitting this together, I noticed that I'll need to move the alitmeter face forward 1mm since there is a slight panel gap with the gauge face mounted on that side. Also, I may print the face in two parts and glue them together thus removing the need to "fix" the surface blemishes.
Well, I kept tweaking at it, and never could get it just right. Then, Rio just jammed it out in a few iterations and I ended up buying his.Somewhere else you said that you had a Prusa MK3S, and its build volume was too small to print out the gauge pod. Did you get a bigger printer? Are there stl files?
Wow, I need to buy some Delica stuff from Rio! Thanks for Rio's link!Well, I kept tweaking at it, and never could get it just right. Then, Rio just jammed it out in a few iterations and I ended up buying his.
Gauge Pods - Starwagon.info
starwagon.info
I don't print in ABS since my printer is in my office, and the fumes are a bit much.
Did you take the new inclinometer apart and install or did you remove the mounting brackets inside the gauge pod housing?If you want to fix broken inclinometer here is the thing.
Perfect size for L300 gage pod. Just gut it out and instal.
Google it.
AUTOOL X95
You can do either way. If you take it apart there is 2 parts, scream and chip. You can use a surface grinder to get rid of ridges on the inclinometer face bazel.Did you take the new inclinometer apart and install or did you remove the mounting brackets inside the gauge pod housing?
He's got a double pod repair plate here, and used to sell whole double pods also.What about a doble gauge pod? mine started cracking where the front screws tighten it down.
Oh sweet! Thanks man!He's got a double pod repair plate here, and used to sell whole double pods also.
Gauge Pods - Starwagon.info