You are using an out of date browser. It may not display this or other websites correctly.
You should upgrade or use an alternative browser.
You should upgrade or use an alternative browser.
Monroe MA 708 on L300??
- Thread starter Cshokunin
- Start date
Sputnik
Well-Known Member
The upper mount on the new shocks needs to be altered. The rubber bushing and central pivot axle thingy needs to be pressed out and new bushings installed in the hole by you or your mechanic.
I used these split bushings so I wouldn't have to press in new bushings. They work well, but because the top shock mounts are sorta short, it was a bit of a fight to get them and the washer and nut onto the mounting pin of the van.
Also, the shocks don't come with nyloc nuts for the lower pin mounts, so the nut that comes with them can work itself off (ask me how I know") ) unless you use Nylocs or use some blue loctite.
) unless you use Nylocs or use some blue loctite.
Also, also, don't torque down the lower nuts very much as the lower pin can be broken during use if it's too tightly held. It needs room to move. Spin the nut on until you can see a couple threads protruding beyond the nut and leave it at that (remember the loctite.)
Be sure the shock body doesn't touch the van's frame. Space the upper shock mount off the frame using a washer or two.
Some useful threads which should be read thoroughly:
'Air adjustable rear shock absorbers (Monroe MA708)' https://delicaforum.com/index.php?threads/air-adjustable-rear-shock-absorbers-monroe-ma708.2418/
'Monroe Air Shocks- premature failure warning!' https://delicaforum.com/index.php?threads/monroe-air-shocks-premature-failure-warning.1004/
https://delicaforum.com/index.php?threads/monroe-ma708-air-shocks.3415/
I used these split bushings so I wouldn't have to press in new bushings. They work well, but because the top shock mounts are sorta short, it was a bit of a fight to get them and the washer and nut onto the mounting pin of the van.
Amazon.com: Energy Suspension 9.8147G Shock Bushing Set : Automotive
Buy Energy Suspension 9.8147G Shock Bushing Set: Shock Bushings - Amazon.com ✓ FREE DELIVERY possible on eligible purchases
smile.amazon.com
Also, the shocks don't come with nyloc nuts for the lower pin mounts, so the nut that comes with them can work itself off (ask me how I know
) unless you use Nylocs or use some blue loctite.Also, also, don't torque down the lower nuts very much as the lower pin can be broken during use if it's too tightly held. It needs room to move. Spin the nut on until you can see a couple threads protruding beyond the nut and leave it at that (remember the loctite.)
Be sure the shock body doesn't touch the van's frame. Space the upper shock mount off the frame using a washer or two.
Some useful threads which should be read thoroughly:
'Air adjustable rear shock absorbers (Monroe MA708)' https://delicaforum.com/index.php?threads/air-adjustable-rear-shock-absorbers-monroe-ma708.2418/
'Monroe Air Shocks- premature failure warning!' https://delicaforum.com/index.php?threads/monroe-air-shocks-premature-failure-warning.1004/
https://delicaforum.com/index.php?threads/monroe-ma708-air-shocks.3415/
Last edited:
Cshokunin
Active Member
This site is so amazing! I get this awesome reply within minutes of asking dumb questions. I've got a couple more, hopefully not dumb.The upper mount on the new shocks needs to be altered. The rubber bushing and central pivot axle thingy needs to be pressed out and new bushings installed in the hole by you or your mechanic.
I used these split bushings so I wouldn't have to press in new bushings. They work well, but because the top shock mounts are sorta short, it was a bit of a fight to get them and the washer and nut onto the mounting pin of the van.
Amazon.com: Energy Suspension 9.8147G Shock Bushing Set : Automotive
Buy Energy Suspension 9.8147G Shock Bushing Set: Shock Bushings - Amazon.com ✓ FREE DELIVERY possible on eligible purchasessmile.amazon.com
Also, the shocks don't come with nyloc nuts for the lower pin mounts, so the nut that comes with them can work itself off (ask me how I know
Also, also, don't torque down the lower nuts very much as the lower pin can be broken during use if it's too tightly held. It needs room to move. Spin the nut on until you can see a couple threads protruding beyond the nut and leave it at that (remember the loctite.)
Be sure the shock body doesn't touch the van's frame. Space the upper shock mount off the frame using a washer or two.
Some useful threads which should be read thoroughly:
'Air adjustable rear shock absorbers (Monroe MA708)' https://delicaforum.com/index.php?threads/air-adjustable-rear-shock-absorbers-monroe-ma708.2418/
'Monroe Air Shocks- premature failure warning!' https://delicaforum.com/index.php?threads/monroe-air-shocks-premature-failure-warning.1004/
https://delicaforum.com/index.php?threads/monroe-ma708-air-shocks.3415/
1) does the T need to be an equal distance between the shocks? I haven't seen that addressed in any of the threads.
2) i just saw a demo on utube showing how when one side depresses, like while cornering, the air gets pushed into the opposite side, causing it to raise. The presenter suggested this was a safety issue in cornering. I've never seen that issue rsised here. I was actually thinking that having the opposite side raise would help. Thoughts guys?
InstrumentOfPeace
Active Member
Energy Suspension bulk-2008 bulk-2008 | Energy Suspension Parts
Universal Bushings made by Energy Suspension | bulk-2008 bulk-2008.
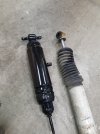
I used 4 of these then sliced them to fit half way each side of the upper. I liked these because of the beveling.
When mounted onto the frame, I have
steel washer/bushing/shock/bushing/steel washer/ nut. (No lock washerThe steel washers came from the original ones.
It was a super tight fit but 1) nut hasn’t even come close to moving 2) the shock hasn’t touch the frame as you can see in the photo how close it sits. (you’ll read about this somewhere in the forums)

1: The Tee can be anywhere that's convenient, no need for it to be centred or for the hoses to be equal lengths.This site is so amazing! I get this awesome reply within minutes of asking dumb questions. I've got a couple more, hopefully not dumb.
1) does the T need to be an equal distance between the shocks? I haven't seen that addressed in any of the threads.
2) i just saw a demo on utube showing how when one side depresses, like while cornering, the air gets pushed into the opposite side, causing it to raise. The presenter suggested this was a safety issue in cornering. I've never seen that issue rsised here. I was actually thinking that having the opposite side raise would help. Thoughts guys?
2: It's not something I've noticed, and I really throw my van around.
Sputnik
Well-Known Member
1. I have the T taped and ziptied on top of the rear sway bar, directly above the spare tire cage. I ran my hoses from the shocks to the T in the spaces between the frame and floor pan, where the floor pan is 'corrugated.'. Basically trying to keep the hoses as high and protected as possible so they don't get snagged as I drive over something.This site is so amazing! I get this awesome reply within minutes of asking dumb questions. I've got a couple more, hopefully not dumb.
1) does the T need to be an equal distance between the shocks? I haven't seen that addressed in any of the threads.
2) i just saw a demo on utube showing how when one side depresses, like while cornering, the air gets pushed into the opposite side, causing it to raise. The presenter suggested this was a safety issue in cornering. I've never seen that issue rsised here. I was actually thinking that having the opposite side raise would help. Thoughts guys?
2. If anything, the air shocks felt like they firmed up the ride and cornering.
Last edited:
The opposite side rises with any charged/sprung suspension... when weight shifts to one side it unloads the other side, which then extends. Doesn't matter if it's nitrogen charged shocks, coils, torsion bars, or leaf springs. But it will be a little worse because the one side isn't just unloading. I haven't really noticed it being an issue and I don't have the rear sway bar either.2) i just saw a demo on utube showing how when one side depresses, like while cornering, the air gets pushed into the opposite side, causing it to raise. The presenter suggested this was a safety issue in cornering.
No, in a corner the weight shifts to the outside (body rolls) and additional inside extension will just help it roll over.I was actually thinking that having the opposite side raise would help. Thoughts guys?
You could install a fill valve for each shock separately if you wanted. That would prevent any charge transfer, and it would allow leveling side to side if needed.
Last edited:
Cshokunin
Active Member
I bought the split bushings but found them a pain to install because the outside bushing kept popping out as I tried to press in onto the pin. Mind you, I lack the proper tools. I also put the extra washer in as everyone suggests but I still wanted to have a few threads showing so I'm really close to the frame (2-3mm). So that nut is right at the end and no issues?Energy Suspension bulk-2008 bulk-2008 | Energy Suspension Parts
Universal Bushings made by Energy Suspension | bulk-2008 bulk-2008.www.energysuspensionparts.com
I used 4 of these then sliced them to fit half way each side of the upper. I liked these because of the beveling.
When mounted onto the frame, I have
steel washer/bushing/shock/bushing/steel washer/ nut. (No lock washerThe steel washers came from the original ones.
It was a super tight fit but 1) nut hasn’t even come close to moving 2) the shock hasn’t touch the frame as you can see in the photo how close it sits. (you’ll read about this somewhere in the forums)
View attachment 11567
InstrumentOfPeace
Active Member
Not a single issue. I don’t believe the nut is even fully seatedI bought the split bushings but found them a pain to install because the outside bushing kept popping out as I tried to press in onto the pin. Mind you, I lack the proper tools. I also put the extra washer in as everyone suggests but I still wanted to have a few threads showing so I'm really close to the frame (2-3mm). So that nut is right at the end and no issues?
I’d guesstimate the amount of pressure is also acting as a lock wash would. I didn’t over tighten but well snug. (Original rusty nut)It’s been maybe 8k-10k miles and driven like I stole it at times. I take corners pretty hard when I do something like shocks to shake what’s loose loose. That nut hasn’t budged.
I’m maybe 4mm-5mm from the frame. I’ve left the shocks dusty just to check for rubbing when I’m under there, never once has the shock touched the frame.
Bushings: I recall hand pressing mine in after using a dab of oil on the outside. Also, a dab of oil on the inside as it was a tight fit.
Blue Loctite is ideal for nuts that have to be used without a lock washer, just as a bit of extra peace of mind.
Cshokunin
Active Member
That's why I left a few threads visible. But as I said above, that puts the shocks really close to the frame.Blue Loctite is ideal for nuts that have to be used without a lock washer, just as a bit of extra peace of mind.
Close is ok, just as long as the shock body isn't touching the frame. A couple of millimetres is plenty.That's why I left a few threads visible. But as I said above, that puts the shocks really close to the frame.
I drilled through the factory rubber bushing in a number of areas to weaken the rubber. Once the rubber was weakened, I used the shock absorber like a hammer on the end of a 2x4, whereby that factory bushing pin was the hammerhead. The factory bushing and it's pin came right out.Thanks. My neighbourhood garage pushed them out for $10.
Just to update; because I had broken one of my shocks, and had to buy a second set, I had an extra set of installation hardware. So I temporarily installed a fill valve for each shock and went for a drive. Having just driven some winding mountain roads yesterday, I am certain the van has notably less roll with the shocks isolated; it could be that the rate of roll is slower, or probably it's both. I think it's notable enough that I've decided I'm going to keep them isolated and permanently install the second fill valve (already done).
FWIW, the Monroe AK64 hose kit is for plumbing two shocks separately and includes two fill valves... it seems to be an add on kit and not an option at purchase from what I can find quickly.
FWIW, the Monroe AK64 hose kit is for plumbing two shocks separately and includes two fill valves... it seems to be an add on kit and not an option at purchase from what I can find quickly.
Cshokunin
Active Member
Wait a minute... did I actually contribute something useful to the forum?!Just to update; because I had broken one of my shocks, and had to buy a second set, I had an extra set of installation hardware. So I temporarily installed a fill valve for each shock and went for a drive. Having just driven some winding mountain roads yesterday, I am certain the van has notably less roll with the shocks isolated; it could be that the rate of roll is slower, or probably it's both. I think it's notable enough that I've decided I'm going to keep them isolated and permanently install the second fill valve (already done).
FWIW, the Monroe AK64 hose kit is for plumbing two shocks separately and includes two fill valves... it seems to be an add on kit and not an option at purchase from what I can find quickly.
Cshokunin
Active Member
I redid mine today so they're separate. Weird thing is, I still can't get the both sides to a equal height. One at 40 psi, the other at 80. Still about an inch difference.Just to update; because I had broken one of my shocks, and had to buy a second set, I had an extra set of installation hardware. So I temporarily installed a fill valve for each shock and went for a drive. Having just driven some winding mountain roads yesterday, I am certain the van has notably less roll with the shocks isolated; it could be that the rate of roll is slower, or probably it's both. I think it's notable enough that I've decided I'm going to keep them isolated and permanently install the second fill valve (already done).
FWIW, the Monroe AK64 hose kit is for plumbing two shocks separately and includes two fill valves... it seems to be an add on kit and not an option at purchase from what I can find quickly.
That is weird; and somewhat concerning IMO... do you have a rear sway bar?I redid mine today so they're separate. Weird thing is, I still can't get the both sides to a equal height. One at 40 psi, the other at 80. Still about an inch difference.
Sputnik
Well-Known Member
I'm wondering if one of the leaf spring shackles or shock mounting points is bent, or maybe a crushed or missing bushing might account for the difference?I redid mine today so they're separate. Still about an inch difference.