You are using an out of date browser. It may not display this or other websites correctly.
You should upgrade or use an alternative browser.
You should upgrade or use an alternative browser.
Question on D4BF Swap
- Thread starter Shaldridge
- Start date
Shaldridge
Active Member
So a new problem has come up. Turns out my accelerator arm (?) and idle screw bracket are way different than the ones in @Growlerbearnz how to. The way the D4BF is configured won't allow my old stuff to work. My idle screw bracket has a rise in it, since it was originally attached on the bottom. When the arm goes on, it drops bellow the idle screw. Even if it didn't drop below the idle screw when seated, I'd have to bottom out the idle screw/fully extend it for it work. Am I missing something?


Last edited:
Can you share photos of the mounting points on the new and old IPs? The height difference makes sense, but I've not seen an IP with the mounting holes further back (or forward).
You might need to hammer the bracket flat (remove that upwards kink) and drill new holes.
You might need to hammer the bracket flat (remove that upwards kink) and drill new holes.
Shaldridge
Active Member
So on the old IP the the bracket attached to the bottom. And with that the arm lines up on the old IP. But on the new one the only option is top mount on top because that line there won't allow bottom mounting (last pic doesn't show it, the bracket isn't level). The holes are the same distance, size (though the old ones were threaded)


Can you share photos of the mounting points on the new and old IPs? The height difference makes sense, but I've not seen an IP with the mounting holes further back (or forward).
You might need to hammer the bracket flat (remove that upwards kink) and drill new holes.
Shaldridge
Active Member
The other problem that arises, even if I were to mod the idle screw bracket, it seems the cable attach loop would still prevent it from seating down far enough to meet the spline bit.Can you share photos of the mounting points on the new and old IPs? The height difference makes sense, but I've not seen an IP with the mounting holes further back (or forward).
You might need to hammer the bracket flat (remove that upwards kink) and drill new holes.

Oh that's frustrating. It looks like the fuel inlet is the problem, it sits much higher than the one on the old IP. Would rotating the fuel line forwards give you more room? Can you use the fuel line from your old IP?
Shaldridge
Active Member
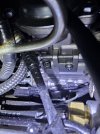
Yeah, essentially the new fuel line needs to be lower (moving it forward or back wouldn't make a difference) the old one sat more flush. it's that middle bit on the new one I need gone. And I'm honestly unsure if that's an "ok thing to do" Like does it screw up things if I remove that spacer (or what I assume is a spacer) (circled in pic)Oh that's frustrating. It looks like the fuel inlet is the problem, it sits much higher than the one on the old IP. Would rotating the fuel line forwards give you more room? Can you use the fuel line from your old IP?

 . as you
Fdlplyr32
Active Member
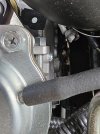
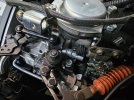
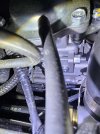
I'm trying to understand your issue, here are some photos of my installation. I did not use the two holes, which didn't have threads, to mount. I didn't have clearance issues. I didn't have to hack or modify anything.
Attachments
Fdlplyr32
Active Member
I think the point here is I chose NOT to use the original Mitsubishi idle screw and bracket and instead just used the Hyundai OEM. Yes, it is harder to reach, but I have not had to make any adjustments since the installation.I'm trying to understand your issue, here are some photos of my installation. I did not use the two holes, which didn't have threads, to mount. I didn't have clearance issues. I didn't have to hack or modify anything.
Shaldridge
Active Member
I'm trying to use the the idle screw from the 4D56, but it mounts from underneath, which without tapping the holes on the new IP can't be done without some nuts, but with the nuts sitting on top the accelerator linkage sits to high. And if I try to mount the screw bracket on top, same issue plus others.I'm trying to understand your issue, here are some photos of my installation. I did not use the two holes, which didn't have threads, to mount. I didn't have clearance issues. I didn't have to hack or modify anything.
Unfortunately, I backed of the new idle screw so I have no idea where it sat factory fresh. If I had known I could use the new screw (when I posted yesterday), I wouldn't have backed it off.
Fdlplyr32
Active Member
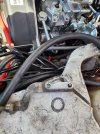
I guess thread counting is easiest...Maybe I can find a measurement for you on my factory setting?
Attachments
Shaldridge
Active Member
Fdlplyr32
Active Member
I forgot to mention, I didn't have to make any adjustment at all when reassembling, to the Hyundai adjustment. When I inserted the arm on the new shaft/splines it lined up perfectly with the oem adjustment. The odd of that seem small. Actually when I compared the old IP shaft position to the new they were in the same place exactly, at idle.I'm assuming that you pulled the arm sleight up and off the shaft? Is that scratch mark your alignment mark you made before removing?
Shaldridge
Active Member
Naw. That scratch is just a scratch. Maybe from previous owner. You pulled it straight up. Spline is sitting where it was originally 
Fdlplyr32
Active Member
I pulled it straight up when removing and put it straight down when inserting in the new IP. I observed that both IP had the same setting, the shaft position was exactly the same. The painted line on the shaft was definitely aligned the same. I inserted the new arm on the shaft and it seated on the splines and the arm hit the stop, top, of the idle adjustment screw.
Fdlplyr32
Active Member
Do you have access to the old IP for a visual comparison? If the old was left at idle when removing the arm you may be able to see something.I pulled it straight up when removing and put it straight down when inserting in the new IP. I observed that both IP had the same setting, the shaft position was exactly the same. The painted line on the shaft was definitely aligned the same. I inserted the new arm on the shaft and it seated on the splines and the arm hit the stop, top, of the idle adjustment screw.
Shaldridge
Active Member
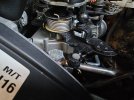
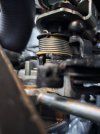
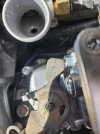
Besides the position shown in pic 1, the only other position (that isn't radically off) is with the idle screw backed all the way off. I'm going to assume the position shown is correct, since the notch in the spindle directly aligns with the factory notch in the arm. And if memory serves my idle screw always sat a little more out than the spec 8mm. The second pic is where the underneath "arm" sits in relation to the vacuum actuator (?) arm. Is that too far off? I know the actuator can be adjusted forward/backwards. Is the gap too big? Should I more the actuator back some?
I have tried to get it to index in other positions to no avail. Why is beyond me, though I have noticed the positions it'll index to more or less line up with the factory notches on the arm.
I guess the big questions is...Am I good here as long as that spindle is sitting where it sat from the factory?
(should add I understand how all this should work, it just ain't working that way for me)
Fdlplyr32
Active Member
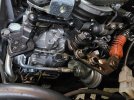
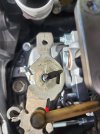
In my opinion you are good, if the idle setting on the spindle is the same as factory. Weird that both the idle setting and the A/C idle diaphragm arm are both different from what I have.
For the diaphragm arm, at idle when my A/C kicks in it draws back and pulls the throttle bringing up the idle speed. You can see there is a gap which is different from yours. When activated it pulls the throttle back about 1/4 inch. I'm sure there is a service manual setting which I ignored. The effect is an rpm increase.
Of course, there are a ton of people here with more knowledge, I just know what worked for me. If I can measure something or more pics will help let me know.