You are using an out of date browser. It may not display this or other websites correctly.
You should upgrade or use an alternative browser.
You should upgrade or use an alternative browser.
What Did You Do for Your Van Today?
- Thread starter feetforbrains
- Start date

active.world
Active Member
Where did you find this Single Din radio 3D print file? Would you mind sharing it?My LHD conversion 1993 Starwagon is still in the mechanics have some more work done, list so far is:
This adds to the already installed LED blubs, new radiator, hoses and fan, new brakes (discs, pads, etc. all round), new ac condenser fan motors, new idle up adjustor, new coolant temp sensor and associated parts. Had single DIN radio bracket printed as have doubt DIN radio installed on top of the Dash.
- New KYB front shocks - Premium level as unable to easily and quickly obtain Bilstein's, etc. here in Manila.
- Complete / all ball joints in the front end as many rubbers had perished
- Dash removed, cleaned, and ac evaporator cleaned plus found a previous owner had bypassed the ac relay which had blown, so relay replaced and wiring repaired
- Wheel bearings front replaced.
- Wiring tided up under dash and around battery area.
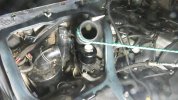
- EGR system including inlet manifold plus turbo removed and being cleaned (soot/carbon build up being removed)
- Adding insulation under the engine covers in an effort to prevent heat transfer into the cabin
- Brake master cylinder being overhauled.
Future, install (on order) sliding mechanism on the passenger seat (noting that with my LHD conversion, the seat slider was moved to the LHS driver seat (battery side) over the large engine cover resulting in a real pain to remove the right hand front passenger seat when accessing engine. Need to replace the rear ac fan switch (on order).
Aiming to edit the 3D print file for the single DIN bracket so I can have a lower pocket OEM style with the top horizontal half blanked off as a future location for additional rocker switches for lights and remote head two way radio. Printed in 3D the heater switch panel but undecided if I will insert USB outlets or rocker switches in them for installing next to the power window switches. May have to replace the rear suspension in the future as the rear leaf springs look flat.
With future camping and touring in mind, looking to have curtains made for the rear and sides, not sure if I should have black out lining or just dark color to block/reduce the light. Purchased a high pressure washer which works great underneath and in the engine bay - need to use a few more times to remove built up road grime from past 30 years.
Spent way more than I thought I would on this project but worth the enjoyment when on the and off the road.
jayramble
Member
Check under this post - towards the bottom -Where did you find this Single Din radio 3D print file? Would you mind sharing it?
Post in thread 'Single din radio trim'
https://delicaforum.com/index.php?threads/single-din-radio-trim.5319/post-43446
greendel
Active Member
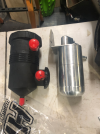
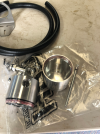
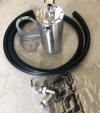
Finally got around to fitting a catch can. Originally bought a ProVent clone off ebay and wasn't happy with the clunkyness of the thing, so didn't get around to installing it. I was helping my son work on his Landrover recently and noticed a shiny aluminium catch can he'd fitted. It's made by a local Adelaide company: High Performance Diesel (hpdiesel.com.au) so I went and bought one. I installed it on the firewall in the air filter box compartment. Just needed to make up a couple of 12mm alloy tubes to redirect the connections and happy with the result. HPD supplied 12mm unions for the can, so no need for messing about stepping down hose connections.
Attachments


Delicatessan
Well-Known Member
put in this new center console. 
Pedro.huerta
Member
That is nice! When did you get it from?
Newdeli
Active Member
That’s cool ! and i still could use cup holdersput in this new center console. View attachment 23686
Delicatessan
Well-Known Member
13
Wish it had a RHD orientation. And if you don’t have mirror switches, you’ll have a hole to fill. I’m working on that.
1303ftmc on Instagram.That is nice! When did you get it from?
Wish it had a RHD orientation. And if you don’t have mirror switches, you’ll have a hole to fill. I’m working on that.
speedyquest
Well-Known Member
A few days ago I started designing and building a 270 degree awning for the van. It's coming along but there are still some details to finish up.


active.world
Active Member
I carefully used a razorblade to remove a lot of pilling on the carpets over and around the engine hump, and then gave it a thorough vacuuming. Honestly made a really big difference on the appearance and almost feels "new" again. Could use a nice shampooing, but I'm not going that far — yet.
active.world
Active Member
Also in the past couple weeks: I won a Jaos rear ladder in Japanese auction about two months back and it finally arrived and is now on the van  I think I've only seen this same ladder on @InstrumentOfPeace van.

I think I've only seen this same ladder on @InstrumentOfPeace van.Dang! I have a OEM padded center console that matches your van (color/fabric)... I would have converted it to cup holders for you for a lot less $$.put in this new center console.


Delicatessan
Well-Known Member
That looks awesome. How does your process work?Dang! I have a OEM padded center console that matches your van (color/fabric)... I would have converted it to cup holders for you for a lot less $$.
View attachment 23786
I'm modifying one for Pavioml soon (waiting on supplies)...That looks awesome. How does your process work?
I think I'll be able to make the cup holders/switch panel a pretty easy DIY modification.
Evil_MJ
New Member
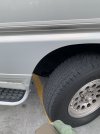
Well, it wasn't today, but I just now found the thread! lol Since getting the Super Exceed about a month ago, we've changed all fluids, installed new 235/75R15 Goodyear ATs, New Bilstein fronts and Gabriel rear air shocks, Tahoe cup holder in console, a new hitch from Xplormor, a J CHAN rising sun license plate and a cling of Jackie Chan on the side window!! lol Plus we drove it to Florida and back.
delikilpat
Member
We are in almost the exact same step of the overhaul, except I decided to try a different tire.Well, it wasn't today, but I just now found the thread! lol Since getting the Super Exceed about a month ago, we've changed all fluids, installed new 235/75R15 Goodyear ATs, New Bilstein fronts and Gabriel rear air shocks, Tahoe cup holder in console, a new hitch from Xplormor, a J CHAN rising sun license plate and a cling of Jackie Chan on the side window!! lol Plus we drove it to Florida and back.
Also I might have to steal the J Chan sticker that’s on point.
SaulGoodman
Member
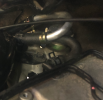
Spent the weekend chasing a belt squeal and redoing the valve cover gasket. I really underestimated how precise the gasket and half-moon have to be. After my second try, no more leak! Seam looks a bit "moist" but I am calling it a success. Time to clean up the old sludge!
delikilpat
Member
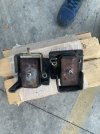
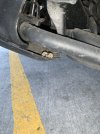
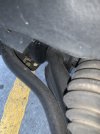
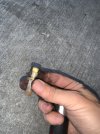
Ratcheting crescent wrench + ample number of swear words = successful engine mount removal.
Also found a mystery bolt hanging out in the front skid plate. 14mm wrench (M14?) size. It doesn’t go to the motor mounts…. I welcome any insights to its origin…
Also found a mystery bolt hanging out in the front skid plate. 14mm wrench (M14?) size. It doesn’t go to the motor mounts…. I welcome any insights to its origin…