Snorkel Install

Kellyn

Forum Administrator
Staff member
Here are some pictures of the FTS Snorkel Kit for the Delica. Here is the link to purchase the snorkel: http://www.fts4x4.com/en/products/?method=detail&aid=65

This hole saw kit was purchased from Northern Tool for next to nothing. I think I ended up using the largest size
20160913_144121.jpg

Behold, the FTS Snorkel. This is a high quality piece. It comes with EVERYTHING needed to install, minus the hole saw kit. I was very impressed with the quality.
20160913_144127.jpg

You may or may not be able to see the designated hole location here
20160913_144115.jpg

I couldn't bring myself to cutting the hole in my baby so my contractor friend happily filled in the position
20160913_144803.jpg

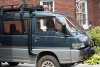
After what seemed like an eternity, the snorkel was fitted.
20160914_125114.jpg
 
Last edited:
Do you notice any better performance (minor I know) due to fresher air coming in from above rather than from down low?
 
@kellyn I just bought the same snorkel kit. Anything tricky I need to know about the install? The flex hose seems pretty long...did you need to cut it at all or did you use the whole length of it?
 
@kellyn I just bought the same snorkel kit. Anything tricky I need to know about the install? The flex hose seems pretty long...did you need to cut it at all or did you use the whole length of it?

I used the entire length of hose and snaked it back into the intake inlet. I saw a post a while back where someone modified the filter housing by changing the location of the inlet, making the overall install cleaner. But that seems like a lot of work, especially since you can getting it working properly as is.

Make sure you have a bit extension on the drill because you are drilling through two panels. If you look from underneath you'll see what I'm talking about. That's the hardest part. That and not cutting yourself on the freshly sharpened body panel. Haha

K
 
I was really going for that textbook safari look and the flush mount doesn't look very tough. Haha
 
I bet it works great, more importantly looks awesome!! Hahaaa

I saw a good DIY snorkel project on the Mitsubishi l300 offroad Facebook group, looks nearly identical when finished with $40 in supplies, I'd post a link but I don't have an FB account, used a friends.

Kellyn would you mind snapping a shot of the air box and snorkel fit to your van? I have a petrol wondering how it's different and if the kit would work on mine. Maybe a stupid question, I guess the hoses will likely be the same but not the filter and box?
 
I have never seen under the hood of a petrol version. I would assume that the airbox is in the same spot, petrol or not. Do you have a cylindrical air box under behind the driver's side under neath the van?
 
Right same location, different filters and housing from what I can tell. Should be straight forward, I'm overthinking it.
 
Yeah. You still have to drill a huge hole into the side of your van. It's tough, believe me. I ended up giving that job to a friend because it just killed me inside to do it myself.

K
 
Waiting for my FTS Snorkel to be delivered today. Does it come with an install instruction guide.

Thanks,

Brian
 
It seems relatively straight forward though. Looking to do mine in the next few weeks, and will document the process. It will be for the panel style, not the one Kellyn's got. (FTS sells two types of snorkels).
 
Bwahahaha!
It comes with a template, but no instructions on how to place it. What I did was cut the hole in the template and put it on the snorkel so the outline matches up; make note of/mark where the "step" on the snorkel is (I folded/creased the template to match)... this has to fit into the groove on the body. Then tape the template onto the vehicle so that the step is in the groove.
This leaves you w/o a center point/mark for drilling the hole in the template, so you then have to estimate or find another way to measure the center (dowel center finder, hole saw with guide bit removed, etc). Do NOT make the hole too small... better to be a little oversized (compared to the tubing ridges). I needed to use a drill bit extension shaft and a longer guide bit as well.

I then attached the brackets to the snorkel, removed the adhesive tape coverings and placed the snorkel against the body making sure the tape sticks well. Then unbolt the brackets leaving them in place to mark/drill.

Oh, and make sure to remove/relocate the controller and wiring that is in there before drilling!
 
Last edited:
got it. Is the air intake under the driver seat. Can I attached the line W/O removing the driver seat?
 
Yeah, the template is a piece of paper with a circle on it LOL.

Thanks for the tips @sk66 - I don't think I've seen a photo of your snorkel? Let's see it!
 
Here you go.
I used SS screws to attach the cap, the "hose clamp" wasn't very secure at all.
 

Attachments

  • _DSC4985.jpg
    _DSC4985.jpg
    4.6 MB · Views: 272
Nice - looks good! It looks like there's a notch cut out so the snorkel can fit flush over the side trim? On mine (the panel style), I'm going to have to cut a piece of the trim off.
 
Top