Tutorial: EGR and Boost Gauge Install

Kellyn

Forum Administrator
Staff member
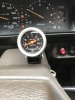
This tutorial was originally for a PLX multigauge unit, a product I no longer condone. However, the install procedure is the same for all of these instruments. Here's my write up:

Step One. Remove the damn seat panel for the 150th time.


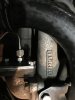
Step Two. Locate your EGT Sensor Probe install location.... Do you have an EGR Bypass?!?! BOOM!


Step Three. Remove your EGR Bypass plate and start drilling. It tells you what size bit to use.


Step Four. Tap that ass


Step Five. Install EGT Probe as far as you can into the plate.


Step Six. Install the plate and sensor probe back on the manifold.


Step Seven. Locate Power and Ground for your Sensor Modules. I choose the 12V Ignition-Switched Solenoid on the back of the firewall for power. The sensor modules collectively draw under 5 amps so stealing power from here shouldn't be a problem. If you had a Wideband Module I would NOT recommend using this power source. Find a stronger power source as wideband sensors suck up some juice. For the ground I made a ring terminal connector directly to the negative terminal


Step Eight. Did you buy the Boost Sensor Module? Obtain a vacuum tee and tap into the feed running into the top of the injection pump. This comes directly from the turbocharger compressor housing.


Step Nine. Run the vacuum, EGT Probe wires through the small opening near the back of the firewall entering the battery well. Zip tie everything onto the main harness that runs into there.

Step Ten. PROFIT. All done!


Last edited:
Impressive write up. Inspired me to take it on.

I chose to go with the PLC devices option as well. Though significantly more expensive than other options the quality of the product and its performance made it worth the money for me. I estimate that total (including zip ties, extension cables etc.) I spent around $300-$325.

The one difference I did was I installed the PLC Devices DM-6 Multiguage. I chose this option because on longer trips, I did not want to be limited by my cell phone battery.

In making this change you need to consider two things. The DM-6 pulls power and data from the sensor modules. This is done through two cables that come with the unit. Each 6ft. long. Putting the sensor modules in the battery box area makes sense, especially if you did a single Odyssey Battery swap like I have done (leaving lots of space). The 6 ft. cables that came with the DM-6 were just not long enough, no matter how you routed them. The good news is the fix is easy. You can splice into the power cable and the data cable is a simple headphone extension cable. I routed mine down the steering column, out the floorboard where the other cables go, along the frame etc. to to below the fuel filter and then up and into the battery area and sensors. This takes about 13ft of cable.

The second thing you need to do is install the 8v converter that comes with the kit. Its easy to do but no where is it clearly stated that you need to do it. If you don't stuff won't work, if you do it works great.

I mounted this on the flat area of the steering column just behind the wheel. Fits good there, looks good and having one guage monitor up to 6 things is a nice clean way to it done.

Thanks again for the inspirational write up.

Thanks for the update! I'm glad you got it sorted. Now that I installed everything I wish I would have installed the gauge. I'm regretting the cell phone only option. Their software is so rustically compiled that it inhibits the functionality to an extent. .
 
Here is a pic of the final product. You may also notice just below the wiper switch I installed an Engine Watchdog. Monitors block and transmission temps. Handy.IMG_0080.JPG
 
Here is a pic of the final product. You may also notice just below the wiper switch I installed an Engine Watchdog. Monitors block and transmission temps. Handy.View attachment 48

That looks great. Less intrusive than I was expecting. I should have done a physical gauge. Well, it's not too late.
 
That looks nice. So is that gauge wired to the sensors, or WiFi connected? I'm about to finally install mine. The sensor probe on mine is long with a 90 bend to where it mounts. I guess I didn't think about the size of the probe and the available space at the EGR blanking plate location. D'oh! Oh well, if it doesn't fit the 7.3 idi needed one too.
 
Mine is hard wired.

There is plenty of space at the EGR blanking location to mount almost any size sensor.
 
That's good to know. I'll see how I feel about it when i get in there. I'm slightly confused about how to get power to it. Where to pull the power from. I've got some reading to do.
 
upload_2017-4-19_15-17-48.png

This is a good place to get it. Looking in from the driver side back toward the battery compartment wall. I combined both power and ground wires together and hooked the hot as shown and the ground directly to the battery.

You can run the wires to the guage two ways. Inside, sloppy, or under. Pull up the drivers mat and behind the footrest is a grommet leading out of the car. Take off the bash plate and pull the grommet down. This will give you the space needed to either punch an additional hole in it or expand/stretch it. Then run the cables along the frame/etc. (zip tie them) until you get under the fuel filter. From there go up and into the battery compartment.

As mentioned you need to get a 12ft. headphone extension cable and you will need to add about 6-8 feet of cable onto the guage power that plugs into the back of you PLX Device module.
 
I didn't buy the PLX pyro, although it looks very nice. I've decided to install the one I bought on the 7.3IDI and wait to do the pyro and boost together for the Deli. I'll use the first install as practice. I'd rather make a mistake on the old Ford than on the old Deli.
 
does your trans temp gauge use an elect sensor or a manual inline? If elect where did you install the sensor and do you know if it is the standard 1/8th NPT thread?
 
The trans temp is from a sensor that is attached to a trans bolt. I attached it to the bolts that hold on the solenoid that controls shifting. So I measures the temp of the unit, not necessarily the fluid.

This has worked out ok, but I think if I had done the EGR and boost gauge first I would not have bothered with this. If you keep you EGR temps in line you will not really have other issues, unless you are towing I suppose
 
Curious how you're (@kellyn @TomBoyd) liking the PLX devices and what temps you're showing/monitoring for on the EGT? Also, since the probe is mounted in the EGR blank does this mean it's pre-turbo? Thanks for the post!
 
I drive to keep the EGT below 1000. Basically I have found that cruising at 60-65 on the flats is fine. As the grade increases so do the EGT's, so I just back off at around 900.

If you don't have a guage I would just advise you drive with common sense. The further you put your foot into it, the hotter they get, quickly. I have found that on anything but a slight uphill grade you just need to back off.

The PLX stuff is great. If you decide to make the investment, get the guage as well. I think Kellyn has come the the conclusion that that is a better option (vs the phone app).
 
What temps are you seeing with the probe on the EGR blanket? I just installed one over the weekend. Test drove it, and seeing temps just above 200 degrees. Just made a short run to the store.
 

Attachments

  • AF093C9A-5E34-43A9-B7BB-F02AE57667DC.jpeg
    AF093C9A-5E34-43A9-B7BB-F02AE57667DC.jpeg
    1.2 MB · Views: 160
  • E376F6A4-5F73-4409-AAE6-536F363C225E.jpeg
    E376F6A4-5F73-4409-AAE6-536F363C225E.jpeg
    1.3 MB · Views: 153
I installed an Auber Instruments round EGT gauge a few months ago, replacing the indoor/outdoor temp gauge in the altimeter/inclinometer pod. I have an alarm set on my EGT gauge that sets off a piercing buzzer at 1200 degrees, which has definitely come in hand as a reminder to pay attention. I installed the probe in the EGR blanking plate as Kellyn suggested. In terms of EGT readings I see the following, please note I haven't been in any hot temperatures since I've installed...

Temps are in fahrenheit
Starting Idle: ~220-300, maybe lower on a cold morning
City Driving: ~400-900, usually the higher end is on acceleration up some of our steep Seattle city hills
Highway Driving Flat: ~650-1000 depending on hills, etc. at about 100-120 kph
Mountain Passes: ~1000-1200; When going over Stevens Pass, or Snoqualmie Pass I generally turn off the Overdrive and cruise at about 80 kph with my RPMs around 3000 and keeping an eye on the EGT and temperature gauges.

Curious what other people set as their limit on temp reading when mounted to the blanking plate?

IMG_4900.JPG
 
Last edited:
What temps are you seeing with the probe on the EGR blanket? I just installed one over the weekend. Test drove it, and seeing temps just above 200 degrees. Just made a short run to the store.

Oh, thats a great spot to mount that gauge. Like that alarm feature too. I'll take a small trip tomorrow and see what readings I'm getting. Let the bus warm up for 5 minutes and headed to work. Didn't see it go over 200 degrees. It was about 60 degrees outside and my commute is about a mile. I'll give an update tomorrow night.
 
I installed an Auber Instruments round EGT gauge a few months ago, replacing the indoor/outdoor temp gauge in the altimeter/inclinometer pod. I have an alarm set on my EGT gauge that sets off a piercing buzzer at 1200 degrees, which has definitely come in hand as a reminder to pay attention. I installed the probe in the EGR blanking plate as Kellyn suggested. In terms of EGT readings I see the following, please note I haven't been in any hot temperatures since I've installed...

Temps are in fahrenheit
Starting Idle: ~220-300, maybe lower on a cold morning
City Driving: ~400-900, usually the higher end is on acceleration up some of our steep Seattle city hills
Highway Driving Flat: ~650-1000 depending on hills, etc. at about 100-120 kph
Mountain Passes: ~1000-1200; When going over Stevens Pass, or Snoqualmie Pass I generally turn off the Overdrive and cruise at about 80 kph with my RPMs around 3000 and keeping an eye on the EGT and temperature gauges.

Curious what other people set as their limit on temp reading when mounted to the blanking plate?

View attachment 536
damn, love that placement. Having a real simple digital EGT LED readout installed, but as time goes on, might be looking for a nice place for a Boost gauge, and that far right spot where the inside/outside temps are might just be the right place.
 
Top