Wet floor fix...

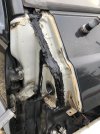
I found this thread because it was raining hard this morning. I'm a new owner, so I had been waiting for my first real rain to see where my leaks were. The first one I noticed was a very slow, but obvious leak near the drivers side hand hold. Then I realized I had some water on the passenger side floor.

I'm not sure I understand how the gutters would cause a leak...but in my eyes and logic, it looks like the rain gutter directs the water to flow right over the corner of the wind shield seal. How would the gutter cause a leak, and not the fact that the water is pouring right out of the gutter onto the wind shield screen ?

I should mention, I bought the car with a cracked windshield so I had that replaced. The guys at the glass shop let me watch and ask questions the whole time they replaced the wind shield. They reused the old seal since they didn't know how to source a new one, and I hadn't realized I should have gotten one in advance.

They asked me if I wanted them to use sealant under the seal, but I said no because the old wind shield seal was in pretty good shape (didn't want to have a mess of cutting out the old sealant in case the wind shield needs to be changed again in the future). Figured, I can always add the sealant later (which they said they would do for me if it leaked).

So I'm guessing I should head back over to those guys and have them take out the wind shield again and add sealant ?

I also plan on chasing down all these know leak points mentioned earlier and sealing them up as well.

Wish me luck and let me know any extra tips you guys have...I'm not excited about this.
 
The gutters can cause a leak, the sealant cracks in the corner where they meet the windscreen: https://delicaforum.com/index.php?threads/wet-front-carpets-footwell-leaks.713/#post-4755

I'd use sealant under the windscreen. There's a FAQ here with pictures and diagrams and all but the TL;DR: is
-No need to remove the windscreen to add sealant, just clean under the rubber with a rag.
-Insist on 3M 08509 sealant: these vans move about a lot and anything else will harden/cure, split, and start leaking again.
-Mask the joint before applying sealant to make cleanup easier and the seam tidy

I did see that picture of the gutter meeting the windscreen, but couldn't see what was abnormal or incorrect in the shot. I actually ordered a new seal to have put in because Steven Lee from Rising Sun Auto suggested that injecting sealant under the windscreen seal will help only just temporarily. A new seal was the best solution he said. Do you agree ?
 
A new seal is strongly recommended, but even a new seal might not be 100% watertight if the metal frame isn't factory-perfect. It needs to be completely clean and have no scratches, rough spots in the paint, or rust.

So yes, install a new seal first and see how you go. If needed you can add sealant later without removing the windscreen.

Sealant will cure leaks permanently if it's the right stuff (the 3M product specified above). Anything that cures or hardens (silicone, urethane, spackle) will eventually start leaking again.

Understood. The frame looked in pretty good shape to me the first time they took the windscreen out. I actually was the one who got in there and cleaned it real good. I'll make sure to do that again and double check for any imperfections, rust, etc.

Really appreciate your help @Growlerbearnz, thank you.
 
So while I was at the auto glass shop getting my new windscreen seal installed I took a little video of the rain gutter on the drivers side...

 
For future reference and in case it helps others (this is an awful problem!) -

In addition to all of the "usual suspects" places for potential leaks into the footwell, here's a +1 that I haven't seen mentioned.

After checking all of the places mentioned above, AND re-sealing the seal in the "cheek", I was still having water come in to the footwell on the passenger (right hand drvie, so left) side of the van.
Originally I thought it was the sealant around the plastic air inlet for the aircon/blower, which I had taken off and replaced a while back. Resealed this, still leaking.

Turns out in my case, the rubber grommet for the door electrics wiring, that sits just below the "seal of doom" behind the "cheek", was letting water in! I guess this may have been my own fault as I had taken out and replaced the grommet a while back (removing and replacing the door). I think some of the rain water that would drain down along the usual "seam" would run down along that grommet, making an efficient path into the footwell.
Anyway, a good dose of gasket maker all around and inside the lips of the grommet, seems to have stopped my leaks.
For now.
 
Just an update because I didn't see it mentioned anywhere in this thread and I did my driver's side "cheek" today...

To access that screw that is above the headlight and leaves almost no room to attack it...just remove the head light. It's two 10mm bolts on the side, and one in front under the headlight and deep back there. Use a light to get your eyes on it. Once you take the head light out you have plenty of room to unscrew or drill out the old screw.
 
To add a little more to the leaky boat thread...

I was doing my EGR delete today (finally! Been on the "to do" list for a while) and at the same time adding an EGT sensor to the lower blocking plate. I wanted to run the wire from the sensor, by the air filter canister, under the trap door held down by the wingnut bolt, out from under the drivers seat, under the carpet (in my case some vinyl/waterproof flooring by the PO) and to the dashboard.

I started lifting the vinyl flooring to give some slack and make it easier to snake the wire underneath, but when I did I noticed some moisture under the flooring (it rained a lot for 2 days, 2 days ago). So I decided to entirely pull up the flooring to get a look at things down there, and boy am I glad I did ! I found a wide open hole under the foot rest that would otherwise be the clutch pedal on a manual transmission.

What was supposed to be an hour working on the car turned into a few more and me pulling the entire flooring up from the front cabin, grinding and wire wheeling any rust I found, corrosealing it, and preping to seal up the hole. Ran out of sun, damn daylight savings, but will pick up again tomorrow.

Wish I could weld, but I can't. How should I seal this hole up ? Its a tough one because the floor is irregularly shaped. If you made the letter "C" with your hand...the hole is about that big. I was thinking a mesh layer and bondo ? Or Fiberglass and resin ?
 
If you can't weld it up, a patch of galvanized steel riveted in place with seam sealer is your best bet IMO.

I ended up using 3 layers of 4oz fiberglass and resin since I know and feel confident with that medium. I need to get a rivet gun eventually, but in addition to not having one, I didn't trust myself to be able to make the sheet metal sit nicely over the hole. There were just too many bends , curves , and dynamics to that part of the floor.

As a general update, removing the cheeks on both sides and re-sealing eliminated a great deal of water inside for me, but I still have one tiny little stream of water coming from behind the AirCon box (I think that's the AC?). Don't believe it's coming from the drain hose, seems to be coming from behind.

leaky.jpg

Did I not do a good enough of a sealing job under the cheek ?
 
-Insist on 3M 08509 sealant: these vans move about a lot and anything else will harden/cure, split, and start leaking again.
Is this the same sealant you would recommend across all of the other leaky areas as well?

Also, any tips on reaching the windshield sprayer nozzle on the passenger side without removing the dash? Seems the AC is in the way / i could not figure out a way to get my arm up there behind it to access the clip like i could on the drivers side. Got the drivers side fixed, so for now I just have one single, slightly wobbly sprayer.
 
Also, any tips on reaching the windshield sprayer nozzle on the passenger side without removing the dash? Seems the AC is in the way / i could not figure out a way to get my arm up there behind it to access the clip like i could on the drivers side. Got the drivers side fixed, so for now I just have one single, slightly wobbly sprayer.
Trying to remember which side I got in without removing the dash. I thought I got the passenger side clipped in and had to remove the dash to get the drivers in. o_O I could be mistaken though.

Find the lankiest person you know and have them snake their arm up in that thing.
 
Is this the same sealant you would recommend across all of the other leaky areas as well?

Also, any tips on reaching the windshield sprayer nozzle on the passenger side without removing the dash? Seems the AC is in the way / i could not figure out a way to get my arm up there behind it to access the clip like i could on the drivers side. Got the drivers side fixed, so for now I just have one single, slightly wobbly sprayer.
3M 08509 is only for sealing rubber to painted steel (windscreen seals, basically). For the other leaky areas (cheek seams, gutters, etc) use a Urethane adhesive sealer.

From memory I removed the glove box and could access the sprayer clip from there. Not easily though, I recall bleeding. Lots of bleeding.
 
Trying to remember which side I got in without removing the dash. I thought I got the passenger side clipped in and had to remove the dash to get the drivers in. o_O I could be mistaken though.

Find the lankiest person you know and have them snake their arm up in that thing.

So driver side is easy enough (you can see it from the floor behind the steering column), just need to turn into a pretzel so you can actually get your arm up there. Passenger side was difficult and mostly blind, but i was able to reach it finally after removing the radio and the soft plastic J shaped AC pipe that is right behind it. Still sliced up my fingers a little bit, but did not need to remove the dash and was able to get my sprayers nice and tight again.
 
I’ve got some rust on my floor so this job is on my horizon. JIS screws! Who knew? I learn something new here everyday.
 
You have to love caring for an antique. After some heavy rains the last few days, I pulled my carpets back as a preventative check. I am glad I did. The dreaded wet floors. Most of the moisture (on both sides) was concentrated in the innermost corner.

IMG-7761.jpgIMG-7765.jpg

I had never noticed as the mats were bone dry and the carpets were also dry to the touch. All the moisture was under the rubber barrier. My first question: Is this typical of a cheek seam leak? If so, where should I see signs of leakage? The front of the vehicle seems fairly dry.

IMG-7742 (1).jpg

Second, how should I treat the existing rust build-up? I plan on using the TP test over the next couple of days to track down the leak, but in the meantime, I would like to treat the existing damage. And lastly, it appears that one of the plastic fasteners for the plastic footrest was broken. Does the average automotive push fastener work? Thanks in advance for the help!

IMG-7768.jpg
 
Thanks for the this post really useful! I had wet floors both sides.. Those screws were a nightmare but used a dmaxo screw extractor set and filled with some tiger seal cheers
 

Attachments

  • IMG_3873.jpeg
    IMG_3873.jpeg
    181.6 KB · Views: 23
Finally getting around to sealing my van's front corner panel "cheeks" as per above. I'm wondering if ... after brushing/scraping the old sealer away ... there is still a bit of light rust, but rustier than most I'm seeing here. Not enough to poke a hole through, but I was thinking of using some rust converter.

I'm wondering if this is likely to have any ill effects on seam sealant? I wasn't planning on painting over the rust converter, just applying to the rust ... washing off with water, final scrub with an abrasive like scotchbrite ... washing with degreaser and water and drying well with heat gun before adding sealant.
 
Top