Wet front carpets, footwell leaks

Ugh.

So. You’re telling me that I need to pull the dash before I can tighten up the washer jets?

Not cool Mitsubishi. Not cool.
 
Ugh. So. You’re telling me that I need to pull the dash before I can tighten up the washer jets?
I've accidentally pulled the hoses off the squirters and managed to replace them without removing the dashboard (access past the pedal box, and through the glove box aperture) but it's a nightmare.

The squirters are held in place with springy metal clips (like the door lock cylinders) so there's only so much tightening you can do, I'd advise using a little sealant as well. Perhaps as a temporary fix (more a diagnostic step) you could mask around the squirter, smear some sealant into the joint, un-mask while the sealant is still wet (to make a tidy edge) and see how it goes. If it resolves the leaking then remove the squirters and do the job properly.

It might be the windscreen seal too. Another diagnostic would be to cover the windscreen seal with some wide electrical/vinyl tape (so the tape seals from the paintwork over the rubber and onto the glass) and hose it down. That'll eliminate the windscreen seal as a source of leaks.
 
Just pulled the cheek on the drivers side. I am cautiously optimistic that this will resolve the majority of the issue. However while fiddling around up front in noted that the stalks are loose. I'll see how things develop after the cheek sealing.
 
I re-caulked the leaky “cheek” seams on my 1992 Exceed this week. Removing the first cheek panel was grueling, taking over 3 hours. The second one, driver’s side, came apart in 40 minutes. The only hard part is the disassembly. I learned from the first one, and I think the second one was just easier. In case it helps you, and referencing the fasteners by number (refer to the MDOCUK photo, earlier post), here are the tactics that worked for me.

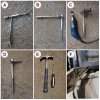
Screw #1 and #2 are easy but hard to access in my case because the bull bar prevented a straight-on approach with a screwdriver. Tool “A” below worked for me. That’s a driver bit with a 1/4” wrench around it for leverage, and a 1/4” socket on the back end so I could press hard without cutting up my hand.

Screw #3 is easy, use a normal screwdriver.

Screws #4, #5 and #6 are easy. But I used a socket on an extension, see “B” below to reach #4 which is buried pretty deep.

Screw #7 was hard for me on both sides. I think because the panel and attachment point are somewhat flexible, so you can’t push very hard when trying to loosen the screw. I tried everything on the first panel, and ultimately stripped the seat for the screwdriver. So I used a Dremel tool to cut a slot in the head, and a screwdriver with a very wide tip. And a wrench for leverage. See image “C.” On the second panel I had the same problem, but after a couple of tries decided to go straight to cutting a slot, and removed it pretty easily after that.

Screws #8 and #9 were pretty easy, but I used setup “D” because there isn’t room to get a straight shot with a regular screwdriver.

Screw #10 is easy with a screwdriver or setup “D.”

Screw #11 on the first panel took me about 1.5 hours to crack. I tried everything. Part of the problem is just accessing it from under the rubber. Ultimately I grabbed it with locking pliers and had my wife twist it up out of the way. See “F.” We worried about tearing the rubber, but that didn’t happen. But that first screw wouldn’t budge, so ultimately I cut the head off (Dremel), drilled the stem and removed it with an easy-out. When I replaced it I used a self-tapping screw with a hex head so it can be removed (if ever again) by putting an open-end wrench straight under the rubber (vs. down from the top with a screwdriver which is harder). The other #11 (driver’s side) was much easier. I put a drop of oil on it and let it sit for 10 minutes. Then I deployed the renowned Vessel impact screwdriver – after about 6 whacks I was able to unscrew it. The Vessel didn’t work for me on any of the other screws, but was a champ on this one.

2764
 
Last edited:
Gutters at rear- on the roof at the back are a couple of plastic panels, when re-sealing the gutters dont forget to remove the panels (2 screws, 1 clip) and seal the seams under there. I think this is where water gets into the jack/tool/rear washer reservoir compartments, though that seems to be the one place I didn't have an issue.

Any photos or more description of where these clips are? I was stumped trying to get these off.
 
When I removed my headlight units before re-caulking my leaky cheeks (see above), a strip of rubber fell off of each headlight. See left side of "B." These had been stuck down to the top front edge of each headlight. I think the white material (ok, it was once white, now dirty grey) was an adhesive strip, but they were both loose and brittle, and fell off. You can see the gap above the headlight unit in "A." I assume the rubber strips are intended to keep water, mud etc. from getting in that gap. There are other gaps, so I'm sure it's not 100% effective. Maybe they were there to stop vibration?

Anyway, today I got some rubbery weather stripping (from Home Depot), see "B," to replace them. I should have done this before reinstalling the headlights, but I was eager to get the van back on the road. I cut the new rubber strips and pushed them in place with a putty knife (right side, "B"). I did this without peeling off the strip that covers the adhesive. Then I pulled out the covering strip, see "C," without disturbing the rubber. Easy.

In "D" you can see the right side headlight unit with the rubber strip in place.

Once I had the material on hand the whole job took less than 10 minutes. I think this m+d weatherseal product is just the right size. For reference, the product number on the bottom right of the packet, is "01033."

2772
 
Last edited:
I've done my cheek seams twice now, but am starting to suspect I have an additional leak. While making a turn in a driving rainstorm, water started dripping from the rear view mirror mount. Where should I start investigating that one? The drip rails along the roof?
 
I've got water coming in the interior rear view mirror and around the driver's side grab handle. Windshield seal leak?
 
I re-caulked the leaky “cheek” seams on my 1992 Exceed this week. Removing the first cheek panel was grueling, taking over 3 hours. The second one, driver’s side, came apart in 40 minutes. The only hard part is the disassembly. I learned from the first one, and I think the second one was just easier. In case it helps you, and referencing the fasteners by number (refer to the MDOCUK photo, earlier post), here are the tactics that worked for me.

Screw #1 and #2 are easy but hard to access in my case because the bull bar prevented a straight-on approach with a screwdriver. Tool “A” below worked for me. That’s a driver bit with a 1/4” wrench around it for leverage, and a 1/4” socket on the back end so I could press hard without cutting up my hand.

Screw #3 is easy, use a normal screwdriver.

Screws #4, #5 and #6 are easy. But I used a socket on an extension, see “B” below to reach #4 which is buried pretty deep.

Screw #7 was hard for me on both sides. I think because the panel and attachment point are somewhat flexible, so you can’t push very hard when trying to loosen the screw. I tried everything on the first panel, and ultimately stripped the seat for the screwdriver. So I used a Dremel tool to cut a slot in the head, and a screwdriver with a very wide tip. And a wrench for leverage. See image “C.” On the second panel I had the same problem, but after a couple of tries decided to go straight to cutting a slot, and removed it pretty easily after that.

Screws #8 and #9 were pretty easy, but I used setup “D” because there isn’t room to get a straight shot with a regular screwdriver.

Screw #10 is easy with a screwdriver or setup “D.”

Screw #11 on the first panel took me about 1.5 hours to crack. I tried everything. Part of the problem is just accessing it from under the rubber. Ultimately I grabbed it with locking pliers and had my wife twist it up out of the way. See “F.” We worried about tearing the rubber, but that didn’t happen. But that first screw wouldn’t budge, so ultimately I cut the head off (Dremel), drilled the stem and removed it with an easy-out. When I replaced it I used a self-tapping screw with a hex head so it can be removed (if ever again) by putting an open-end wrench straight under the rubber (vs. down from the top with a screwdriver which is harder). The other #11 (driver’s side) was much easier. I put a drop of oil on it and let it sit for 10 minutes. Then I deployed the renowned Vessel impact screwdriver – after about 6 whacks I was able to unscrew it. The Vessel didn’t work for me on any of the other screws, but was a champ on this one.

View attachment 2764


Hi there,

Thanks for your advice!
Say, I also have some self tapping screws that are stuck (as Growlerbeanz says, probably havent been good in a previous life).
Tried with wd40, tapping and everything but no movement.
I dont have a dremel tool but i thought of drilling them out, do you think that would be ok as well?

Cheers

Tim
 
I've got water coming in the interior rear view mirror and around the driver's side grab handle. Windshield seal leak?
Look where your roof gutters meet the front windscreen pillars. I had a very small crack there I could only see it when I shone a very bright light there. Had it on both sides. Sealed them with silicon and no more leek.
 
I'm replacing all the burnt out T1 bulbs in my dash switches. Pulled the switch to the lower right of the steering wheel for the rear HVAC fan On/Off and discovered that its bulbs are slightly larger than the T1 size used in the fog lamp, door lock/unlock, and rear defroster. Anyone know the proper size for this larger bulb? Seems like it's close to a T1-1/2 but not quite a perfect match.
 
Top