Wet front carpets, footwell leaks

Morgonzo

Active Member
Hello all my Delica Brothers and Sisters, I wanted to share a couple of pics with you of my seam sealing adventures to stop the wet floor-board syndrome and stop my footwells from rusting.
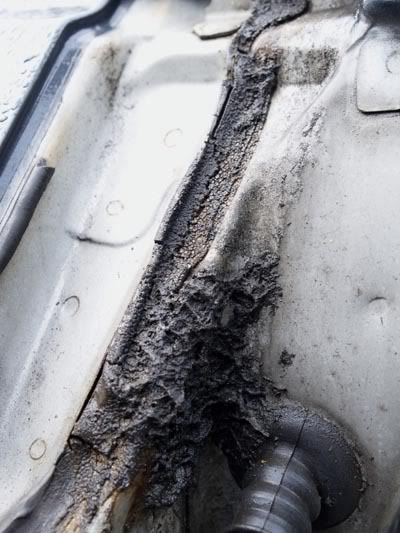
I don't know how long it was leaking for, but in February I finally pulled back the drivers carpet and found this...IMG_2719.JPG no bueno! I knew it was time to do the front seam seal job. The first thing to do is remove the headlight bezels..IMG_2933.JPG
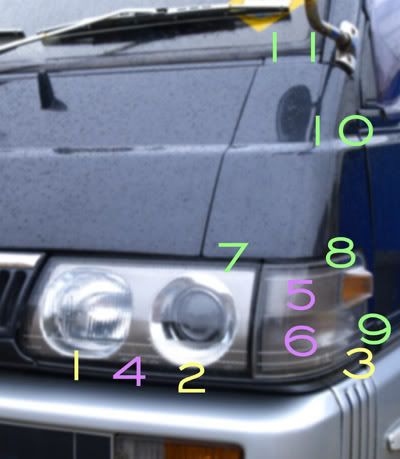
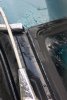
Three Phillips head screws hold these on, one in the door jamb and two in front under the lenses. Gently pull forward and the clips will pop out. Safely set aside. Next to remove is what i've been referring to as the "Cheeks" of the van. This was the hardest part for me. There are 4 screws holding this panel on. 1 in the door jamb (easiest to get out but not easy!) 1 under the windshield rubber IMG_2902.JPG 
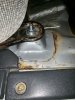
and two above the headlights (PITA!) I adopted a special approach to get these out..a wood chisel wedged beneath a ring-end wrench with the phillips bit taped into it. I used the chisel to apply upwards pressure to get the bit to bite. These screws were NOT coming out without a fight. I went and bought a brand new screwdriver bit set just so I wouldn't strip out the heads of the screws. Lot's of PB Blaster later...IMG_2911.JPG
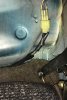
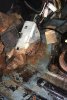
GROSS! the other side was the same. Time for the wire brush....IMG_2914.JPGLooks better, time for a beer and the Metal de-IMG_2921.JPG greaser....now with it clean i'll apply the seam sealer IMG_2926.JPG 
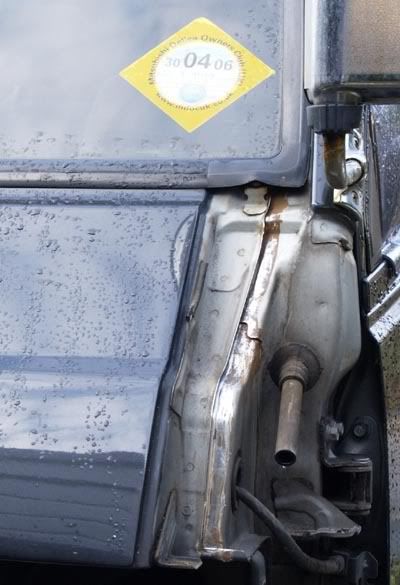
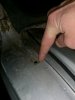
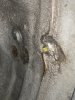
an important thing to look at is the seam to the side that extends straight down just behind the wire in the pic where you can see a touch of grey. I scraped as far down as I could reach and then applied the sealer over the whole area. The product i used was Dynatron grey seam sealer#550 and got from Vatozone for around 12 bucks. Now that you've sealed all the seams, just put it all back together and Voila! No more wet floors! It's been a couple of months since I did this and we've had HEAVY rain lately and I'm happy to report that my carpets and floorboards have remained dry no matter how hard the rain.
It's not hard, and even if your van isn't leaking it's worth doing for piece of mind.
Cheers,
Morgonzo.
 
I finally got around to doing this last weekend (only drivers side was getting swamp foot but happy there wasn't any rust), it finally poured out and so far not a drop of water in my footwells! Very excited to not have wet carpet smell looming in my cabin after a rain.

I do have to say the screws to get that quarter panel off were a pain in the ass. I didn't have a JIS screwdriver set (I do now) so I stripped a couple with a phillips.

I ended up having to dremel a slot in 3 of the screws so I could use a flathead screwdriver (which worked) and I just replaced with new machine screws.
 
As soon as the rains of the summer came. they showed me that my Delica was in need of the same repair....

I did, however, experience a small battle with the screw directly above the headlight housing. I'll tell the tale in pictures:
20180609_115909.jpg20180609_115914.jpg20180609_122014.jpg20180609_122317.jpg20180609_122439.jpg20180609_125602.jpg20180609_131723.jpg20180609_132848.jpg20180609_132903.jpg

So far so good!
 
Having chased pesky leaks forever, I have finally banished the wet dog smell from the Delica. No more damp carpets! Woohoo!

The forums are a wealth of information, but, having experienced every single possible cause* of water ingress into the footwell, I though I should put them all in one post, in order of severity:

Front panel seams- Remove the front quarter panels above the headlamps, strip out the old, crusty sealant in the major seam there, paint, and replace sealant with new flexible body sealant. Fixed 80% of the issue on my Deli. Sealant: use a Urethane flexible sealant of a reputable brand (Sikaflex, 3M, Wurth). Avoid silicone sealant, it contaminates the paint and makes future repairs more difficult.

Here's Mark's awesome instructions, copied from MDOCUK.co.uk

* Step 1 - Removing the indicator pod and attached fascia (seen below the headlights)
* Positions are marked in yellow.
* There are 3 x crosshead screws:

Seal01.jpg


1 and 2 are located in the gap between the bottom of the headlight and the lower fascia panel (TIP 1 - Don’t accidentally adjust the headlight beam angle – the screws are next to each other!)
3 is located on the side below the indicator pod.

The rear of the indicator pod has locating lugs so gently pull towards the front of your Delly rather to the side. There are two cables with locking connectors – remove and note which plug goes to which socket. All the cables are neatly tied to the chassis with a piece of wire – undo for better access.

* Step 2 - Removing the headlight pod
* Screw positions are marked in purple.
* There are 3 x machine screws with washers

With the indicator pod clear, unscrew the 3 machine screws starting with number 4 first. 5 and 6 are located on the side.
TIP 2 - the headlight pod is heavy so keep a tight hold when removing the final screw; otherwise.... crunch!. There is one connector to this pod – disconnect

* Step 3 - Removing the side wing
* Screw positions are marked in green
* There are 5 x crosshead self-tapping screws (that's ... FIVE)

Depending on whether you’ve been good in a previous life will depend on whether the screws come out easily or not. Obviously I must have been a traffic warden as mine were a pig.... Being in an awkward position means getting enough grip or “purchase” (a much underused word) is sometimes difficult so I used a screwdriver bit and a ring spanner (see next photo)

Open the door to access screw number 10.
11 is located just under the windscreen rubber and it’s probably best to tackle that one with a normal screwdriver as you’ll be bending back the rubber and screwing at the same time (ooh err missus) No need to remove it fully – just loosen off a little.

With all the screws off the panel should lift clear although there may be a little sealant sticking it to the body so carefully does it..
With the panel removed you’re in for a shock..


* Step 4 - Clean up and prepare

Seal02.jpg


What a mess, huh? Something like a small chisel is best to scrape off the stubborn sealer. Remove every trace and clean up with a small iron brush and dry thoroughly with kitchen towel – In addition, I used a heat gun to make sure the exposed seam was bone dry.

Seal03.jpg


Looking better after a good clean up. Hey! – does anyone else use their MDOCUK sticker as a tax disk holder??


* Step 5 – Sealant Fun

Seal04.jpg


I used a tube of this stuff from my local motor-factors for about a fiver – recommended. Used less than a third and I was squirting it everywhere so if you’ve a delly-buddy close by, go halfs and share the fun for £2.50 a vehicle – bargain!

TIP 3 – Smear downwards – that’s the way water normally goes
TIP 4 - Protect your skin by cutting a latex glove apart – you’ll have 5 goes for about a penny (and retain your fingerprints too!)

* Step 6 – Finished !

Seal05.jpg


There, that’s better – Simply re-assemble everything in the correct order - Now you can look forward to barefoot cruzin’ without damp feet!

Total time (if your lucky) – 2 hours (max)
Enjoy xx
Mark Windsor-Hampton MDOCUK 2006


Windscreen seal- For a full description of how to remove and replace the windscreen check here. Remove the screen, clean up any surface rust on the windscreen flange (the screen aperture can rust through, which is nasty to fix), and clean the rubber seal (turpentine is good for removing old sealant without damaging the rubber). While you have the screen out, pay attention to the front corners of the gutter (below) the sealant there can crack too. When replacing the seal, use non-hardening mastic-type windscreen sealant, applied between the two rubber lips of the windscreen seal. 3M 08509 is good stuff.
3254

Antenna- The antenna plinth can crack with age or if overtightened, distorting the rubber seal and letting water in. Remove antenna, clean seal and pillar, reinstall with a smear of sealant.

Gutters- The roof of my Deli seems to have had a few low clearance parking building incidents, and the seam where the roof is spot welded to the gutter had opened up. Water leaking through the gutter seam came down the inside of the A-pillar and emerged mysteriously behind the washer reservoir and accelerator pedals- a very frustrating leak to track down. Scraping the old sealant out of the gutters (remove the plastic trim first!), repainting the seam, and sealing with Sikaflex adhesive seam sealer fixed this delightful leak. Pay extra attention to the front corners where the seam meets the windscreen:

GutterCorners.jpg
(Before you get all judgey, this was my spare parts van ;-))


Gutters at rear- on the roof at the back are a couple of plastic panels, when re-sealing the gutters dont forget to remove the panels (2 screws, 1 clip) and seal the seams under there. I think this is where water gets into the jack/tool/rear washer reservoir compartments, though that seems to be the one place I didn't have an issue.

Screen washer jets- They're out on big stalks, and get used as handles when the kids are climbing up the front bullbar. But just the one time. Grrr. The washer stalks felt a bit loose and, lo and behold, water was coming inside. I actually removed the dashboard to get at these, straightened the wee metal clips that hold them in, and sealed them to the front panel with Sikaflex adhesive seam sealer. While I was there:

Wiper spindles- remove the wiper arms (lift plastic cover, undo 12mm nut, rock wiper arm on spindle until the taper comes free), lift off the rubber dust cover, and check the big retaining nut is tight. Or for extra points use a little adhesive seam sealer between the front panel and the spindle before tightening.

Plastic grille clips- the saga continues. The grey plastic trim that runs between the headlamps is held in by 10 (I think?) plastic clips, a bit like the door lining cards. These are sealed with thin foam washers, and the first time this panel is removed all the foam washers disintegrate. Either replace the foam washers or seal each one with a smear of (wait for it...) Sikaflex adhesive seam sealer.

Air intake box seal-
file.php
IntakeDuct.JPG (65.22 KiB) Viewed 2823 times

I suspect this one was my own fault, having removed the dashboard and half the aircon system, I think I had damaged the foam seal where the plastic air intake seals to the back of the passenger headlamp housing. A tiny dribble of water from here happened only when driving in heavy rain, but a hefty squirt of seam sealer and bolting it back on nice and tight has fixed it just lovely.

Aircon drain tube: Konadog on the Delica.ca forum added that the aircon drain tube can easily be kicked loose, which fills the passenger footwell with water VERY quickly! Be sure to check this first before dismantling your Deli... (its the rubber tube that comes from the aircon box and *should* exit to outside through a wee grommet in the floor).
floor leak.jpg
 
Last edited:
How do you pop that plastic grill off? I couldn’t really see a good place pry it and I don’t want to snap it in half.
 
If you remove the headlamps, you can get a spudger/small pry bar between the clips and the body. I think you can even see the first couple of clips. Once you've figured out one clip the rest are easy. Do use a pry bar to lever the clips out, don't try pulling the panel off; if you damage the little brackets the clips attach to it shows in the painted finish.
 
If you remove the headlamps, you can get a spudger/small pry bar between the clips and the body. I think you can even see the first couple of clips. Once you've figured out one clip the rest are easy. Do use a pry bar to lever the clips out, don't try pulling the panel off; if you damage the little brackets the clips attach to it shows in the painted finish.
That did the trick thank you. I looks like that was one of the last 3 leaks. I broke one of the clips so hopefully I can find one at autozone.
 
After getting some hefty rain overnight (Winter in the PNW), my foot mat (drivers side) in the front was all wet. I took it out to dry, used the chance to remove some rust and gunk, and looked for the leak. The usual suspects don't seem to be involved, but maybe I'm wrong.
After some rain, there is a small puddle as seen here:
IMG_5497.jpg
I'm not 100% sure that is where the water comes in, at the base of the flange there. It could be dripping from above but I felt around and it all seems dry. Also, no spatter that would indicate it dripped. Has anyone seen this particular spot leak? It would be fairly easy to fix with a bead of caulk, but I thought I'd ask.
Another option would be to dust with some talcum power to see where the water runs from. Ideas?
 
I'm not 100% sure that is where the water comes in, at the base of the flange there.
I would be surprised if water was coming up from below unless there is a significant hole. That seems to be about where A-pillar leaks show up... gutter seam, antenna...
 
I don't think you'll see a drip spatter, but it will creep along seams and wires and then pool in a low spot. Maybe use the "TP" test?

Take a single clean dry piece of toliet paper and run it along 3-4 inches of the middle underside of the dash. If it comes up wet, then with a new piece move left about 6 inches and run it 3-4 inches. If it's dry, go right and try again. Keep working your way back towards where it's coming in. Hopefully, you'll find that the water comes along the dash, from that wire, bumps into that connector, goes along that bracket, connects to that firewall, that goes to that pin-prick hole!
 
I'd also check the plastic panel between the headlamps (I'd tape up the top gap between the panel and the body and see if the leak goes away) and the windscreen wipers and washers (if they're loose, they'll leak.)

While you're under there, check that you don't also have a brake fluid leak- that rusty brake pedal is suspicious. Take a peek at the brake booster and look for peeling paint.
 
Hello leaky gurus,

The footwell swamp in my van is getting outta hand. I am fairly certain I could stock it with fish and they’d be a-okay. Before I go about tearing things apart, I took a couple photos to see if you all had any insight on a likely intrusion spot.

I’ve (somewhat) amended tired weatherstripping around the door with black silicone to no avail. I’m no @Growlerbearnz nz and do not have the wherewithal to reseal my windscreen, hoping there’s a professional in PDX who can tackle that. Taking off the cheek and resealing that seam is about all I’m comfortable/capable of doing. With these pictures provided, do you all have any ideas of where to start? I’ve only been able to find water trickling down behind the fuse box so far. Though that area around the false pedal is pretty wrecked, I can’t seem to find any water coming in around it.

Thanks!
 

Attachments

  • 8F1E9239-A482-4278-B339-202089839F11.jpeg
    8F1E9239-A482-4278-B339-202089839F11.jpeg
    309.8 KB · Views: 261
  • F986565C-E547-45F6-9F48-383C89E43D68.jpeg
    F986565C-E547-45F6-9F48-383C89E43D68.jpeg
    201.4 KB · Views: 280
  • 26C4E084-969E-43A1-863D-2797E04AB4AF.jpeg
    26C4E084-969E-43A1-863D-2797E04AB4AF.jpeg
    245.3 KB · Views: 284
  • D90103FA-2B51-47F5-89F5-B1CE1AC85246.jpeg
    D90103FA-2B51-47F5-89F5-B1CE1AC85246.jpeg
    112 KB · Views: 282
coming down the wall by the fusebox is indicative of the corner (cheek) leaking IME.
 
I PM’d you as well. I was going to tackle my leaks tomorrow. If you want, we can do it together and compare notes.

- Fabian (aka Krazykraut)
 
Hello leaky gurus,

The footwell swamp in my van is getting outta hand. I am fairly certain I could stock it with fish and they’d be a-okay. Before I go about tearing things apart, I took a couple photos to see if you all had any insight on a likely intrusion spot.

I’ve (somewhat) amended tired weatherstripping around the door with black silicone to no avail. I’m no @Growlerbearnz nz and do not have the wherewithal to reseal my windscreen, hoping there’s a professional in PDX who can tackle that. Taking off the cheek and resealing that seam is about all I’m comfortable/capable of doing. With these pictures provided, do you all have any ideas of where to start? I’ve only been able to find water trickling down behind the fuse box so far. Though that area around the false pedal is pretty wrecked, I can’t seem to find any water coming in around it.

Thanks!
I pulled my carpet on both sides and used a flashlight at night to locate several holes in both front wheel wells by backlighting the cab and looking under the wheel wells for light comin thru. Several being where the plastic trim at the door jam attaches to the body (plastic fasteners were cracked and broke causing seepage from tire spray) and the major offenders were at the drivers side. Where the right side of the seat bolts down, it bolts to a small hump that’s spot welded to the wheel well. Those spot welds had rusted all the way through the sheet metal. The right side of my drivers seat was hanging on by one spot weld. The others were gushing water from the direct tire spray. My floorboard was completely flooded too. I used clear waterproof Goop to seal the holes, then drilled a hole thru the wheel well and used a long bolt/washer/nut to safely reattach that side of the drivers seat using more Goop to seal the washer and bolt. I’ve been dry as a bone since! My carpet has dried out, and Ive been driving on wet roads with no leakage.
 

Attachments

  • 716F1F47-03C9-4EE5-BDDE-E06223FE7E24.jpeg
    716F1F47-03C9-4EE5-BDDE-E06223FE7E24.jpeg
    795.2 KB · Views: 214
  • 754D37C6-04FE-404D-BA20-CCAC0CFAB08F.jpeg
    754D37C6-04FE-404D-BA20-CCAC0CFAB08F.jpeg
    998.8 KB · Views: 209
  • E563CC0B-CE9B-48CD-9507-7AC0F38E8E16.jpeg
    E563CC0B-CE9B-48CD-9507-7AC0F38E8E16.jpeg
    852.4 KB · Views: 214
Last edited:
Having chased pesky leaks forever, I have finally banished the wet dog smell from the Delica. No more damp carpets! Woohoo!

The forums are a wealth of information, but, having experienced every single possible cause* of water ingress into the footwell, I though I should put them all in one post, in order of severity:

Front panel seams- Remove the front quarter panels above the headlamps, strip out the old, crusty sealant in the major seam there, paint, and replace sealant with new flexible body sealant. Fixed 80% of the issue on my Deli. Sealant: use a Urethane flexible sealant of a reputable brand (Sikaflex, 3M, Wurth). Avoid silicone sealant, it contaminates the paint and makes future repairs more difficult.

Here's Mark's awesome instructions, copied from MDOCUK.co.uk

* Step 1 - Removing the indicator pod and attached fascia (seen below the headlights)
* Positions are marked in yellow.
* There are 3 x crosshead screws:


Seal01.jpg


1 and 2 are located in the gap between the bottom of the headlight and the lower fascia panel (TIP 1 - Don’t accidentally adjust the headlight beam angle – the screws are next to each other!)
3 is located on the side below the indicator pod.


The rear of the indicator pod has locating lugs so gently pull towards the front of your Delly rather to the side. There are two cables with locking connectors – remove and note which plug goes to which socket. All the cables are neatly tied to the chassis with a piece of wire – undo for better access.

* Step 2 - Removing the headlight pod
* Screw positions are marked in purple.
* There are 3 x machine screws with washers


With the indicator pod clear, unscrew the 3 machine screws starting with number 4 first. 5 and 6 are located on the side.
TIP 2 - the headlight pod is heavy so keep a tight hold when removing the final screw; otherwise.... crunch!. There is one connector to this pod – disconnect


* Step 3 - Removing the side wing
* Screw positions are marked in green
* There are 5 x crosshead self-tapping screws (that's ... FIVE)


Depending on whether you’ve been good in a previous life will depend on whether the screws come out easily or not. Obviously I must have been a traffic warden as mine were a pig.... Being in an awkward position means getting enough grip or “purchase” (a much underused word) is sometimes difficult so I used a screwdriver bit and a ring spanner (see next photo)

Open the door to access screw number 10.
11 is located just under the windscreen rubber and it’s probably best to tackle that one with a normal screwdriver as you’ll be bending back the rubber and screwing at the same time (ooh err missus) No need to remove it fully – just loosen off a little.


With all the screws off the panel should lift clear although there may be a little sealant sticking it to the body so carefully does it..
With the panel removed you’re in for a shock..


* Step 4 - Clean up and prepare

Seal02.jpg


What a mess, huh? Something like a small chisel is best to scrape off the stubborn sealer. Remove every trace and clean up with a small iron brush and dry thoroughly with kitchen towel – In addition, I used a heat gun to make sure the exposed seam was bone dry.

Seal03.jpg


Looking better after a good clean up. Hey! – does anyone else use their MDOCUK sticker as a tax disk holder??


* Step 5 – Sealant Fun

Seal04.jpg


I used a tube of this stuff from my local motor-factors for about a fiver – recommended. Used less than a third and I was squirting it everywhere so if you’ve a delly-buddy close by, go halfs and share the fun for £2.50 a vehicle – bargain!

TIP 3 – Smear downwards – that’s the way water normally goes
TIP 4 - Protect your skin by cutting a latex glove apart – you’ll have 5 goes for about a penny (and retain your fingerprints too!)


* Step 6 – Finished !

Seal05.jpg


There, that’s better – Simply re-assemble everything in the correct order - Now you can look forward to barefoot cruzin’ without damp feet!

Total time (if your lucky) – 2 hours (max)
Enjoy xx
Mark Windsor-Hampton MDOCUK 2006


Windscreen seal- Remove the screen, clean up any surface rust on the windscreen flange (the screen aperture can rust through, which is nasty to fix), and clean the rubber seal (turpentine is good for removing old sealant without damaging the rubber). While you have the screen out, pay attention to the front corners of the gutter (below) the sealant there can crack too. When replacing the seal, use non-hardening mastic-type windscreen sealant, applied between the two rubber lips of the windscreen seal. The seal is designed to allow water to drain down and out, if you apply too much sealant, or put it in the wrong place, it can block the proper drainage and encourage rust.
View attachment 1431

Antenna- The antenna plinth can crack with age or if overtightened, distorting the rubber seal and letting water in. Remove antenna, clean seal and pillar, reinstall with a smear of sealant.

Gutters- The roof of my Deli seems to have had a few low clearance parking building incidents, and the seam where the roof is spot welded to the gutter had opened up. Water leaking through the gutter seam came down the inside of the A-pillar and emerged mysteriously behind the washer reservoir and accelerator pedals- a very frustrating leak to track down. Scraping the old sealant out of the gutters (remove the plastic trim first!), repainting the seam, and sealing with Sikaflex adhesive seam sealer fixed this delightful leak. Pay extra attention to the front corners where the seam meets the windscreen:

View attachment 1418
(Before you get all judgey, this was my spare parts van ;-))


Gutters at rear- on the roof at the back are a couple of plastic panels, when re-sealing the gutters dont forget to remove the panels (2 screws, 1 clip) and seal the seams under there. I think this is where water gets into the jack/tool/rear washer reservoir compartments, though that seems to be the one place I didn't have an issue.

Screen washer jets- They're out on big stalks, and get used as handles when the kids are climbing up the front bullbar. But just the one time. Grrr. The washer stalks felt a bit loose and, lo and behold, water was coming inside. I actually removed the dashboard to get at these, straightened the wee metal clips that hold them in, and sealed them to the front panel with Sikaflex adhesive seam sealer. While I was there:

Wiper spindles- remove the wiper arms (lift plastic cover, undo 12mm nut, rock wiper arm on spindle until the taper comes free), lift off the rubber dust cover, and check the big retaining nut is tight. Or for extra points use a little adhesive seam sealer between the front panel and the spindle before tightening.

Plastic grille clips- the saga continues. The grey plastic trim that runs between the headlamps is held in by 10 (I think?) plastic clips, a bit like the door lining cards. These are sealed with thin foam washers, and the first time this panel is removed all the foam washers disintegrate. Either replace the foam washers or seal each one with a smear of (wait for it...) Sikaflex adhesive seam sealer.

Air intake box seal-
file.php
IntakeDuct.JPG (65.22 KiB) Viewed 2823 times

I suspect this one was my own fault, having removed the dashboard and half the aircon system, I think I had damaged the foam seal where the plastic air intake seals to the back of the passenger headlamp housing. A tiny dribble of water from here happened only when driving in heavy rain, but a hefty squirt of seam sealer and bolting it back on nice and tight has fixed it just lovely.

Aircon drain tube: Konadog on the Delica.ca forum added that the aircon drain tube can easily be kicked loose, which fills the passenger footwell with water VERY quickly! Be sure to check this first before dismantling your Deli... (its the rubber tube that comes from the aircon box and *should* exit to outside through a wee grommet in the floor).
View attachment 1419
Just getting into my driver's side (RHD) front cheek seam seal and right off the bat i've got a query. I've got the first 3 screws out to release the indicator pod but it's not coming off. Is there a chance that on an '89 assembly there's another hold/attach screw? The two side screws and two tops look to be light housing attachments. Just curious before I start unjiggering everything ;)IMG_20190125_125622.jpg
 
Just getting into my driver's side (RHD) front cheek seam seal and right off the bat i've got a query. I've got the first 3 screws out to release the indicator pod but it's not coming off. Is there a chance that on an '89 assembly there's another hold/attach screw? The two side screws and two tops look to be light housing attachments. Just curious before I start unjiggering everything ;)View attachment 1794
I'd use Amayama to look up my exact model/chassis and then look at the parts blow up for the headlight module... That way you can see that there might be 3 screws underneath and one screw on the side (just making up numbers). But, when I painted my 91 Delica and removed the headlights, there was always one more screw then I expected when taking off the headlights.
 
OK fellow '89rs. check attached pics. We have two tabs on the top of our bezel//trim assembly that attach to two frame mounted clips. You can't see 'em and there's no real access points. I snapped my right one before figuring out what was happening and then with 4 1/2 hands went in from the underside on the left hand clip and got it depressed to release. I'm not overly concerned if I can't locate a replacement plastic clippee thingee because the whole assembly screws in. And just for thoroughness we also only have 1 light connector for the turn signal/side marker.IMG_20190125_144258.jpgIMG_20190125_144149.jpgIMG_20190125_144143.jpg
 
Top