My Turtle Van the JB470

Tanuki

Member
LOGD1781.jpg

Hey everyone, I wanted to start a thread to document my journey with my new (to me) 1997 JB470. This thread will document the build, repairs, and adventures with this van.

Background:
I have been riding adventure bikes for about 10 years now. I have owned a BMW R1200GS, KTM 1290SAR, KTM 1090 AdvR, KTM 790AdvR. I have traveled pretty extensively through the western states, I have done a number of Back Country Discovery Routes, and even did a solo trip from Portland, OR to Managua, Nicaragua. Pros of Motorcycle ADV Riding: Bikes are lighter than cars, they can go more places, they are easier to put on boats when needed, cheaper/ easier to fix, simple
Cons of Motorcycle ADV Riding: You are always dirty, you have a lot of gear to wear, you can take far less supplies, harder to travel with someone, sleeping always means camping, or staying with people/ hotels, having a sit down is pretty rough when you have to wear boots into the stall.

THE BIGGEST ISSUE IN ADV MOTORCYCLE TRAVEL: WORK
It is nearly impossible to do longer trips on a bike without quitting your job. In theory you could set up camp, but tent camping and work are a pretty bad combo especially if you care about the quality of your work. Because of this, I have only been able to do longer trips by quitting my job and living on savings until coming back to work.

WHY A JB470?
When I finally took a job that allowed me to be truly remote, I knew it was time to set up a mobile office/ living space. The criteria for this vehicle were:
  • Compact for tighter roads/ driving in town
  • Off-Road Capable
  • Global Platform with Available Parts
  • Lower cost vehicle with lower perceived value/ stand-out less
  • Bed, Area for a laptop, Toilet, and Shower
My instinct was stay small and go with something like a Ford Transit Connect. After traveling a lot on a motorcycle it seemed like a nice compact way to at least be able to set up a desk and a bed, but in the end:
  • You can't stand up
  • They aren't really off-road vehicles
  • I have had really bad luck with Ford reliability
So next I thought a 144 BlueTec Sprinter with Four Wheel drive would be a better option. They are compact, but you can stand up in them and a lot of people are currently traveling the globe with them.

The cons:
  • Very expensive
  • Great target to be broken into especially in other countries
  • Still pretty small
  • 4x4 reviews are mixed, but most say its not as capable as you might hope
Even with the list of cons above, it is pretty easy to justify spending money on the Sprinter as you are going to be living in it, and even a mid priced sprinter doesn't compare to a mortgage/ cost of rent.

I had started the search for the right Sprinter, when a friend of mine from Africa turned me onto the JB platform. My friend also does a lot of ADV motorcycle riding, but he takes his wife around the world on the back of an F800GSA. They eventually decided to build a General Dynamics Duro 6x6, and while that thing is amazing and can go anywhere, its way too big for me. I can't even imagine the fuel economy. We talked for a while about a number of Japanese Camper Vans that are pretty off-road capable, and finally landed on the JB470 to look into.

Since we all know I ended up with the JB470, let me explain the pros and cons of the decision:

Pros:
  • Compact (3 feet shorter than the 144)
  • Essentially the same interior space as a 144 BUT you have a bed in place over the cab
  • Shower, Bathroom, sink, dinette
  • No wasted space. I love the purpose built interior. Every space has been engineered to optimize the space the way a boat is built.
  • Global platform being based on the L300
  • Diesel with a Webasto heater, so as long as the car has fuel, I will never be cold
  • Good ground clearance with the ability to increase height
  • Pretty universal 6 bolt lug pattern
  • Light weight
  • Decent fuel economy
  • Engine should run forever
  • Super unique vehicle that gets looks everywhere you go
Cons:
  • Parts are harder to find than I originally had anticipated. Some are even out of production.
  • It's used, so it has a number of strange wires the original owner ran
  • Japanese systems, so radio, electric, etc are not the same as US spec, so adaptors will be required
  • Slow. The vehicle is ok around town, but the worst is climbing hills and watching your engine temp rise as you do.
  • It's 25 years old, so plastic is brittle, fiberglass and seals are all getting old
  • Short wheel base is pretty smooth on the road, but it can get pretty bouncy on a trail
  • Super unique vehicle that gets looks everywhere you go
Importing a JB470
Once I decided on the JB470, I found a broker in Japan and started looking for a vehicle. At the time, there were only 2 JB470's for sale in all of Japan that were over 25 years old (if you are unfamiliar with the 25 year rule in the USA, just google it). I didn't have a lot of options, but luckily one of the two was VERY clean with low miles. I paid the broker to do a PPI and negotiate the deal. Once the vehicle was secured, I had the broker take the vehicle to a shop in Japan for some maintenance items (See REPAIRS below).

After the vehicle maintenance was done, it was a matter of WAITING for a vessel. Because the JB is much taller than a normal vehicle, and will not fit in a container, you have to ship them via RORO. You also have to wait on a special type of space for the vehicle to ship on because it cannot fit on the lower decks. In total, I waited 7 months for my vehicle to arrive in the United States. It would have been longer, but rather than waiting for a West Coast Port (Tacoma/ Long Beach) I told them to just ship the vehicle to the next available US port and I would drive home from wherever that was. The port ended up being the Port of Galveston.

Note: If you are planning to import a vehicle, be aware you will need a broker in the country you ship from, as well as a broker in the United States. My brokers were Midori Works in Japan, and Great World in America. There were a few crazy unexpected costs here, but overall both parties were fairly easy to work with.

Here is a shot of the vehicle when it was for sale. You might notice they photoshopped the paint damage on the front right of the vehicle:
FBB1A50B-89FC-4054-BFF8-49C3C9050EDA.JPG

Something else that is sort of fun, was I randomly checked the vessel tracking and my vessel was going through the Panama Canal right when I looked, So I got a shot of the vessel as it went by their live camera in the canal:
Screen Shot 2023-06-27 at 11.42.41 AM.png

Once the vehicle arrived and cleared customs, I decided to fly down and drive the Van to Salt Lake and then on to Portland, Oregon, and back home again.

Condition
The overall condition of the van was probably about what I had expected. The DIY wiring for multimedia etc was a little messier than I hoped for including having stapled wires into the the walls/ cabinets/ ceiling. The toilet looked clean enough, but I through it away before ever opening it. Some of the electronics didn't work either as the house battery was completely dead. Overall I was really happy with the appearance and smell of the vehicle. The drivetrain, as I would find out over the next 3,400 miles, was pretty much flawless as well.

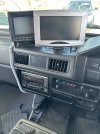
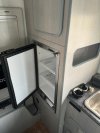
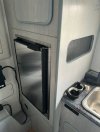
Here are some photos of the vehicle as I received it:
09707D3A-E09D-46A3-83C1-8B8758280501.JPG
IMG_3561.jpeg

IMG_3481.jpeg
IMG_3490.jpeg

JB470 Reference/ Help Items:
Parts: www.amayama.com/en/catalogs/mitsubishi

General Maintenance Part Numbers:
  • Oil Filter: Napa 1067/ WIX 51067
  • Fuel Filter: WIX 33128
  • Air Filter: WIX 42222
  • Oil: Liqui Moly - 2044 or Rotella 15W-40
  • Radiator Cap: Murray 7513

REPAIRS

Jan 13, 2023
Service done at 66,000km prior to shipping Total Cost of services: $1,450 USD
  • Timing Belt
  • New Water Pump
  • Bearings for Belt Tensioner
  • Cam Oil Seal
  • Crank Oil Seal
  • Fan Belt
  • A/C Belt
  • Power Steering Belt
  • Fresh Coolant
  • Fresh Brake Fluid

July 21, 2023
Replaced main battery at 66,000km upon receiving the vehicle at Port of Galveston: $245
  • Optima Red Top
July 25, 2023
Basic Alignment at Les Schwab Herriman, UT: $117.96

August 15, 2023
New Radiator Cap from O'Reilly Murray PN: 7513 $12.50


The Journey Begins
As expected, right off the boat the battery was more than dead. I had to have it jump started at the port and once again at my hotel, so I went straight to Autozone for a fresh battery before my LONG road trip (That map shows 3,022 miles, but I came in closer to 3,400 total).

Screen Shot 2023-08-16 at 1.13.42 PM.png

One thing I realized quickly, was that averaging around 60mph meant I would lose around 15minutes per hour driven (4 hour drive becomes 5 hours). I also lost a lot of time stopping for fuel. The tank is pretty small in these vans, I was lucky to get to 180/190 miles on 12 gallons. So around 16mpg, but I logged miles and fuel the whole trip, so later I can update this with a better number. I was also driving on some fresh 9 year old snow tires.


The first day I drove from Galveston to Tucumcari, NM and had my first experience sleeping at a rest stop.
IMG_3633.jpeg

The next day I made it from Tucumcari to Salt Lake. I took the path through Albuquerque so that. I could get a shot of the van at Walter White's residence. It took me about 32 hours of driving total to get from Galveston to Salt Lake City.
IMG_3656.jpeg

I am out of space for photos, so the journey will be TBC in a response below.
Initial Impressions
  • She is slow. I knew she would be slow, but she is slow.
  • She is clean and overall like a 9/10 condition
  • Heat and power could be an issue, but can be addressed. You wont make it faster, but the cooling system could be improved.
  • People LOVE seeing this thing on the road. Every time I held up traffic, I fully expected to get the finger from the cars passing me, but they all gave me the thumb's up with a big smile.
What I Plan to Change
  • Bull Bar/ Spare Tire Relocation to front (I love how @Nulla did theirs)
  • Lift
  • Wheels/ Tires
  • Front and rear receivers
  • Replace Flooring
  • Clean interior
  • Remove Japanese Electronics
  • Add an AC
  • Add a Fridge
  • Redo the electric system
  • Plumb the shower
  • Fix the sink pump
  • Starlink
  • Repad the dinette seats
  • Some suspension work/ connecting rods/ tie rods
 
Last edited:
Salt Lake to Portland
Because Salt Lake was a midpoint on the journey, and because my home is there, I decided to stop and address a few items the RV needed before continuing on the Portland.
  • The exhaust was broken just behind the rear axle. I believe this is how it came, but I really didn't notice it till I was giving her the first washing in Salt Lake. So I took it to a shop to do a sleeve style weld and pull the exhaust back up high and tight.
  • Get a trip permit from the Utah DMV while I wait for my license plates
  • Remove all of the media center from the previous owner
  • Clean the exterior and interior
IMG_3888.jpeg
Once these were addressed, I was back on the road. The goal was to get to Portland for the Big Northwest Subie event that I had been invited to attend by Subaru as I do some work for them.

The first day I drove from Salt Lake to Boise, without any issues. I was a little nervous because the van got pretty hot driving through Moab Utah a couple days before and I wasnt sure how she would do climbing the hills going in and out of Utah/ Oregon.
IMG_3915.jpeg

From Boise it was onward to Portland where I would stay a few days and attend the Subaru event. It was fun seeing how excited everyone at the Subaru event was to see my little Mitsubishi hiding between the sea of Subarus. I even picked up my friend Bucky at the Portland airport in the van as he was also working the event.
IMG_3953.jpeg
IMG_2865.jpeg
IMG_4001.jpeg
IMG_4043.jpeg

After the big subaru meet, it was time to head back to Salt Lake. This time. I got up early and drove All day getting home around 3AM.
IMG_4152.jpeg


Now that I am home, I can say how happy I am with this little gem. The condition is great, it runs amazingly. It needs a few things, and I need a little more patience. I really appreciate everyone that read this far to hear my story.

As this thread continues, I will be:
  • Modifying the Van
  • Reviewing the Van
  • Traveling and working from the Van
I also want to keep a section on the first thread with common part numbers, prices etc for quick reference.

Thanks for joining in!
 
Well, lots of Tech on order...

Renogy:
1 × Renogy ONE Core
2 × 12V 200Ah Core Series Deep Cycle Lithium Iron Phosphate Battery
1 × Rover Li 20 Amp MPPT Solar Charge Controller
1 × 2000W 12V Pure Sine Wave Inverter
2 × 200 Watt 12 Volt Monocrystalline Solar Panel
1 × RENOGY Door & Window Sensor
1 × RENOGY Smart Plug
1 × RENOGY Motion Sensor
1 × RENOGY Smart Relay

Dometic:
1x RTX 2000

Plan will be to run the solar array and mount the ac at the same time. I want to try to share some of the same cutouts for running wires etc.
 
Last edited:
IMG_5233.jpeg


Alright, so today we are working on the lift. From stock, we were able to lift the front 4 inches to max using the torsion bar, from there we brought it down 2 inches so now there is still 2 inches of down travel. I will likely swap the front shocks too, but need to look into whats available. We pulled the rear leaf springs to have them add one leave and re arch. I dont think we will need a bigger shackle to accommodate the spring either. We should be able to get everything leveled out in the next day or two and back on the road.
 
Screen Shot 2023-09-01 at 1.32.09 PM.png

Solar System started showing up today. They sent the wrong controller, and I haven't seen my batteries yet, but luckily I can start test fitting the panels this weekend.
 
IMG_5515.jpg

Just picked it up from the shop. This is allegedly a 2 inch front and rear lift. Its hard to tell in pictures like this, but it feels taller to climb into. I also replaced a broken leaf in back so either way I am happy.
 
Starting to put together my trail repair kit for the van.

Here's the buildout so far:

Metric Hex Wrenches: 1.5, 2, 2.5, 3, 4, 4.5, 5, 5.5, 6, 7, 8, 9, 10
3/8 swivel wrench
3 extensions
6" Long Nose Locking Pliers
6" Long Nose Pliers
6" Slip Joint Pliers
8-19 Metric Open End Box Wrench
8-19 Sockets
3 Slotted Screwdrivers
3 Phillips Screwdrivers
Tire Pressure Gauge
Zip Ties
Adjustable Crescent Wrench
Box Knife
Flashlight


I will have this quick tool roll alongside another bag with some larger tools like a hammer, pry bar, etc. I will build that kit out next.
IMG_6065.jpeg


Also, currently working on the solar and AC. We ran into a little bit of a space issue so I am having a rack made for the panels.

1695431488205.png
 
Last edited:
Alright, So the electrical system is pretty well in place.

Here's what's new:

-2 Renogy 200 watt solar panels
-Custom rack to mount them behind the AC
-Dometic RTX 2000
-Ampere 400ah Battery (this required some trimming to the rear trunk area, but we got it in without doing anything too detrimental to that little box)
-Victron Isolated DC to DC Charger
-Renogy Rover Li 20 Amp MPPT Solar Charge Controller
-Renogy 2000W 12V Pure Sine Wave Inverter

I still have some automation bits to install, but really happy with how this turned out.


IMG_6129 Large.jpegIMG_6114 Large.jpeg
IMG_6116.jpeg
 
Hi!
I've enjoyed this thread so much.
Good luck with all the next steps / trips.
Thank you! I’ll hopefully have her ready for some real adventures soon. Still waiting on registration so I’m doing all I can to upgrade while I wait for license plates.
 
As many of you know, I’m setting this can up for global travel and remote work. As many of you have said, everything you add or bring should have 2 purposes, well this monitor is a smart tv/ monitor so I figured that counted as dual-purpose

The hardest part of using this monitor vs a tv was the lack of wall mounts available, so I had to customize a mounting solution.

Plus now I can play SNES in here.
image.jpg
 
Great thread. Wish I had caught it sooner cuz I'd have asked about the little black tv when you were in PDX.
 

Attachments

  • IMG_3490.jpeg
    IMG_3490.jpeg
    195.8 KB · Views: 1
Great thread. Wish I had caught it sooner cuz I'd have asked about the little black tv when you were in PDX.
The black one is the cctv rear view backup camera. The contrast is so bad I wouldn’t trust it ever I plan to run a wireless camera back there probably do perimeter cameras eventually.
 
Alright, the simple add a leaf option left me with a squated JB470. SO, I went ahead and ordered the 2 inch lift shackles from delicausa.com as well as bilstein shocks for the rear.

The shocks are Bilstein Shock, B8 5125 Series, Monotube, 15.12 in Compressed / 24.35 in Extended, 46 mm, Steel, Zinc Plated

The shackles are from this kit: https://www.delicausa.com/product/l300-2-lift-kit-with-extended-w-procomp-ext-shocks/

Here is how she sits now:
View attachment 24218View attachment 24217View attachment 24216
Suspension set up looks great. Thanks for the write up, will be helpful as I just picked up my 470 today! What size tires are you running? And also what are you using for crossbars on the roof rack? Cheers
 
Suspension set up looks great. Thanks for the write up, will be helpful as I just picked up my 470 today! What size tires are you running? And also what are you using for crossbars on the roof rack? Cheers
I will need to measure the cross bars they are just aluminum 1x1 rods.

Wheels are 15, tires are just the snow tires it came with, so I’ll try to do wheels and tires soon actually. Want to move to a 28 inch tire
 
Today's update, the fridge is in and the sink is working!

I looked all over for a fridge that would fit in space I had, and ended up with a Nova Kool R1200 which is actually a 12v/110 marine application. The front shroud is a little small, but like a millimeter so theres a tiny gap on one side. Overall I am super happy with how well this fills the space though.

Also, I ordered a new submersible pump for the sink and faucet. I just did some off of Amazon for now as every time i get looking i can never find anything that I like, and this seemed like a good one based on reviews etc. We were unable to get the switch working on the faucet that triggers the pump though, so we left the original switch to turn the pump on. A bit of a work around, but it keeps me from having to cap that hole, so thats the silver lining.

I had a look at the webasto heater now that it is cold out and realized that it only runs when the car is running, seems like a bit of a waste, so I will start looking at ways to rewire it so I can have it run while the vehicle is off (if possible).

Next on my list of "to do's":

-Order a toilet (I am really leaning towards the Separett Tiny)
-Shower ( Still undecided on what to do. This will be a big job to install a water tank, water heater, and all the plumbing)
-Weboost & Starlink
-Flooring
-Trailer Hitch front and rear
-Winch
-Wheels & Tires

It sounds like a lot, but I am feeling pretty good about where she is so far.

This is the pump and the faucet:

Faucet: https://www.amazon.com/dp/B0BWK5FTFR?psc=1&ref=ppx_yo2ov_dt_b_product_details
Pump: https://www.amazon.com/dp/B086N211TF?psc=1&ref=ppx_yo2ov_dt_b_product_details

This is the fridge:
 

Attachments

  • IMG_7677.jpg
    IMG_7677.jpg
    146.9 KB · Views: 10
  • IMG_7676.jpg
    IMG_7676.jpg
    157.1 KB · Views: 9
Top