Repacking the Hubs

Backdoor

Active Member
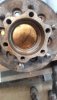
I pulled off the hubs to replace the rotors and calipers. Cleaned everything up. Repacked the hubs and now going to assemble everything.

My question is, how much grease do I need to put inside the hubs?

Just a light coat? Or should I be spooning it in there?

Is there a spec for the amount of grease to put this all back together?

Thsnks!
 

Attachments

  • 20200517_155850.jpg
    20200517_155850.jpg
    107.8 KB · Views: 130
As Grant said; repacked bearings and a coating... overpacking the auto hubs can cause problems.
 
@Growlerbearnz @sk66 @Kellyn See the pic below. The dierections for putting the locknut back on are to tighten it up to 127-196nm, Loosen the nut back to 0nm and then tighten it up to 25nm.

What tool would I need to attach to my Torque wrench to get that locknut (Item #7 in the drawing) tightened up to the proper specifications?

Thanks!

-SeanHub Torque Specs.png
 
You don't have special tool MB990954?! ;-) It seems like a common enough problem that there must be some kind of tool available, but I've never found one. I ended up making one:
IMG_20200524_084548.jpg

However, you can install it all using a drift to hammer the locknut around. The torque settings are just to get you in the ballpark, the critical setting is step >C< where you check the hub turning resistance using a spring scale. Get that within range and your bearings will last forever.

IMG_20200524_084627.jpgScreen Shot 2020-05-24 at 08.44.01.png

The initial 150Nm is just to make sure the bearing races are seated, "as tight as you dare with a drift and hammer" is about right. The following steps (0->25Nm->30deg. loose -> up to 20deg. loose to install locknut) are just approximations. It's step >C< you need to get right.
 
You don't have special tool MB990954?! ;-) It seems like a common enough problem that there must be some kind of tool available, but I've never found one. I ended up making one:
View attachment 6346

However, you can install it all using a drift to hammer the locknut around. The torque settings are just to get you in the ballpark, the critical setting is step >C< where you check the hub turning resistance using a spring scale. Get that within range and your bearings will last forever.

View attachment 6347View attachment 6345

The initial 150Nm is just to make sure the bearing races are seated, "as tight as you dare with a drift and hammer" is about right. The following steps (0->25Nm->30deg. loose -> up to 20deg. loose to install locknut) are just approximations. It's step >C< you need to get right.

Thanks for this, very insightful. I ended up making a tool out of a 4wd locknut socket I found at Napa. A little pricey for what it is but I felt better about using this than a hammer and drift. I was able to get the nut set to the proper torque settings using this. Just had to cut off 2 of the 4 pins.

20200523_162229.jpg
As far as using the spring, I'm having a hard time understanding how that works.
Do I attach it to the lug nuts and pull back and measure the resistance of the wheel turning backwards?

I'm having a hard time figuring out exactly what is happening in the pictures. I'm a little slow on the uptake. Videos are helpful and I usually have to watch them a few times before it sinks in and I catch on.

Thanks.

-Sean
 
Last edited:
Right side finally done. Time to move over to the Left side. This will be a little trickier as the lower ball joint is "welded" to the spindle. So spindle and ball joint will be replaced as well.20200524_125544.jpg20200524_125531.jpg20200524_125523.jpg
 
Hey crew. Going to circle back on this one. Currently diving into this for the first time on my rig as there had been a pretty big klunk and as it turns out lots of play in both front wheels. Pulled one assembly apart without much incident and the bearings are pretty well beat up. I was quite surprised at how the cages mashed in behind the rollers.

Ok so two questions:

Is it recomemded to always swap out the races when replacing the bearings?

Auto-lock hubs. How to deal with these (clean and grease) without full disassembly?

pic of the old bearing (top) vs new bearing (bottom)0DC668B3-E846-44F9-8195-0B55AB283900.jpeg986D4E17-02AA-42EF-9F4D-3FC3B00D4CD9.jpeg
 
Is it recommended to always swap out the races when replacing the bearings?
ALWAYS. The bearings and their races are a matched set that become even more matched as they wear together. Never use new rollers on used races if you want the bearings to last.

Auto-lock hubs. How to deal with these (clean and grease) without full disassembly?
You can't, really. From memory there's a large bronze bush inside that needs good lubrication, and the only way to get grease into it is to disassemble the hub. If you were to wash the complete hub with a solvent you'd never get the grease back into that bush.

If you're not disassembling the hub then the best you can do is scoop/wipe out as much grease as you can to remove any caught particles (taking care not to push contaminated grease deeper into the assembly), then top up with clean grease.
There's a risk in doing that though, if the new grease is incompatible with the old grease they can separate: the oil can fall out of the binder, which is worse than dirty grease. (Same with the bearings and wheel hub: clean out all the old grease before repacking.)

I recommend Redline CV2 grease. Expensive, but it's full synthetic with a binder that's compatible with most other greases.
 
ALWAYS. The bearings and their races are a matched set that become even more matched as they wear together. Never use new rollers on used races if you want the bearings to last.

Fair enough. I was leaning the way of replacing them regardless, seeing as the bearings were pretty beat up. But good to know even under the best of circumstances to replace the race.

I cannot say I am excited about taking the lockers apart. The grease inside the hub at this point has the consistency of used motor oil and it is everywhere, so it's best to get it all opened up and cleaned out. It's anyone's guess as to its age.

My shop also recommended the Redline Synthetic, so that's what I will go with. I'm not too worried about getting spendy on things that I have to do every several years. It's cheap insurance.

It's turning out to be a bigger job than expected. Good thing I'm only doing one at a time. I separated the hub from the rotor this morning to get it turned. That took a minute, So much rust! I just cleaned all the threads up so assembly will go much more smoothly. Then after we button mine up we are digging into my buds. Never ending!! Oh and I think we are going to fab up a socket for the adjuster ring this evening. Extra excitement!
 
Ok. Dismantling the locking hub isn't all *that* tricky, but a few components have to be aligned for it to go together correctly.

I would advise you wash the assembled hub with solvent, then get a feel for how the parts are aligned and how far each piece can turn. If you have a scriber then make a small scratch on each piece so you can reassemble them in alignment.

It's mostly held together with internal snap rings which can be removed with a small screwdriver. Just be aware that there's one large spring inside that *really* wants to pop out. It's not strong enough to damage anything, but it'll cause the hub to disassemble dramatically: if you're not ready for it and haven't marked the parts it might be a bit of a puzzle to reassemble.

Reassembly is easier if you have some kind of clamp to hold it together against spring pressure while you install the last circlip.

May the odds be ever in your favour!
 
Last edited:
so close over here. Last question. Pressing in the oil seal. The manual states getting it flush with the hub. However there is a rubber lip and the hard part. Which should press in flush with the hub. A or B?
EF032503-955E-4A6F-9922-5B86908DA3DD.jpeg

the manual looks like A should be flush but just making sure.

1B333A78-6B4C-407F-863B-3FE433E1541E.jpg


regarding the autolock mech. I will dig into this tomorrow and will be sure to keep an eye on that spring that wants so badly to be free.And of course the clocking of the parts.
Thanks again!!


Admin edit:
Here's a clearer diagram of the seal's orientation


View attachment 13697

The flap goes towards the outside of the hub. When the hub's installed the flap makes a seal inside the brake dust shield, stopping dust from getting at the main oil seal. You want to grease the flap before installing the hub: if it's installed dry it'll wear out almost immediately. .
 
so close over here. Last question. Pressing in the oil seal. The manual states getting it flush with the hub. However there is a rubber lip and the hard part. Which should press in flush with the hub. A or B?
Normally the spring lip goes towards what is being retained (i.e. inwards) and you can see/read the markings on the hard part/face. And that's how the manual reads to me ("apply grease to the oil seal lip"). Flush means all the way flush...

IDKW your picture is different than the one in my copy... but I think this one is a bit clearer.
Screen Shot 2020-08-12 at 8.47.48 AM.png
 
A is flush in the picture. You cannot see B “lip” because tool is resting over it in picture. Grease the seal before installing and be careful not to rip the lip!
 
Ok ok last assembly question i promise.
Do you all seal up between the hub and auto locker with silicone sealant like the manual specifies?

Mine definitely did not have anything on it upon disassembly.

A218682E-964B-4C7C-A899-10673F21E039.jpeg

looks like this would be the stuff.

 
I use Permatex grey high strength silicone. The actual brand and consistency doesn't matter much here, it's simply a moisture seal, it's not under any load. A tiny, tiny bead around the hub here:
IMG_20200814_143610.jpg


PS. I got dug Into the auto locker bc why not!

Look at that sludge pretending to be grease! Barf!

Have a close look at this part:
Screen Shot 2020-08-14 at 14.45.32.png

It's actually two pieces that form a tiny clutch, but the two parts sometimes get jammed together. The hubs will engage more smoothly if you separate the parts, clean them, and grease before reassembly.
 
Last edited:
Top