Repacking the Hubs

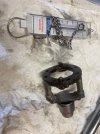
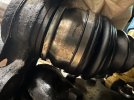
Look at that sludge pretending to be grease! Barf!

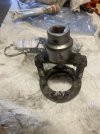
Have a close look at this part:
View attachment 7807

It's actually two pieces that form a tiny clutch, but the two parts sometimes get jammed together. The hubs will engage more smoothly if you separate the parts, clean them, and grease before reassembly.

Now he tells me!!! Fortunately, I haven't buttoned the system up yes so that should be easy enough to do.
Even with all the handling and wiping, they were not going to let on that they should be two separate parts.

I have some ultra copper from permatex. that should work as well. will get that going tomorrow as well.

So much to learn. Fortunately, all the time in the world!
 
This just in from the Facebooks:

117762027_10157196553931400_8563359351931058417_o.jpg

...this is what can happen if you forget to apply that bead of silicone. Water either seeps in or is sucked in when a hot wheel hub is plunged into a cold river. However it happens, your grease turns to butter and your auto hub turns to sparkles.
 
dang it!!

So it took me about five minutes to pull the auto locker off the van,remove the c-clip, seperate those two peices, and clean them
Now, I cannot get them to go back together.

They separated really easily. Seems like I should just be able to press them in together by hand and they should go. However it’s almost like these require a pressfit.

I tried to knock them together with a mallet but no luck. One side will sit in while the other side will be raised.

I don’t want to gouge any of the surfaces. Any suggestions? A vice?

A4244401-AC36-4E9F-966A-41FFD1065C27.jpeg07F007A4-60B5-4485-A999-F20F805607C2.jpeg
 
They're supposed to be separate, being locked together is incorrect (but they all end up like that). They should reinstall as two pieces without any drama.
 
Someone asked and I just figured I would post the pics here for reference.
The HUB Spindle tool part I used (Hacked) was purchased from Napa Auto parts.
Keep in mind this was used to remove the hub locknut on a 1994 Delica L400 Exceed 2 Short Wheel Base.
Not sure if all Delicas use the same sized locknut.
Here are the pics of that tool -

Part Number 3246
20220520_160753.jpg

Had to grind off 2 of the lugs and slightly round the other 2 for a perfect fit.
20220520_161022.jpg
 
Backdoor,

Thank you for your help! Your part was confirmed by Growlerbearnz to work with the L300. Now all your work is archived to help others! Bravo! :cool:
 
I recently had cause to set my bearing preload and took a couple photos to upload. This thread seems like a good place to archive them. As mentioned in the thread, you will need to have (and any wrench-twirling, Delica owner should certainly have): 1) a pin socket for the preload ring and 2) an old-style spring balance that max’es out around 20N. The latter is easily Amazon-had. The formerly noted socket modified to suit, or see my abomination Frankenstein’d up out of scrap. I used a spare preload ring, with the internal threads ground off. The existing holes made pin alignment trivial. Photos tell the rest:
 

Attachments

  • 68B783FF-F01C-4681-BBC0-55D7F54BE2B6.jpeg
    68B783FF-F01C-4681-BBC0-55D7F54BE2B6.jpeg
    162.7 KB · Views: 49
  • A9258B88-8605-4E27-8DEC-F21DAD9BDE17.jpeg
    A9258B88-8605-4E27-8DEC-F21DAD9BDE17.jpeg
    207.9 KB · Views: 49
  • 5B637EF6-F61F-4FBF-A53B-DD69E910A77A.jpeg
    5B637EF6-F61F-4FBF-A53B-DD69E910A77A.jpeg
    227.8 KB · Views: 47
Last edited:
Someone asked and I just figured I would post the pics here for reference.
The HUB Spindle tool part I used (Hacked) was purchased from Napa Auto parts.
Keep in mind this was used to remove the hub locknut on a 1994 Delica L400 Exceed 2 Short Wheel Base.
Not sure if all Delicas use the same sized locknut.
Here are the pics of that tool -

Part Number 3246
Just saw this... it appears the L300/L400 use the same size spindle nut socket; and any 2-5/8" 4 point socket for Ford/GM 4WD can be modified to suit in the same way. A suitable socket costs ~ $20 or less once you know what you are looking for.
 
Thanks for this, very insightful. I ended up making a tool out of a 4wd locknut socket I found at Napa. A little pricey for what it is but I felt better about using this than a hammer and drift. I was able to get the nut set to the proper torque settings using this. Just had to cut off 2 of the 4 pins.

View attachment 6365
As far as using the spring, I'm having a hard time understanding how that works.
Do I attach it to the lug nuts and pull back and measure the resistance of the wheel turning backwards?

I'm having a hard time figuring out exactly what is happening in the pictures. I'm a little slow on the uptake. Videos are helpful and I usually have to watch them a few times before it sinks in and I catch on.

Thanks.

-Sean
Sean, what part # is this? Which tool did you buy to modify?
 
Has anyone had issues upon reassembly getting the CV joint snap ring put back on? I had replaced my CV axle on the left side, assembling the CV axle in the hub with the auto locker on the bench, I have room to put the spacer and snap ring on. When I go to assemble the CV/hub/auto locker assembly back on the van, I cannot get the CV to fully seat into the hub to put on the spacer and snap ring after the auto locker. I have about a 1/16 of an inch gap on the back of the hub dust cover, I’ve ensured the groved brass washer on the CV is facing the correct direction and am at a loss. I’ve disassembled and reassembled this thing a dozen time to no avail. I even tried reinstalling the old CV axle, and have the same issue.
Please….can anybody help?!?! My van is dead in the water….. @Growlerbearnz any ideas?
 
Are you hung up on any rusted surfaces? I don’t have pic in front of me, but is the cv axle having interference at the inboard of steering knuckle dust seal? Pics definitely would help
 
Has anyone had issues upon reassembly getting the CV joint snap ring put back on? I had replaced my CV axle on the left side, assembling the CV axle in the hub with the auto locker on the bench, I have room to put the spacer and snap ring on. When I go to assemble the CV/hub/auto locker assembly back on the van, I cannot get the CV to fully seat into the hub to put on the spacer and snap ring after the auto locker. I have about a 1/16 of an inch gap on the back of the hub dust cover, I’ve ensured the groved brass washer on the CV is facing the correct direction and am at a loss. I’ve disassembled and reassembled this thing a dozen time to no avail. I even tried reinstalling the old CV axle, and have the same issue.
Please….can anybody help?!?! My van is dead in the water….. @Growlerbearnz any ideas?
I am having this exact same issue and on the same side, the passenger/ left side. I was able to do the right side no problem. But just like you said, there's a very small distance that it needs to come out in order for the snap ring to fall back in place. I can just barely see the groove. I've tried putting a scissor jack underneath to try and lift up the whole assembly ever so slightly thinking that maybe just that small deviation will allow it to snap in. Nothing.
 
I am having this exact same issue and on the same side, the passenger/ left side. I was able to do the right side no problem. But just like you said, there's a very small distance that it needs to come out in order for the snap ring to fall back in place. I can just barely see the groove. I've tried putting a scissor jack underneath to try and lift up the whole assembly ever so slightly thinking that maybe just that small deviation will allow it to snap in. Nothing.
 
Has anyone had issues upon reassembly getting the CV joint snap ring put back on? I had replaced my CV axle on the left side, assembling the CV axle in the hub with the auto locker on the bench, I have room to put the spacer and snap ring on. When I go to assemble the CV/hub/auto locker assembly back on the van, I cannot get the CV to fully seat into the hub to put on the spacer and snap ring after the auto locker. I have about a 1/16 of an inch gap on the back of the hub dust cover, I’ve ensured the groved brass washer on the CV is facing the correct direction and am at a loss. I’ve disassembled and reassembled this thing a dozen time to no avail. I even tried reinstalling the old CV axle, and have the same issue.
Please….can anybody help?!?! My van is dead in the water….. @Growlerbearnz any ideas?
But since I swapped out my fixed hubs for manual locking hubs, I'm just able to keep it unlocked and can still use the vehicle. But if I want to use four-wheel drive and lock the hubs, it will work. But if I turn I can hear a clicking sound which is probably free play because the snap ring isn't holding everything tight
 
Are you hung up on any rusted surfaces? I don’t have pic in front of me, but is the cv axle having interference at the inboard of steering knuckle dust seal? Pics definitely would help
I can rotate the CV, no binding on any surfaces. No rust, new components.
 

Attachments

  • IMG_6406.jpeg
    IMG_6406.jpeg
    138.4 KB · Views: 18
  • IMG_6405.jpeg
    IMG_6405.jpeg
    161.6 KB · Views: 17
I am having this exact same issue and on the same side, the passenger/ left side. I was able to do the right side no problem. But just like you said, there's a very small distance that it needs to come out in order for the snap ring to fall back in place. I can just barely see the groove. I've tried putting a scissor jack underneath to try and lift up the whole assembly ever so slightly thinking that maybe just that small deviation will allow it to snap in. Nothing.
Exact same here. @sk66 had some great recommendations on another thread, but none of those suggestions have worked for me. I thought it was that grooved brass washer, but I had it facing correctly.
 
Top