What Did You Do for Your Van Today?

Replaced the head, small timing mistake on my part destroyed the old head. While I was in there I replaced the water pump, thermostat and radiator. Installed a boost gauge and water temp gauge and catch can as well, added lights to the delica reflector on the rear because it looks so cool. She runs like a champ! The new aluminum radiator from delicaworks is no joke, runs super cool now even on long grades.
 
Well, I just installed the new @DelicaWorks Stainless Steel side exhaust.
2913

Had to drill a hole and weld in a new bung for the Wide Band Air Fuel Sensor, so that took some time. Did not have any luck in welding the additional mount, since each time I tried welding it, the weld seemed solid, but then broke off when I tried to use it. Will fix it better when I get some downtime in a few weeks.

But, for those curious, here's the difference in sound (with a little audio changes from iOS microphone sensitivity...)

 
With plenty of help from Fabian (Krazykraut), I finally sealed the leaky seam behind the drivers side cheek. A hose test today confirmed the leak has been fixed..for now! I’ve already had my windshield sealed and have sealed up the gutter and wiper fluid stalks.

Upon cleaning up, we realized one wiper blade was quite loose, allowing water to enter around the base. We’d both thought the nut to tighten it was on the inside, though today I realized it’s not and was quite easy to tighten up. Should I be water free (at least up front..), I can begin to lay down sound/heat shield, working my way to the back of the bus.

Later on, I decided to tear into the dash to get eyes on some nonsense rattling. Once enough bolts had been loosened to move it around, I noticed my air ducting was all sorts of disconnected from the blower motor. I’d always thought the airflow was weak and attributed that to a tired motor. After putting on some new foam and closing it back up, it blows nice and strong. My AC even functions! Que luxury.
 
EGR delete, installed thermo coupler in lower plate and ran wire into cabin for EGT gauge. Installed temp sensor for new water temp gauge. Test fit Evan’s DelicaWorks side dump exhaust, planning on pulling it off to have wide band sensor bung installed. Then wire up AFR/boost combo gauge.
 
Last edited:
New brake drums and custom made shoes thanks to the local race brakes shop (compound rating: mildly insane).

2927

2928

They're not broken in yet and already it stops ridiculously well. The uprated front brakes had been doing all the work, but now you can feel the back end working.
 

Attachments

  • IMG_20190807_100416.jpg
    IMG_20190807_100416.jpg
    493.8 KB · Views: 6
  • IMG_20190807_100511.png
    IMG_20190807_100511.png
    442.9 KB · Views: 5
New set of Kumho Road Venture AT51's 30x9.5
Somewhat amazed at the ride and drive improvement over the OLD Geolandar's that were on there. Also threw on a new set of black M12x1.5 6-spline lug nuts to clean up the dinged & rusted look of the original OEM set.
 
I'm a filthy criminal, I've been driving around with a 2.5mm stone chip in the "critical vision area". Apparently it's a miracle I haven't run over hordes of schoolkids and/or nuns yet. No road registration for me until it's fixed. New windscreen time! ($150, so not really a huge deal.)
3027

3026

3028
 
Repainted the 'racooning'. After cut and polish, really brought it up a notch, IMHO. Also finished repaint on the supports for the Delica mirror situation (not shown for clarity).


IMG_5361.JPGIMG_5362.JPG
 
Last edited:
My driver's side window has been problematic, struggling to go up and I'd often have to help it the last third of the way. It was clear that the window alignment was somehow off. I'd generally have to assist the forward edge of the window, as if the whole window was tilting toward the front. Due to being askew it would struggle or jam altogether. I lubed the window guides with both graphite and silicone spray. no love. Time to have a closer look

As you can see, rear edge of the window is dropping out of the frame due to the forward edge dropping.
View attachment 1850

Door disassembly is well covered in delica.ca and the manual. Once the door panel was off, I lubed interior rails, ran it up and down and looked for adjustment screws. I had read there were adjustable rails, but nothing on my van seemed to have any play.

It seemed more likely that the front of the window would sag as opposed to the rear raising faster. I needed to get the front edge angled more vertical.

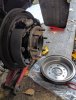
Here you see the front guide rail that aligns the window while it is in the door and guides it into the upper frame.

View attachment 1851

As you can see, when the window is down, there is a fulcrum point of sorts on this rail supporting much of the glass weight. I suspect this causes it to bow.

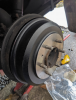
There is space between the guide and the door frame (space to shim) I found by applying pressure here, i.e. pulling it in with one hand while operating the switch with the other, I could make the window rise smoothly.

The gap measured 5/8" After cutting a few pieces of wood slightly larger to see what would straighten the window without constricting it, I decided to add 3/32" inch to the gap. I used some old ipe from a deck I built, so this is very hard wood that should not compact much. I suppose metal would be more precise.
View attachment 1852

Pry the rail out slightly with a screwdriver and insert your shim. Secure with a dab of epoxy for good measure.
View attachment 1853

Close up door. Window rises smoothly and evenly again!
I had the same problem and a dry (teflon) lube got it 95% better. But I still had a small gap in the rearmost upper corner; just about the size your would want it if your objective was a whistling noise at highway speed. In my case, the window was well past your shim point for the critical last 1/2" (make the joke if you must...). If you look further up the door from your spacer block, there is an upper mounting screw for the guide. I took this screw out and stretched the hole (with a burr) so that I could adjust the guide rearward. This solved the problem and the window closes tightly now. Next I'm going to re-form the weatherstrip in the upper rear corner since the bad window action has mushed it down. I am planning to glue the strip to the window edges and wedge a piece of wood that is window thickness (or a little better) in there 'til the glue sets.

IMG_5437.JPG
 
And the other thing I did for my van today was join the illuminated club (illuminati?!?). LED's arrived from US Amazon and I put 'em right in. Couldn't have been easier. Now I have 4 extra sets so if you are in NZ or Australia and want a pair, just let me know. Happy to share, n/c.

IMG_5438 2.JPG
 
Before and after. Sticker from shop.zengraphics.co.uk via eBay. The Mitsu emblem came off some rando car but the size was close and it does the business.

llb.JPGlrb.JPGlla.JPGlra.JPG

Added USB to the location-with-no-purpsose

usb.JPG

Before and after, driver's seat restoration

seatb.JPGseata.JPG
 
Last edited:
Forgive the crap photo, but I'm scrambling to get this thing ready for a trip in a few days, and too busy Doing to be much bothered Documenting. For a taste of what I'm dealing with, here's the Lower Rust Stucture (roughly equivalent to a "frame" on a normal vehicle), port side, just fore of the rear leaf spring front mount. Mounting a front fuel tank to a manual-trans Delica, I found that only the front bracket holes had captive nuts. Chasing those threads was actually more work than fishing M10x1.25 bolts - with slots cut into the ends for counterholding during assembly - through the frame for the rear bracket. Those are two stick magnets.

Anyone attempting this job - at first, to increase fuel capacity, but when the rear tank died during restoration, to have any fuel tank at all - should be prepared to bend AC lines and relocate the brake proportioning valve. My brakes are getting refabricated from scratch so the latter was hardly any extra work. More on that later.

Picture 3691.jpg
 
With access to a vinyl cutter, and too much time on my hands, I made a replacement for the long lost StarWagon decal. Maybe not exactly the correct size and subtly different from the original, but it looks pretty stock.
I haven't seen a single Delica in all Grace Silver Metallic so I had to guess it should be black.
View attachment 1141
If anyone else is interested, I can either share the Silhouette file or cut some more decals.
That looks great! One question: how did you remove the old residual decal? What tools? What solvents/soaps?
 
Top